×
- Hello
- Login or Register
- Quick Links
- Live Chat
- Track Order
- Parts Availability
- RMA
- Help Center
- Contact Us
- Shop for
- Nissan Parts
- Nissan Accessories
My Garage
My Account
Cart
Genuine Nissan Murano Piston
Engine Pistons- Select Vehicle by Model
- Select Vehicle by VIN
Select Vehicle by Model
orMake
Model
Year
Select Vehicle by VIN
For the most accurate results, select vehicle by your VIN (Vehicle Identification Number).
18 Pistons found


Nissan Murano Piston W/Pin
Part Number: A2010-8J110$88.44 MSRP: $130.82You Save: $42.38 (33%)Ships in 1-2 Business Days
Nissan Murano Piston With Pin
Part Number: 12010-3KY9A$123.61 MSRP: $174.58You Save: $50.97 (30%)Ships in 1-2 Business Days

Nissan Murano Piston,W/Pin
Part Number: A2010-JP09C$146.24 MSRP: $206.55You Save: $60.31 (30%)Ships in 1-3 Business DaysNissan Murano Piston W/Pin
Part Number: 12010-3KY2A$67.23 MSRP: $174.58You Save: $107.35 (62%)Ships in 1-2 Business DaysNissan Murano Piston W/Pin
Part Number: A2010-8J172$63.25 MSRP: $89.33You Save: $26.08 (30%)Ships in 1-2 Business DaysNissan Murano Piston With Pin
Part Number: 12010-3KY1A$123.61 MSRP: $174.58You Save: $50.97 (30%)Ships in 1-3 Business Days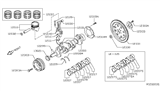
Nissan Murano Piston W/Pin
Part Number: 12010-9HP2A$126.22 MSRP: $178.28You Save: $52.06 (30%)Ships in 1-3 Business DaysNissan Murano Piston W/Pin
Part Number: 12010-9HP1A$126.22 MSRP: $178.28You Save: $52.06 (30%)Ships in 1-3 Business DaysNissan Murano Piston W/Pin
Part Number: 12010-9HP0A$129.66 MSRP: $183.13You Save: $53.47 (30%)Ships in 1-3 Business Days
Nissan Murano Piston W/Pin
Part Number: A2010-JP09D$146.24 MSRP: $206.55You Save: $60.31 (30%)Ships in 1-3 Business DaysNissan Murano Piston W/Pin
Part Number: A2010-JP02D$146.24 MSRP: $206.55You Save: $60.31 (30%)Ships in 1-3 Business DaysNissan Murano Piston W/Pin
Part Number: A2010-JP00D$150.26 MSRP: $212.23You Save: $61.97 (30%)Ships in 1-3 Business DaysNissan Murano Piston,W/Pin
Part Number: A2010-JP01C$150.26 MSRP: $212.23You Save: $61.97 (30%)Ships in 1-3 Business DaysNissan Murano Piston,W/Pin
Part Number: A2010-JP02C$146.24 MSRP: $206.55You Save: $60.31 (30%)Ships in 1-3 Business DaysNissan Murano Piston W/Pin
Part Number: A2010-JP01D$150.26 MSRP: $212.23You Save: $61.97 (30%)Ships in 1-3 Business DaysNissan Murano Piston,W/Pin
Part Number: A2010-JP00C$150.26 MSRP: $212.23You Save: $61.97 (30%)Ships in 1-3 Business Days
Nissan Murano Piston
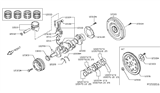
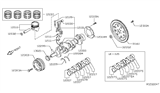
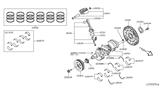
The Nissan Murano Piston is a part of the mechanism that turns the car's wheel with the help of pressure and is placed in the cylinder. This part bears the gases that are produced by the ignited fuel. The Piston rings, which are also a part of the Piston, will seal the gap between this component and the wall of the cylinder. Therefore, the sealing helps to retain pressure, and the oil is controlled here. A connecting rod connects the Piston to the crankshaft and transforms the Piston's reciprocating motion into rotation. This rotation will drive the transmission gears and axle shafts. The factory units applied in the Nissan Murano are made of cast or forged lightweight aluminum alloy, which is selected for strength under high temperature and reduced mass. The top ring of a Nissan Murano Piston may have a coating on its surface in order to reduce heat and wear, such as plasma molybdenum or chromium. Cast iron is frequently applied on the second ring. To forestall blow-by and ensure continuous sealing performance of the Nissan Murano combustion chambers, the Nissan Murano powertrain is able to deliver reliable power thanks to an appropriate ring gap and bore finish.
If you need any OEM Nissan Murano Piston, feel free to choose them out of our huge selection of genuine Nissan Murano Piston. All our parts are offered at unbeatable prices and are supported by the manufacturer's warranty. In addition, we offer quick shipping to have your parts delivered to your door step in a matter of days.
Nissan Murano Piston Parts Questions & Experts Answers
- Q: What steps must be taken before removing the piston and connecting rod assemblies from the engine on Nissan Murano?A:Before the piston and connecting rod assemblies are to be removed there are two major parts that are to be removed and they are cylinder head and oil pan. Insert your fingernail and look for any ridge at the upper limit of ring travel, which is approximately 1/4 inch down from the top of each cylinder; if there are ridges, they must be shlaped is carbon has deposited and worn into the cylinders with a ridge reamer due to the fact that it could cause piston breakage. After flattening the ridges turn the engine over so that the Crankshaft is in the vertical position. Feel the end float of connecting rods with the help of feeler gauges; if the play exceeds the maximum rate, then new connecting rods may be required. Marking of the connecting rods and the caps should be done in such a way that one cannot be confused with the other. Tighten the connecting rod cap bolts progressively and uniformly, remove the cap and without letting the bearing insert drop, push the connecting rod / piston out from the top of the engine. Perform this again to the other cylinders and then replace the caps and inserts to cover not to harm them. Regarding the piston rings, measure the ring end gaps and make sure that the side clearance of the piston ring is appropriate. Locate or align the piston/connecting rod assemblies with the new ring sets, install the top ring into the first cylinder, and use the scribe-and-feeler gauges to set the end gap. If the gap is too large or too small adjust it as needed making sure not to be too forceful. Place the oil control ring followed by the middle and then the top ring with the correct orientation. It is recommended to wash the cylinder walls, sharpen the edges of the cylinder and have the crankshaft installed before installing the assemblies. Scrub the journal and bearing faces, place the new upper bearing insert, and make sure there is a snap fit without any grease. Place the gaps of the piston ring in the correct manner, apply oil to the piston as well as the rings and use a piston ring compressor for this process. After scraping the connecting rod bearing with Clean Cloth, use Plastigage to measure the oil clearance of bearing across the surfaces to mach mark. When attempting to determine the clearance, it should be noted that if the clearance is low then there could be incorrect bearing size problem or there could be some problem with the journal. Last but not the least, remove all the Plastigage deposits, coat the bearing faces with grease and put the rod cap with new nuts and bolted it with the recommended torque. The process is then continued on the other assemblies, with special attention paid to cleanliness and orientation of the components. After installation, using the special tool rotate the crankshaft to check the binding, and use a feeler blade to check the connecting rod end play once more and adjusting it if needed.


