×
- Hello
- Login or Register
- Quick Links
- Live Chat
- Track Order
- Parts Availability
- RMA
- Help Center
- Contact Us
- Shop for
- Nissan Parts
- Nissan Accessories
My Garage
My Account
Cart
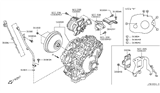
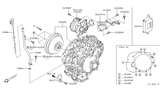
Genuine Nissan Murano Transmission Assembly
Trans Assembly- Select Vehicle by Model
- Select Vehicle by VIN
Select Vehicle by Model
orMake
Model
Year
Select Vehicle by VIN
For the most accurate results, select vehicle by your VIN (Vehicle Identification Number).
22 Transmission Assemblies found


Nissan Murano Automatic Transmission Assembly
Part Number: 31020-1XE1C$3200.11 MSRP: $3874.23You Save: $674.12 (18%)Ships in 1-3 Business Days

Nissan Murano Automatic Transmission Assembly
Part Number: 31020-1XE1B$3200.11 MSRP: $3874.23Limited AvailabilityYou Save: $674.12 (18%)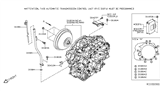
Nissan Murano Automatic Transmission Assembly
Part Number: 31020-3WX2A$3520.68 MSRP: $4241.99You Save: $721.31 (17%)Ships in 1-3 Business Days
Nissan Murano Automatic Transaxle
Part Number: 31020-3YX0C$6855.35 MSRP: $8299.46You Save: $1444.11 (18%)Ships in 1-3 Business DaysNissan Murano Automatic Transaxle
Part Number: 31020-3YX0D$6320.62 MSRP: $7631.74You Save: $1311.12 (18%)Ships in 1-3 Business Days
Nissan Murano Automatic Transmission Assembly
Part Number: 310C0-1XD0D$2183.00 MSRP: $2642.86You Save: $459.86 (18%)Ships in 1-3 Business DaysNissan Murano Automatic Transmission Assembly
Part Number: 31020-3WX1E$3503.88 MSRP: $4241.99You Save: $738.11 (18%)Ships in 1-3 Business Days
Nissan Murano Automatic Transmission Assembly
Part Number: 310C0-1XE0B$3200.11 MSRP: $3874.23Limited AvailabilityYou Save: $674.12 (18%)Nissan Murano Automatic Transmission Assembly
Part Number: 310C0-1XE0A$3200.11 MSRP: $3874.23You Save: $674.12 (18%)Ships in 1-3 Business Days

Nissan Murano Transaxle Assembly Automatic
Part Number: 31020-3WX6E$3520.68 MSRP: $4241.99You Save: $721.31 (17%)
| Page 1 of 2 |Next >
1-20 of 22 Results
Nissan Murano Transmission Assembly
One of the benefits of the Nissan Murano Transmission Assembly is that it can deliver engine torque smoothly to the wheels. The crossover has steady acceleration at any speed. Over the years, the Nissan Transmission Assembly has transitioned from clutch-heavy manuals to fully hydraulic automatics which use planetary gearsets and fluid couplings for effortless shifts. The automatics remove the unpleasant hard pedal effort and the precise timing for double clutching. In subsequent times, a continuously variable design was added in another Transmission Assembly style to replace fixed gears with belts and pulleys so that the engine speed could rise or drop independently of the road speed to balance power with economy. The manual versions retain parallel shafts and driver-selected gears, while automatic and CVT Transmission Assembly options use computer-directed clutches to select ratios in moments. Although the control method in automatic CVT is different and manuals require the driver's total input while the automatics depend on hydraulic pressure and CVTs offer near-infinite steps, every Transmission Assembly does the same thing. They enable the adjustment of torque so that whether the Murano crossover needs to climb a hill or pass on a highway, it can do so easily. Scheduled fluid checks assist the Murano in avoiding indicators like slipping or grinding that suggest the Nissan unit needs attention.
If you need any OEM Nissan Murano Transmission Assembly, feel free to choose them out of our huge selection of genuine Nissan Murano Transmission Assembly. All our parts are offered at unbeatable prices and are supported by the manufacturer's warranty. In addition, we offer quick shipping to have your parts delivered to your door step in a matter of days.
Nissan Murano Transmission Assembly Parts Questions & Experts Answers
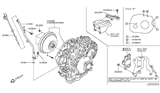
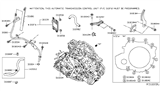
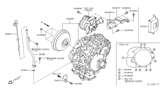
- Q: How to remove and install the Transmission Assembly from a Nissan Murano?A:To dismantle the engine and trans axle from the vehicle; paint match marks between the torque converter and drive plate since they will be released and reassembled, then unlock the torque converter bolts by turning the crank shaft to expose each bolt. Separate the splice wiring connections of the trans axle and then remove the wiring harness connected to the trans axle, dipstick tube and then the trans axle mounts attached to the sub frame. Loosen and disconnect the engine-to-trans axle bolts for proper orientation of reassembly and then extract the trans axle from the engine; slide it back, including the removal of trans axle cooler hose and the torque converter, and sealing the front to avert contamination. Regarding installation, it's advisable to flush the trans axle cooler and hoses with solvent, and in some cases, you might perform the second flush with clean automatic transmission fluid. To do this, make sure that the torque converter hub is locked into the pump securely while the front grid of the torque converter should be at least half an inch behind the trans axle housing. Swing the trans axle to the back of the engine using the marks made previously and put lugs on the torque converter to the drive plate, then move the trans axle forward to have dowel pins and torque converter interfaced. Fit trans axle mounting bolts in the correct position and without applying excessive force on the components and then tighten trans axle to engine bolts to the recommended torque. Bolt on the torque converter and tighten the bolts, and then top-up the trans axle with fluid because the torque convertor could be empty and it might take more fluid than when changing the fluid normally. Ignite the engine, engage the parking brake and run through all the gears of the trans axle thrice to test Shift Cable mobility. With the trans axle in Park or Neutral, allow the engine to warm up to its normal temperature and then shut the engine off and check the fluid level other than making a road test to check for leaks.

Related Nissan Murano Parts
 Nissan Murano Valve Body
 Nissan Murano Torque Converter
 Nissan Murano Transmission Pan
 Nissan Murano Transmission Oil Cooler
Browse by Year
2024 Transmission Assembly 2023 Transmission Assembly 2022 Transmission Assembly 2021 Transmission Assembly 2020 Transmission Assembly 2019 Transmission Assembly 2018 Transmission Assembly 2017 Transmission Assembly 2016 Transmission Assembly 2015 Transmission Assembly 2014 Transmission Assembly 2013 Transmission Assembly 2012 Transmission Assembly 2011 Transmission Assembly 2010 Transmission Assembly 2009 Transmission Assembly 2008 Transmission Assembly 2007 Transmission Assembly 2006 Transmission Assembly 2005 Transmission Assembly 2004 Transmission Assembly 2003 Transmission Assembly