×
- Hello
- Login or Register
- Quick Links
- Live Chat
- Track Order
- Parts Availability
- RMA
- Help Center
- Contact Us
- Shop for
- Nissan Parts
- Nissan Accessories
My Garage
My Account
Cart
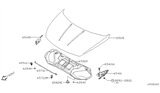
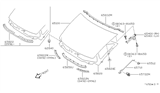
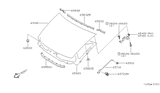
Genuine Nissan Quest Hood
Engine Hood- Select Vehicle by Model
- Select Vehicle by VIN
Select Vehicle by Model
orMake
Model
Year
Select Vehicle by VIN
For the most accurate results, select vehicle by your VIN (Vehicle Identification Number).
7 Hoods found


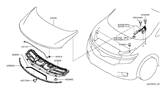
Nissan Quest Hood Assembly
Part Number: F510M-1JAMA$492.39 MSRP: $758.69You Save: $266.30 (36%)Ships in 1-3 Business Days
Nissan Quest Hood Assembly
Part Number: 65100-5Z030$443.80 MSRP: $666.85You Save: $223.05 (34%)Ships in 1-2 Business Days

Nissan Quest Hood
The Nissan Quest Hood protects the engine bay while allowing owners a quick lift-up for routine checks. As a hinged shield, it seals the compartment against rain, dirt, and flying debris, but swings open in seconds so spark plugs, belts, and fluids are easily accessible. Throughout the production run, Quest minivans have featured the panel in a variety of materials. Early on, it was stamped from strong steel. Later on, to save weight, it switched to aluminum. Then, on later edition models, it switched to impact-tolerant fiberglass. As you can see, Nissan makes its choice for the material on the Hood to balance protection with saving weight to improve fuel economy. Every Hood, regardless of its material, is designed to include crumple zones that collapse upon impact, directing crash energy away from passengers. The internal latch and secondary safety catch are what actually stop the Hood from lifting while driving. It would be a straightforward setup and is reliable mile after mile. Due to thoughtful design changes, owners of Nissan cars now enjoy quieter cabins, improved aerodynamics, and easier maintenance. The company is still improving Nissan performance and the recent Quest Hood is a vital performance piece. Nevertheless, it is often overlooked.
If you need any OEM Nissan Quest Hood, feel free to choose them out of our huge selection of genuine Nissan Quest Hood. All our parts are offered at unbeatable prices and are supported by the manufacturer's warranty. In addition, we offer quick shipping to have your parts delivered to your door step in a matter of days.
Nissan Quest Hood Parts Questions & Experts Answers
- Q: How should the hood be removed and installed properly on Nissan Quest?A:The hood is heavy and somewhat awkward to remove and install, so at least two people should perform this procedure. Begin by using blankets or pads to cover the cowl area of the body and Fenders to protect the paint. Make marks or scribe a line around the hood hinge for proper alignment during installation. Disconnect any cables or wires that may interfere with removal. Have an assistant support one side of the hood while taking turns to remove the hinge-to-hood retaining bolts, then lift off the hood. For installation, reverse the removal steps. To adjust the hood, move the hinge plate slot after loosening the bolts or nuts for fore-and-aft and side-to-side adjustments. Scribe a line around the hinge plate to determine movement, then loosen the bolts or nuts and adjust the hood into the correct alignment, tightening the hinge bolts afterward to check the position. If necessary, adjust the entire Hood Latch assembly up and down as well as side to side on the radiator support to ensure the hood closes securely and flush with the fenders. Mark around the hood latch mounting bolts for reference, loosen them, reposition the latch assembly, and retighten the bolts before checking the fit. Finally, adjust the hood bumpers on the radiator support to ensure the hood is flush with the fenders when closed, and periodically lubricate the hood latch assembly and hinges with white, lithium-base grease to prevent binding and wear.


