×
- Hello
- Login or Register
- Quick Links
- Live Chat
- Track Order
- Parts Availability
- RMA
- Help Center
- Contact Us
- Shop for
- Nissan Parts
- Nissan Accessories
My Garage
My Account
Cart
Genuine Nissan Quest Hood Cable
Hood Release Cable- Select Vehicle by Model
- Select Vehicle by VIN
Select Vehicle by Model
orMake
Model
Year
Select Vehicle by VIN
For the most accurate results, select vehicle by your VIN (Vehicle Identification Number).
7 Hood Cables found


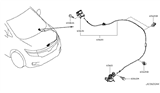
Nissan Quest Cable Hood Lock
Part Number: 65621-ZM70A$34.98 MSRP: $52.60You Save: $17.62 (34%)Ships in 1-3 Business Days
Nissan Quest Cable Hood Lock
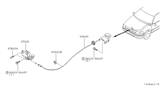
Part Number: 65621-1JA0A$106.12 MSRP: $163.51You Save: $57.39 (36%)Ships in 1-3 Business DaysNissan Quest Cable Assembly-Hood Lock
Part Number: 65621-5Z000$34.98 MSRP: $52.60You Save: $17.62 (34%)Ships in 1-3 Business Days
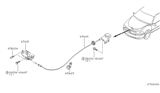
Nissan Quest Cable Assembly-Hood Lock
Part Number: 65620-6B000$118.00 MSRP: $181.82Limited AvailabilityYou Save: $63.82 (36%)Nissan Quest Cable Assembly-Hood Lock
Part Number: 65620-0B000$118.00 MSRP: $181.82Limited AvailabilityYou Save: $63.82 (36%)Nissan Quest Cable Hood Lock
Part Number: 65621-5Z00A$34.98 MSRP: $52.60You Save: $17.62 (34%)Ships in 1-3 Business Days
Nissan Quest Hood Cable
The Hood Cable for Nissan Quest allows the driver to quickly pop the hood for safe and easy access to the engine bay for checks or fixes. This thin steel wire connects the release handle inside the cabin with the twin latch points at the front. Thus, a single pull yanks the latch open and the lid lifts with minimal effort. The minivan has applied two fundamental layouts across all generations of Nissan Quest. The earlier model employed a single continuous Hood Cable that wound its way from the lever to a junction block before splitting to left and right latches. Subsequent models use a primary Hood Cable from the lever to a junction and shorter secondary cables to each latch, reducing strain on any one section. While both styles are designed for the same purpose, the multi-section design is less expensive to replace since only the worn section is replaced. Over time, a Hood Cable may age, stretch, or even crack, allowing water to penetrate within the strands, rust them, and result in the latch getting stuck or not moving at all. Owners should therefore replace a frayed Hood Cable on their Nissan Quest without much delay to ensure their hoods open smoothly.
If you need any OEM Nissan Quest Hood Cable, feel free to choose them out of our huge selection of genuine Nissan Quest Hood Cable. All our parts are offered at unbeatable prices and are supported by the manufacturer's warranty. In addition, we offer quick shipping to have your parts delivered to your door step in a matter of days.
Nissan Quest Hood Cable Parts Questions & Experts Answers
- Q: How to replace the Hood Cable and Hood Latch on a Nissan Quest?A:Start by opening the Hood and pulling off the hood Grille to access the latch, then draw a alignment guide around the latch so you know how to fit it back later. Pull out the latch joining bolts by the radiator support, then take the latch out. Take off the hood release cable by letting go of its hook on the latch unit and undoing the mounting screws holding it in place. Reinstall like you took it apart, and tune the latch so the hood settles comfortably with a small overlap between bumpers. To fix the cable, unplug it from the latch assembly first and take off the panel underneath the driver seat. Unscrew and remove the two bolts that mount the hood release lever and cable assembly. Pull the cable out into the compartment, seperating them from each other. Take a stiff wire, connect it to the cable end of the latch, and remove the retaining clips. Take out the grommet, then pull the cable through the firewall opening. Replace the old cable with the new one, put the grommet on the new cable, push the cable back through the firewall, and join it to the latch assembly. Finish the job by pressing on the edge of the grommet until it sinks completely into the firewall opening.

Related Nissan Quest Parts
 Nissan Quest Emblem
 Nissan Quest Hood Latch
 Nissan Quest Grille
 Nissan Quest Hood
 Nissan Quest Hood Hinge
Browse by Year
2017 Hood Cable 2016 Hood Cable 2015 Hood Cable 2014 Hood Cable 2013 Hood Cable 2012 Hood Cable 2011 Hood Cable 2010 Hood Cable 2009 Hood Cable 2008 Hood Cable 2007 Hood Cable 2006 Hood Cable 2005 Hood Cable 2004 Hood Cable 2003 Hood Cable 2002 Hood Cable 2001 Hood Cable 2000 Hood Cable 1999 Hood Cable 1998 Hood Cable 1997 Hood Cable 1996 Hood Cable 1995 Hood Cable 1994 Hood Cable 1993 Hood Cable