×
- Hello
- Login or Register
- Quick Links
- Live Chat
- Track Order
- Parts Availability
- RMA
- Help Center
- Contact Us
- Shop for
- Nissan Parts
- Nissan Accessories
My Garage
My Account
Cart
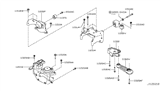
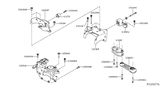
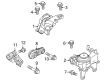
Genuine Nissan Rogue Engine Mount
Engine Motor Mount- Select Vehicle by Model
- Select Vehicle by VIN
Select Vehicle by Model
orMake
Model
Year
Select Vehicle by VIN
For the most accurate results, select vehicle by your VIN (Vehicle Identification Number).
42 Engine Mounts found


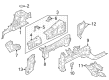
Nissan Rogue Rod Assy-Torque
Part Number: 11360-4BA0B$139.09 MSRP: $196.45You Save: $57.36 (30%)Ships in 1-3 Business Days


Nissan Rogue Rod Assy-Torque
Part Number: 11360-JD00A$127.18 MSRP: $179.63You Save: $52.45 (30%)Ships in 1-2 Business Days

Nissan Rogue Engine Mounting Insulator, Right
Part Number: 11210-ET80A$201.49 MSRP: $298.35You Save: $96.86 (33%)Ships in 1-3 Business Days


Nissan Rogue Engine Mounting Insulator , Left
Part Number: 11220-5HA0A$237.49 MSRP: $351.65You Save: $114.16 (33%)Ships in 1-3 Business Days


Nissan Rogue Engine Mounting Insulator, Right
Part Number: 11210-5HA0A$194.92 MSRP: $288.62You Save: $93.70 (33%)Ships in 1-3 Business Days

Nissan Rogue Engine Mounting Insulator, Left
Part Number: 11220-4BA0A$266.96 MSRP: $395.28You Save: $128.32 (33%)Ships in 1-3 Business Days


Nissan Rogue Engine Mounting Insulator, Left
Part Number: 11220-ET81B$241.76 MSRP: $357.97You Save: $116.21 (33%)Ships in 1-2 Business Days


Nissan Rogue Rod Assy-Torque
Part Number: 11350-5HA0A$113.06 MSRP: $159.68You Save: $46.62 (30%)Ships in 1-3 Business Days
Nissan Rogue Insulator-Engine Mounting,Rh
Part Number: 11210-6RC0B$229.07 MSRP: $339.18You Save: $110.11 (33%)Ships in 1-3 Business DaysNissan Rogue Engine Mounting Insulator ,Left
Part Number: 11220-4BA0B$266.96 MSRP: $395.28You Save: $128.32 (33%)Ships in 1-3 Business Days
Nissan Rogue Engine Mounting Insulator ,Right
Part Number: 11210-4BA0A$176.70 MSRP: $261.63You Save: $84.93 (33%)
Nissan Rogue Rod Assy-Torque
Part Number: 11350-4BA0A$114.73 MSRP: $162.05You Save: $47.32 (30%)Ships in 1-3 Business Days
Nissan Rogue Rod Assy-Torque
Part Number: 11360-6LA0A$144.31 MSRP: $203.83You Save: $59.52 (30%)Ships in 1-3 Business Days
Nissan Rogue Insulator-Engine Mounting,Rh
Part Number: 11210-6RA0A$207.62 MSRP: $307.42You Save: $99.80 (33%)Ships in 1-3 Business Days
Nissan Rogue ROD ASSY-TORQUE
Part Number: 11360-6RC0B$206.63 MSRP: $291.85You Save: $85.22 (30%)Ships in 1-3 Business Days
Nissan Rogue Insulator-Engine Mounting,LH
Part Number: 11220-6RA0A$216.99 MSRP: $321.30You Save: $104.31 (33%)Ships in 1-3 Business Days
Nissan Rogue Rod Assy-Torque
Part Number: 11360-6RC5B$208.86 MSRP: $295.00You Save: $86.14 (30%)Ships in 1-3 Business Days
Nissan Rogue Bracket-VTC Control Unit
Part Number: 237F4-6RA0A$200.81 MSRP: $283.64You Save: $82.83 (30%)Ships in 1-3 Business Days
Nissan Rogue Engine Mounting Bracket
Part Number: 11231-4BA0B$122.33 MSRP: $172.78You Save: $50.45 (30%)Ships in 1-3 Business DaysNissan Rogue Engine Mounting Insulator, Left
Part Number: 11220-4BA1A$234.59 MSRP: $347.35You Save: $112.76 (33%)Ships in 1-3 Business Days
| Page 1 of 3 |Next >
1-20 of 42 Results
Nissan Rogue Engine Mount
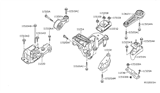
Engine Mount in Nissan Rogue vehicles execute two main tasks which combine engine noise and vibration reduction with engine-transaxle positioning and support inside the chassis. Such isolation is necessary because it ensures comfort during drives and operational safety of the vehicle. A conventional Engine Mount employs rubber insulators to separate metal components and certain vehicles and implement hydraulic mounts known as hydromounts that effectively absorb engine vibrations. Engine Mount using electronic systems can adjust their stiffness according to the engine speed for optimized movement reduction. Since Nissan Rogue production began they have applied three different categories of Engine Mount such as rubber-based and hydraulic-based and active-unit versions. The specific characteristics of Engine Mount include rubber mount wear susceptibility and hydraulic mount leak vulnerability. Scheduled inspections help examine the Nissan Rogue Engine Mount to maintain its integrity because broken mounts cause both unhealthy noises and increased vibrations that harm the vehicle's performance.
If you need any OEM Nissan Rogue Engine Mount, feel free to choose them out of our huge selection of genuine Nissan Rogue Engine Mount. All our parts are offered at unbeatable prices and are supported by the manufacturer's warranty. In addition, we offer quick shipping to have your parts delivered to your door step in a matter of days.
Nissan Rogue Engine Mount Parts Questions & Experts Answers
- Q: What should be done if engine mounts are broken or deteriorated on Nissan Rogue?A:Engine mounts seldom require attention, but broken or deteriorated mounts should be replaced immediately to prevent damage or wear on driveline components. During the check, the engine must be raised slightly to remove the weight from the mounts. Begin by raising the vehicle and securely supporting it on jackstands, then remove the splash shields. Position a jack under the engine Oil Pan with a large wood block between the jack head and the oil pan, carefully raising the engine just enough to relieve the weight on the mounts, avoiding placement of the wood block under the oil pan drain plug. Inspect the mounts for any cracks, hardened rubber, or separation from the metal plates, noting that the rubber may split down the center. Check for relative movement between the mount plates and the engine or frame using a large screwdriver or prybar; if movement is detected, lower the engine and tighten the mount fasteners. Applying rubber preservative can help slow deterioration. For replacement, disconnect the cable from the negative terminal of the battery, raise the vehicle, and support it securely on jackstands while supporting the engine. To remove the upper torque rod, take out the through-bolts and bracket bolts. For the front engine mount, place a floor jack with a block of wood under the oil pan, then remove the torque rod bracket, engine mount to body bolts, and engine mount-to-engine bolts before taking out the mount. To remove the lower torque rod, again remove the through-bolts and bracket bolts. For the left-hand mount, remove the battery and battery tray along with the air filter housing, then support the transaxle with a floor jack. Remove the mount top bolts and side bolts through the wheel well, then take out the mount. Installation follows the reverse order of removal, ensuring to use thread-locking compound on the mount bolts and nuts, tightening them securely.

Related Nissan Rogue Parts


Browse by Year
2025 Engine Mount 2024 Engine Mount 2023 Engine Mount 2022 Engine Mount 2021 Engine Mount 2020 Engine Mount 2019 Engine Mount 2018 Engine Mount 2017 Engine Mount 2016 Engine Mount 2015 Engine Mount 2014 Engine Mount 2013 Engine Mount 2012 Engine Mount 2011 Engine Mount 2010 Engine Mount 2009 Engine Mount 2008 Engine Mount