×
- Hello
- Login or Register
- Quick Links
- Live Chat
- Track Order
- Parts Availability
- RMA
- Help Center
- Contact Us
- Shop for
- Nissan Parts
- Nissan Accessories
My Garage
My Account
Cart
Genuine Nissan Rogue Hood
Engine Hood- Select Vehicle by Model
- Select Vehicle by VIN
Select Vehicle by Model
orMake
Model
Year
Select Vehicle by VIN
For the most accurate results, select vehicle by your VIN (Vehicle Identification Number).
5 Hoods found


Nissan Rogue Hood Assembly
Part Number: 65100-4BA0A$456.42 MSRP: $703.27You Save: $246.85 (36%)Ships in 1-3 Business Days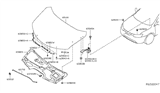
Nissan Rogue Hood Assembly
Part Number: 65100-4BA0B$456.42 MSRP: $703.27You Save: $246.85 (36%)Ships in 1-3 Business Days
Nissan Rogue Hood
Part Number: FEA0M-JM0MA$410.39 MSRP: $632.35You Save: $221.96 (36%)Ships in 1-3 Business DaysNissan Rogue Hood
Part Number: F510M-JM0MA$410.39 MSRP: $632.35You Save: $221.96 (36%)Ships in 1-3 Business Days
Nissan Rogue Hood
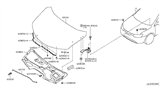
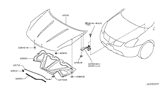
The Nissan Rogue Hood is located at the front of the SUV and seals the engine bay from rain and debris and the wind. At the same time, it gives quick lift-up access to the engine bay for routine checks. Not only does the Hood safeguard components, but it also smooths airflow over the nose of your vehicle, trimming drag and providing a sleek styling surface. Year after year, rugged strength has been offered by a standard steel or aluminum skin along with engineered crumple zones that absorb crash energy. Meanwhile, a fiberglass version is available that is lighter and utilizes a gelcoat finish for weight savers. Gelcoat fiberglass Hood variants are significantly lighter than the stock sheet-metal piece. With primer-coated steel, owners can match their factory paint. This ensures that Nissan models retain their consistent look year after year. Each Rogue Hood is attached with reliable hinges, regardless of material, and has a safety latch to prevent sudden opening while still able to pop open easily at the cockpit release for service. Upon ordering a new Hood, verify that it is for the exact trim of your Nissan Rogue so the latches will align properly. The cost of these parts is usually under a reasonable amount.
If you need any OEM Nissan Rogue Hood, feel free to choose them out of our huge selection of genuine Nissan Rogue Hood. All our parts are offered at unbeatable prices and are supported by the manufacturer's warranty. In addition, we offer quick shipping to have your parts delivered to your door step in a matter of days.
Nissan Rogue Hood Parts Questions & Experts Answers
- Q: How should the hood be removed and installed properly on Nissan Rogue?A:The hood is rather massive and does not come off or install easily-it might be cumbersome to do this alone, so a minimum of two people will be needed. It can be started by using the blanket or the pad to cover the region of the cowl together with the Fenders so that the paint will not get damaged. Scribe or make marks around the hood hinge so as to help in alignment when shall be putting it back in place, and of any cables or wires that could hinder the removal process. stand thus with an assistant on the other side of the hood, and then unscrew the hinge to hood nuts while the shoulder holds the hood. Lift off the hood, and for installation reverse the above said steps such as, removing the bolts of engine hood. For the adjustment purposes the fore and aft position and, side to side position can be concurrently moved by shifting the hinge plate slot after loosening the bolts or nuts. Draw a line around the hinge plate to mark the movement, and then release the bolts/ nuts and align the hood properly, finally,screw the hinge bolts. If needed the complete Hood Latch assembly can be shifted up & down and side to side on the radiator support to get a good closure of the hood, and a good fit against the side fenders. Place a mark around the hood latch mounting bolts for even reference, then free the bolts, adjust the position of the hatch assembly if necessary, and torque the bolts again before carrying out a proper fit test. At last, the setting of the hoods Bumpers located at the ends of the radiator support should be adjusted in a way to bring the hoods effectively in line with the fenders once closed, as well as the lubing of the hood latch assembly and the hinges with white lithium-base grease to reduce binding and wear should be done occasionally.


