×
- Hello
- Login or Register
- Quick Links
- Live Chat
- Track Order
- Parts Availability
- RMA
- Help Center
- Contact Us
- Shop for
- Nissan Parts
- Nissan Accessories
My Garage
My Account
Cart
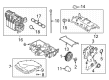
Genuine Nissan Rogue Intake Manifold
Engine Intake Manifold- Select Vehicle by Model
- Select Vehicle by VIN
Select Vehicle by Model
orMake
Model
Year
Select Vehicle by VIN
For the most accurate results, select vehicle by your VIN (Vehicle Identification Number).
14 Intake Manifolds found


Nissan Rogue Intake Manifold Assembly
Part Number: 14001-JG35A$620.33 MSRP: $876.17You Save: $255.84 (30%)Ships in 1-3 Business Days
Nissan Rogue Intake Manifold
Part Number: 14001-4BV1B$895.05 MSRP: $1264.20You Save: $369.15 (30%)Ships in 1-3 Business Days
Nissan Rogue Intake Manifold Assembly
Part Number: 14001-6RR0A$947.40 MSRP: $1338.13You Save: $390.73 (30%)Ships in 1-3 Business Days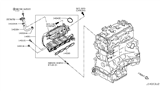
Nissan Rogue Intake Manifold
Part Number: 14001-7FH0A$505.58 MSRP: $714.10You Save: $208.52 (30%)Ships in 1-3 Business DaysNissan Rogue Intake Manifold Assembly
Part Number: 14001-6RC0A$1044.57 MSRP: $1475.38You Save: $430.81 (30%)Ships in 1-3 Business DaysNissan Rogue Intake Manifold Assembly
Part Number: 14001-JG30A$620.33 MSRP: $876.17You Save: $255.84 (30%)Ships in 1-3 Business DaysNissan Rogue Intake Manifold
Part Number: 14001-4BV0A$895.05 MSRP: $1264.20You Save: $369.15 (30%)Ships in 1-3 Business DaysNissan Rogue Intake Manifold Assembly
Part Number: 14001-4BV0E$895.05 MSRP: $1264.20You Save: $369.15 (30%)Ships in 1-3 Business DaysNissan Rogue Intake Manifold
Part Number: 14001-4BV0D$895.05 MSRP: $1264.20You Save: $369.15 (30%)Ships in 1-3 Business Days


Nissan Rogue Intake Manifold Assembly
Part Number: 14001-4BA0B$404.20 MSRP: $570.90You Save: $166.70 (30%)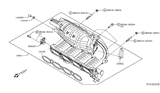


Nissan Rogue Intake Manifold Assembly
Part Number: 14001-4BT0A$636.94 MSRP: $899.63You Save: $262.69 (30%)
Nissan Rogue Intake Manifold
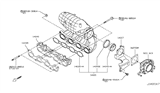
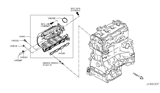
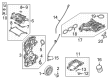
The Nissan Rogue Intake Manifold easily directs air or an air-fuel mixture to each cylinder for smooth combustion. Downstream from the throttle body, the Intake Manifold has individual runners routing flow towards each cylinder head port. Their smooth shape minimizes deceleration, allowing even distribution in the manifold to meet. In multiport injection engines, the fuel enters at the runner ends. In the gasoline direct injection variants, only clean air goes into the passages. Many assemblies are designed in two halves, an upper and a lower, which bolt together and seal to the cylinder head with gaskets to prevent air from leaking in and causing a lean mixture. Modern manifolds for the Nissan Rogue are typically made from lightweight composite plastic, which helps reduce weight and keep the air entering the system cooler than metal. Sensors for the air charge or coolant temperature may mount inside the Intake Manifold. Thus, the Nissan management system can adjust the operation for efficiency and power as the Rogue moves and the Intake Manifold continues to provide the required charge. Every Nissan model of the Rogue uses this Intake Manifold for its well-balanced airflow.
If you need any OEM Nissan Rogue Intake Manifold, feel free to choose them out of our huge selection of genuine Nissan Rogue Intake Manifold. All our parts are offered at unbeatable prices and are supported by the manufacturer's warranty. In addition, we offer quick shipping to have your parts delivered to your door step in a matter of days.
Nissan Rogue Intake Manifold Parts Questions & Experts Answers
- Q: How to remove and reinstall the intake manifold on Nissan Rogue?A:Some components of a fuel injection system must be erased, but before doing so, drain the fuel system pressure. Then, the engine cover fasteners should be unscrewed and the cover should be unbolted in case it is present. For 2013 and model year before or for 2014 and model year and for Rogue Select models, the cowl panel will need to be unplugged. Remove two bolts and the air inlet duct is set away from the throttle body and air filter housing for 2014 and future model Rogue except Rogue Select. Remove the following components for the 2013 and earlier models Or 2014 and later Rogue select models Pull out the air filter housing and resonator assembly. Remove the wire connector from the black terminal of the battery. Label and remove the PCV hose, brake booster hose, TCA, EVAP hose and PCM. Take off the throttle body along with its gasket and place the two on the side but do not detach any hose connected to the coolant. As you will be removing the throttle body, go ahead and take out the intake manifold support bracket fasteners and the bracket if fitted. Bulb the fuel line from the fuel rail and ensure you that you may end up removing the fuel injectors and fuel rail to access for the mounting bolts. On the 2014 and later model year vehicles excluding Rogue Select, remove the front exhaust pipe and the electrical connectors from the intake manifold runner control valve position sensor and runner control valve. Unbolt the intake manifold's nuts and bolts in reverse while tightening sequence, take the intake manifold off the Cylinder Head. To do on 2013 or earlier models and 2014 or later Rogue Select models, take off the manifold, then take out the intake manifold adapter. For installation, all previous gasket material and sealant should be scraped off with the help of a scraper from the manifold and cylinder head, then use the brake system cleaner to wipe the mating surfaces. If the model is prior to 2013 or 2014 and later Rogue Select models, place a new gasket on top of the adapter and align the intake manifold on the cylinder head studs. Place a new gasket on the studs and then put the intake manifold on the studs and tighten the nuts/bolts on it. Having sequentially tightened the nuts/bolts to the required torque, the last process is to re-tighten the first bolt, then check the torque again. The remain portion of the installation is done in a sequence that is opposite to the removal process. Last but not the least and that is why the battery needs to be reconnected and some of the re-learn procedures need to be done.

Related Nissan Rogue Parts

Browse by Year
2025 Intake Manifold 2024 Intake Manifold 2023 Intake Manifold 2022 Intake Manifold 2021 Intake Manifold 2020 Intake Manifold 2019 Intake Manifold 2018 Intake Manifold 2017 Intake Manifold 2016 Intake Manifold 2015 Intake Manifold 2014 Intake Manifold 2013 Intake Manifold 2012 Intake Manifold 2011 Intake Manifold 2010 Intake Manifold 2009 Intake Manifold 2008 Intake Manifold