×
- Hello
- Login or Register
- Quick Links
- Live Chat
- Track Order
- Parts Availability
- RMA
- Help Center
- Contact Us
- Shop for
- Nissan Parts
- Nissan Accessories
My Garage
My Account
Cart
Genuine Nissan Sentra Brake Booster
Brake Power Booster- Select Vehicle by Model
- Select Vehicle by VIN
Select Vehicle by Model
orMake
Model
Year
Select Vehicle by VIN
For the most accurate results, select vehicle by your VIN (Vehicle Identification Number).
36 Brake Boosters found

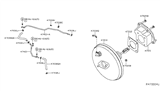
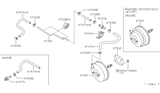
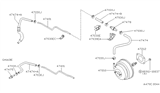
Nissan Sentra Brake Booster Assembly
Part Number: 47210-3SG0A$451.42 MSRP: $688.98You Save: $237.56 (35%)Ships in 1-3 Business Days
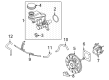
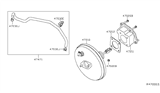
Nissan Sentra Brake Booster Assembly
Part Number: 47210-6LA0C$424.03 MSRP: $647.18You Save: $223.15 (35%)Ships in 1-3 Business Days
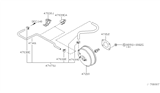
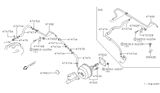
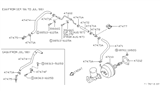
Nissan Sentra Master Vacuum Assembly
Part Number: 47210-4Z400$111.16 MSRP: $153.10You Save: $41.94 (28%)Ships in 1-2 Business Days


| Page 1 of 2 |Next >
1-20 of 36 Results
Nissan Sentra Brake Booster
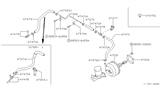
The Nissan Sentra Brake Booster amplifies the pressure that you apply to the brake pedal before it reaches the master cylinder of the brake system. In other words, the booster eases the physical effort needed to stop the car. Situated between the brake pedal and master cylinder, this Brake Booster fits within a two-piece shell inside the Nissan engine bay and operates by engine vacuum causing a pressure difference across an internal diaphragm and piston, easing everyday Sentra stops. Upon pressing the pedal, the driver's action engages a rod that activates a valve. This valve allows atmospheric air to enter the rear chamber of the power piston. Moreover, the front chamber of the power piston remains under vacuum. Therefore, due to this difference in pressure, the power piston moves forward. Furthermore, this increase in hydraulic pressure gets transferred to the master cylinder. When the pedal is not pressed, vacuum pressure equalizes on both sides of the brake, allowing it to disengage from the wheels. Once the engine stops, the Brake Booster only offers limited assistance as the vacuum is not available. Every Nissan compact in the Sentra lineup utilizes the same vacuum-operated Brake Booster design that reduces pedal effort. The Nissan brake system is equipped with a reliable Brake Booster, the sealing surfaces of which warrant regular inspection throughout the service life of the vehicle. Each Sentra can be counted on for a smooth and predictable stopping response.
If you need any OEM Nissan Sentra Brake Booster, feel free to choose them out of our huge selection of genuine Nissan Sentra Brake Booster. All our parts are offered at unbeatable prices and are supported by the manufacturer's warranty. In addition, we offer quick shipping to have your parts delivered to your door step in a matter of days.
Nissan Sentra Brake Booster Parts Questions & Experts Answers
- Q: How to operat, check, replace, and adjust a power brake booster on Nissan Sentra?A:Press the Brake Pedal down several times when the engine is off and ensure that there is no alteration of the pedal reserve distance. Push the pedal down and start the engine. If it falls slightly, it's ok. Airtightness check: Start your car then turn it off after one or two minutes. Depress gently on the brake pedal for several times. Every next time the pedal presses down less and less means that air-tight nature of booster has been maintained. While the engine is running, step on the brakes and bring it to a halt with them still pressed hard down; if there is no change in pedal travel space even after maintaining pressure on it for thirty seconds, then you will know that your booster remains air-tight. Replacement: Note: Power brake booster units should not be dismantled. Most automotive repair shops do not have these sorts of tools as they are quite specialized. They are quite intricate and should be replaced because they affect brake performance dramatically, particularly with a new or reconditioned one fitted because of their essential role in braking ability. Remove battery from vehicle. Take out air filter housing for clearance purposes. Unbolt master cylinder from brake booster vacuum hose connected to booster, remove this vacuum hose slowly so as not to damage other parts such as pipes which supply air to engine through intake manifold where burnt gases could have been vented into if vacuum line had any leakage whatsoever, pin which keeps clevis attached onto accelerator will now be pulled out+remove safety clip then release clevis from accelerator by removing pin connecting both of them together along with its fastener nuts holding it against fire wall; finally lift whole unit away freeing up additional space within engine compartment without having unplug anything else besides necessary connections while keeping care over wires routing around inside wheel arch before pulling directly towards front end via top hole located near strut mounting point excepting those left hanging freely behind during removal process; otherwise, you need pull them further back before doing anything else besides simply plugging them back into respective sockets after installation; should check that outer body shell lined up properly on frame rails otherwise if not in correct alignment needs realigning by means off special fixture used during manufacture process consisting mainly brackets which are set against side walls until we get right position in relation towards front end underneath vehicle. Battery removal: (a) Remove the battery's negative (-) terminal from the vehicle. (b) Remove the battery insulator from the battery tray. Remove four nuts securing booster to firewall and then remove booster out of engine compartment. Before fitting new booster measure its input rod length and adjust it as necessary. Then install with a new gasket between booster and firewall. Adjustment measurement: Measure from power brake booster to hole in input rod clevis and compare your measurement to dimension; if necessary, adjust clevis before installing power brake booster and comparing it with dimension. If necessary, loosen adjusting nut and turn clevis in or out required length, next mount booster, attach clevis onto accelerator's pedal again ensuring all threads are tightened up appropriately to prevent loss while braking system remains operational throughout car's life cycle thus saving costs associated servicing such as replacing pads every six months like most drivers do these days wherein an average person can burn through three sets within two years just because they drive too aggressively plus using cheap materials available market at moment.

Related Nissan Sentra Parts
 Nissan Sentra Brake Proportioning Valve
 Nissan Sentra Master Cylinder Repair Kit
 Nissan Sentra Brake Fluid Pump
 Nissan Sentra Brake Master Cylinder
 Nissan Sentra Brake Fluid Level Sensor
Browse by Year
2025 Brake Booster 2024 Brake Booster 2023 Brake Booster 2022 Brake Booster 2021 Brake Booster 2020 Brake Booster 2019 Brake Booster 2018 Brake Booster 2017 Brake Booster 2016 Brake Booster 2015 Brake Booster 2014 Brake Booster 2013 Brake Booster 2012 Brake Booster 2011 Brake Booster 2010 Brake Booster 2009 Brake Booster 2008 Brake Booster 2007 Brake Booster 2006 Brake Booster 2005 Brake Booster 2004 Brake Booster 2003 Brake Booster 2002 Brake Booster 2001 Brake Booster 2000 Brake Booster 1999 Brake Booster 1998 Brake Booster 1997 Brake Booster 1996 Brake Booster 1995 Brake Booster 1994 Brake Booster 1993 Brake Booster 1992 Brake Booster 1991 Brake Booster 1990 Brake Booster 1989 Brake Booster 1988 Brake Booster 1987 Brake Booster 1986 Brake Booster 1985 Brake Booster 1984 Brake Booster 1983 Brake Booster 1982 Brake Booster