×
- Hello
- Login or Register
- Quick Links
- Live Chat
- Track Order
- Parts Availability
- RMA
- Help Center
- Contact Us
- Shop for
- Nissan Parts
- Nissan Accessories
My Garage
My Account
Cart
Genuine Nissan Sentra Brake Master Cylinder
- Select Vehicle by Model
- Select Vehicle by VIN
Select Vehicle by Model
orMake
Model
Year
Select Vehicle by VIN
For the most accurate results, select vehicle by your VIN (Vehicle Identification Number).
44 Brake Master Cylinders found


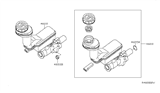
Nissan Sentra Cylinder Brake Master
Part Number: 46010-3SG1B$327.51 MSRP: $499.87You Save: $172.36 (35%)Ships in 1-3 Business Days
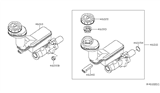
Nissan Sentra Brake Master Cylinder Assembly
Part Number: 46010-ET010$227.20 MSRP: $336.42You Save: $109.22 (33%)Ships in 1-3 Business DaysNissan Sentra Brake Master Cylinder Assembly
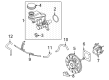
Part Number: 46010-3SG0B$227.10 MSRP: $336.27You Save: $109.17 (33%)Ships in 1-3 Business DaysNissan Sentra Brake Master Cylinder Assembly
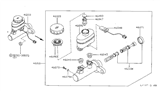
Part Number: 46010-3SG1A$327.51 MSRP: $499.87You Save: $172.36 (35%)Ships in 1-3 Business DaysNissan Sentra Brake Master Cylinder Assembly
Part Number: 46010-3SG0A$227.10 MSRP: $336.27You Save: $109.17 (33%)Ships in 1-3 Business Days
Nissan Sentra Brake Master Cylinder Assembly
Part Number: 46010-6LA2D$140.75 MSRP: $208.40You Save: $67.65 (33%)


| Page 1 of 3 |Next >
1-20 of 44 Results
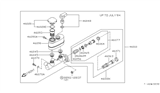
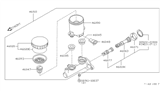
Nissan Sentra Brake Master Cylinder
The Nissan Sentra Brake Master Cylinder transforms the force applied to the brake pedal into hydraulic pressure, which then sends fluid to the wheel circuits, enabling the vehicle to slow down or stop. The Brake Master Cylinder is either cast iron or aluminum. It has two pistons, seals, and springs that slide through a bore. A pushrod moves the pistons forward when the driver presses the pedal. Then a return spring retracts the pistons when it is released. The Brake Master Cylinder's fluid reservoir, which is typically a separate plastic container sealed with O-rings on the unit's top, supplies fluid so the pistons always have fluid to pressurize. A dual-circuit design operates the brake piston for each wheel independently, allowing sufficient brake pedal pressure to remain available to continue braking even in case of a leak. The firewall of the Nissan vacuum power booster generally bolts to the front of the Brake Master Cylinder. To keep the braking system of a Sentra in working order, leaks and corrosion are regularly checked. As a result, each Sentra comes with a working Brake Master Cylinder and a confident pedal feel for each Nissan Sentra driver.
If you need any OEM Nissan Sentra Brake Master Cylinder, feel free to choose them out of our huge selection of genuine Nissan Sentra Brake Master Cylinder. All our parts are offered at unbeatable prices and are supported by the manufacturer's warranty. In addition, we offer quick shipping to have your parts delivered to your door step in a matter of days.
Nissan Sentra Brake Master Cylinder Parts Questions & Experts Answers
- Q: How to remove the Brake Master Cylinder on a Nissan Sentra?A:Disconnecting the battery and removing the air filter housing is always the first step to take before removing the Brake Master Cylinder. It is also necessary to disconnect the electrical connector for the fluid level warning switch and, where applicable, disengage and close off the clutch fluid hose for a vehicle with manual transaxle. Then again, carefully draw off as much fluid as you can from the reservoir using a syringe without spilling any. Commence by loosening fittings upon those ends of Brake Lines that enter into that cylinder. Detach it from its nuts which connects it to power booster having care on not leaving behind any remaining substance within this bottle. To install it, bench bleed new Brake Master Cylinder through holding it in a vise clamping bleeder tubes at output ports. Fill brake reservoir with recommended brake fluid then slowly press pistons into Brake Master Cylinder causing expulsion of air in chambers under pressure back into reservoir. One after another remove each of these bleed pipes and put plugs inside these openings so that there will be no spillage of any liquid or air getting inside. Apply silicone grease to the power booster bore and coat end O-ring of a Brake Master Cylinder inserting a new O-ring seal afterwards. The next step would be to place your hand on top of that booster pushing its studs through holes on other side until you feel them tightening up your fingers around nuts but not more than what is required at this point; now thread connections onto both its cylinders tight enough too! Fill reservoir with fluid, bleed lines at Brake Master Cylinder then proceed bleeding rest system should bring things back order soonest possible time possible-before reattaching battery or even attempting anything else lest some damage done internally somewhere resulting in loss braking performance leading complete failure altogether if not attended timely enough.

Related Nissan Sentra Parts
 Nissan Sentra Brake Proportioning Valve
 Nissan Sentra Brake Booster
 Nissan Sentra Master Cylinder Repair Kit
 Nissan Sentra Brake Fluid Pump
 Nissan Sentra Brake Fluid Level Sensor
Browse by Year
2025 Brake Master Cylinder 2024 Brake Master Cylinder 2023 Brake Master Cylinder 2022 Brake Master Cylinder 2021 Brake Master Cylinder 2020 Brake Master Cylinder 2019 Brake Master Cylinder 2018 Brake Master Cylinder 2017 Brake Master Cylinder 2016 Brake Master Cylinder 2015 Brake Master Cylinder 2014 Brake Master Cylinder 2013 Brake Master Cylinder 2012 Brake Master Cylinder 2011 Brake Master Cylinder 2010 Brake Master Cylinder 2009 Brake Master Cylinder 2008 Brake Master Cylinder 2007 Brake Master Cylinder 2006 Brake Master Cylinder 2005 Brake Master Cylinder 2004 Brake Master Cylinder 2003 Brake Master Cylinder 2002 Brake Master Cylinder 2001 Brake Master Cylinder 2000 Brake Master Cylinder 1999 Brake Master Cylinder 1998 Brake Master Cylinder 1997 Brake Master Cylinder 1996 Brake Master Cylinder 1995 Brake Master Cylinder 1994 Brake Master Cylinder 1993 Brake Master Cylinder 1992 Brake Master Cylinder 1991 Brake Master Cylinder 1990 Brake Master Cylinder 1989 Brake Master Cylinder 1988 Brake Master Cylinder 1987 Brake Master Cylinder 1986 Brake Master Cylinder 1985 Brake Master Cylinder 1984 Brake Master Cylinder 1983 Brake Master Cylinder 1982 Brake Master Cylinder