×
- Hello
- Login or Register
- Quick Links
- Live Chat
- Track Order
- Parts Availability
- RMA
- Help Center
- Contact Us
- Shop for
- Nissan Parts
- Nissan Accessories
My Garage
My Account
Cart
Genuine Nissan Sentra CV Boot
Axle Boot- Select Vehicle by Model
- Select Vehicle by VIN
Select Vehicle by Model
orMake
Model
Year
Select Vehicle by VIN
For the most accurate results, select vehicle by your VIN (Vehicle Identification Number).
53 CV Boots found


Nissan Sentra Repair Kt Outer RH
Part Number: C9241-ET00J$102.70 MSRP: $145.05You Save: $42.35 (30%)Ships in 1-3 Business Days
Nissan Sentra Repair Kit-Dust Boot,Outer
Part Number: C9241-JA00A$59.08 MSRP: $81.45You Save: $22.37 (28%)Ships in 1-2 Business Days


Nissan Sentra Inner Dust Boot Repair Kit
Part Number: C9741-ET000$46.63 MSRP: $64.29You Save: $17.66 (28%)Ships in 1-2 Business Days
Nissan Sentra Repair Kit-Dust Boot,Outer
Part Number: C9241-ET000$50.77 MSRP: $69.98You Save: $19.21 (28%)Ships in 1-3 Business Days


Nissan Sentra Repair Kit-Dust Boot,Outer
Part Number: 39241-8U025$51.18 MSRP: $70.55You Save: $19.37 (28%)Ships in 1-3 Business Days

Nissan Sentra Inner Dust Boot Repair Kit
Part Number: C9741-JA00A$52.02 MSRP: $71.72You Save: $19.70 (28%)

Nissan Sentra Repair Kit-Dust Boot,Outer
Part Number: 39241-0M325$35.44 MSRP: $48.85You Save: $13.41 (28%)Ships in 1-2 Business Days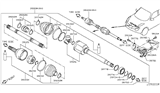
Nissan Sentra DUSTBOOTKIT-Repair,Inner
Part Number: C9741-3NF0C$120.11 MSRP: $169.65You Save: $49.54 (30%)Ships in 1-3 Business Days
Nissan Sentra Repair Dust Boot Kit Inner
Part Number: 39741-9E025$28.19 MSRP: $38.83You Save: $10.64 (28%)Ships in 1-2 Business Days
Nissan Sentra Repair Dust Boot Kit Outer
Part Number: C9241-BM700$112.35 MSRP: $158.68You Save: $46.33 (30%)Ships in 1-3 Business Days
Nissan Sentra Repair Dust Boot Kit Inner
Part Number: C9741-3ZN0B$60.04 MSRP: $84.80You Save: $24.76 (30%)Ships in 1-3 Business Days
Nissan Sentra Repair Dust Boot Kit Outer
Part Number: C9241-3ZN0B$30.31 MSRP: $41.78You Save: $11.47 (28%)Ships in 1-3 Business DaysNissan Sentra Repair Dust Boot Kit Inner
Part Number: C9G41-3ZN0B$60.04 MSRP: $84.80You Save: $24.76 (30%)Ships in 1-3 Business Days
Nissan Sentra Repair Dust Boot Kit Inner
Part Number: C9741-BJ00A$124.42 MSRP: $175.73You Save: $51.31 (30%)Ships in 1-3 Business Days
Nissan Sentra Dust Cover Kit
Part Number: 39741-02A26$29.89 MSRP: $41.20Limited AvailabilityYou Save: $11.31 (28%)
Nissan Sentra Repair Kt Dust Cover A
Part Number: 39241-03A26$33.38 MSRP: $46.02Limited AvailabilityYou Save: $12.64 (28%)
Nissan Sentra Repair Kit Seal
Part Number: 39241-03A25$33.38 MSRP: $46.02Limited AvailabilityYou Save: $12.64 (28%)Nissan Sentra Repair Kt Dust Cover Inner
Part Number: 39741-70A25$36.92 MSRP: $50.90Limited AvailabilityYou Save: $13.98 (28%)
Nissan Sentra Inner Dust Boot Repair Kit
Part Number: 39741-8U026$39.69 MSRP: $54.72You Save: $15.03 (28%)
Nissan Sentra Repair Kit-Dust Boot,Outer
Part Number: 39241-64J28$42.90 MSRP: $59.13Limited AvailabilityYou Save: $16.23 (28%)
| Page 1 of 3 |Next >
1-20 of 53 Results
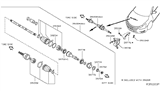
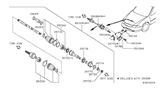
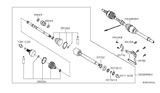
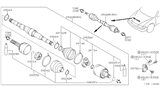
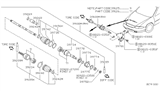
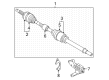
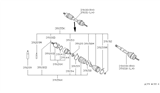
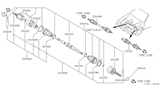
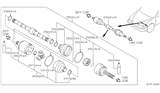
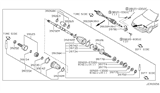
Nissan Sentra CV Boot
The Nissan Sentra CV Boot acts as a flexible cover that seals the constant-velocity joint located on the front halfshaft. The CV Boot contains grease and keeps dirt, debris, and moisture from entering. The CV Boot will bend with suspension travel and steering input, allowing the joint to change angles without losing lubrication. The CV Boot is created using soft rubber or plastic and acts as a closed chamber for smooth transfer of torque from the transaxle to the wheels. The CV Boot ensures grease and cleanliness, which reduces friction and wear that can cause the joint to fail, resulting in a loss of drive power. Sentra benefits from this component. When the component is intact, it delivers dependable power to the front wheels of the Nissan Sentra. This helps the vehicle respond reliably when accelerating and cornering. If your CV Boot is compromised, grease will leak out and dirt will leak in, causing damage. It is essential for any Nissan model that uses front halfshafts and especially critical for a Nissan Sentra to keep this barrier in place for normal operability on the road.
If you need any OEM Nissan Sentra CV Boot, feel free to choose them out of our huge selection of genuine Nissan Sentra CV Boot. All our parts are offered at unbeatable prices and are supported by the manufacturer's warranty. In addition, we offer quick shipping to have your parts delivered to your door step in a matter of days.
Nissan Sentra CV Boot Parts Questions & Experts Answers
- Q: How to replace the CV Boot on Nissan Sentra?A:If the CV joints must be overhauled (usually due to tom boots), explore all options before beginning the job. Complete rebuilt driveaxles are available on an exchange basis which eliminates much time and work. Whichever route you choose to take, check on the cost and availability of parts before disassembling the vehicle. For the inner CV joint, remove the driveaxle, boot clamps, and the joint housing. Use a center punch to mark the tripod and axleshaft to ensure that they are reassembled properly. Remove the snap-ring from the end of the axleshaft with a pair of snap-ring pliers. Use a hammer and a brass punch to drive the tripod joint from the driveaxle. Clean all components with solvent to remove the grease, and check for cracks, pitting, scoring and other signs of wear. Slide the clamps and boot onto the Axle Shaft. Place the tripod on the shaft and install the snap ring. Apply grease to the tripod assembly, the inside of the joint housing and the inside of the boot. Install the housing on the joint, then install the retaining ring. Slide the boot into place, making sure both ends seat in their grooves. Adjust the length of the joint, equalize the pressure in the boot, then tighten and secure the boot clamps. Install a new circlip on the inner CV joint stub axle. Install the driveaxle. For the outer CV joint, remove the driveaxle, then remove the boot clamps. Perform the outer CV joint boot replacement procedure.

Related Nissan Sentra Parts


Browse by Year
2025 CV Boot 2024 CV Boot 2023 CV Boot 2022 CV Boot 2021 CV Boot 2020 CV Boot 2019 CV Boot 2018 CV Boot 2017 CV Boot 2016 CV Boot 2015 CV Boot 2014 CV Boot 2013 CV Boot 2012 CV Boot 2011 CV Boot 2010 CV Boot 2009 CV Boot 2008 CV Boot 2007 CV Boot 2006 CV Boot 2005 CV Boot 2004 CV Boot 2003 CV Boot 2002 CV Boot 2001 CV Boot 2000 CV Boot 1999 CV Boot 1998 CV Boot 1997 CV Boot 1996 CV Boot 1995 CV Boot 1994 CV Boot 1993 CV Boot 1992 CV Boot 1991 CV Boot 1990 CV Boot 1989 CV Boot 1988 CV Boot 1987 CV Boot 1986 CV Boot 1985 CV Boot 1984 CV Boot 1983 CV Boot 1982 CV Boot