×
- Hello
- Login or Register
- Quick Links
- Live Chat
- Track Order
- Parts Availability
- RMA
- Help Center
- Contact Us
- Shop for
- Nissan Parts
- Nissan Accessories
My Garage
My Account
Cart
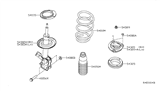
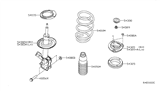
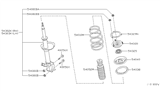
Genuine Nissan Sentra Shock Absorber
Suspension Shock Absorber- Select Vehicle by Model
- Select Vehicle by VIN
Select Vehicle by Model
orMake
Model
Year
Select Vehicle by VIN
For the most accurate results, select vehicle by your VIN (Vehicle Identification Number).
211 Shock Absorbers found


Nissan Sentra Strut Kit Front Right Hand
Part Number: E4302-9AM0B$162.57 MSRP: $240.72You Save: $78.15 (33%)Ships in 1-3 Business Days


Nissan Sentra Strut Kit Front Left Hand
Part Number: E4303-9AM0B$162.57 MSRP: $240.72You Save: $78.15 (33%)Ships in 1-3 Business Days


Nissan Sentra Shock Absorber Kit Rear
Part Number: E6210-4AF0A$131.63 MSRP: $190.63You Save: $59.00 (31%)Ships in 1-2 Business Days


Nissan Sentra Strut Kit Front Right Hand
Part Number: E4302-ZJ60A$131.23 MSRP: $190.05You Save: $58.82 (31%)Ships in 1-3 Business Days
Nissan Sentra Shock Absorber Kit Rear
Part Number: E6210-3SH0C$134.33 MSRP: $194.54You Save: $60.21 (31%)Ships in 1-3 Business Days


Nissan Sentra Strut Kit Front Left Hand
Part Number: E4303-ZJ60A$131.12 MSRP: $189.90You Save: $58.78 (31%)Ships in 1-3 Business Days


Nissan Sentra ABSORBER Kit-Shock, Rear RH
Part Number: E6200-ZJ60A$124.79 MSRP: $180.74You Save: $55.95 (31%)Ships in 1-2 Business Days


Nissan Sentra Strut Kit Front Left Hand
Part Number: E4303-ET00B$131.78 MSRP: $178.13You Save: $46.35 (27%)Ships in 1 Business DayNissan Sentra Strut Kit Front Right Hand
Part Number: E4302-4AF0A$191.12 MSRP: $282.98You Save: $91.86 (33%)Ships in 1 Business Day

Nissan Sentra Front Suspension Strut Kit Right Hand
Part Number: E4302-6LB1B$226.84 MSRP: $335.88You Save: $109.04 (33%)Ships in 1-3 Business DaysNissan Sentra Front Suspension Strut Kit Left Hand
Part Number: E4303-6LB1B$226.84 MSRP: $335.88You Save: $109.04 (33%)Ships in 1-3 Business DaysNissan Sentra Strut Kit Front Left Hand
Part Number: E4303-4AF0A$191.12 MSRP: $282.98You Save: $91.86 (33%)Ships in 1 Business DayNissan Sentra Strut Kit Front Right Hand
Part Number: E4302-3SH0C$148.04 MSRP: $219.20You Save: $71.16 (33%)Ships in 1-3 Business DaysNissan Sentra Strut Kit Front Left Hand
Part Number: E4303-3SH0C$148.31 MSRP: $219.60You Save: $71.29 (33%)Ships in 1-3 Business DaysNissan Sentra Rear Shock Absorber Kit
Part Number: E6200-ET000$94.38 MSRP: $136.68You Save: $42.30 (31%)Ships in 1-3 Business DaysNissan Sentra Front Suspension Strut Kit Right Hand
Part Number: E4302-4FU0B$166.61 MSRP: $246.70You Save: $80.09 (33%)Ships in 1-3 Business DaysNissan Sentra Rear Shock Absorber Kit
Part Number: E6210-4FU1A$122.50 MSRP: $177.42You Save: $54.92 (31%)Ships in 1-3 Business Days
Nissan Sentra Strut Kit Front Right Hand
Part Number: 54302-6Z626$142.77 MSRP: $196.65You Save: $53.88 (28%)Ships in 1-2 Business Days
Nissan Sentra Shock Absorber Kit Rear
Part Number: E6210-9AM0A$126.52 MSRP: $178.70You Save: $52.18 (30%)

| Page 1 of 11 |Next >
1-20 of 211 Results
Nissan Sentra Shock Absorber
Nissan Sentra Shock Absorber units are designed to make the compact car stable and smooth by controlling unwanted movement of the suspension and absorbing energy from bumps and potholes. Within the Nissan layout applied on the Sentra, each Shock Absorber is paired with coil springs inside the strut. The Shock Absorber has a hydraulic piston that converts the kinetic motion into heat, allowing the body to avoid excessive bounce, nose dive while braking, and excessive roll through the turns. As Shock Absorbers get older, their efficiency diminishes due to excess use or contaminated Shock Absorber fluid. This will lead to certain symptoms which include rear suspension noise, uneven ride height, bouncy travel, or rear-end squat. The rear suspension no longer absorbs impacts like it applied to. A fatigued Shock Absorber can be indicated by handling cues such as a harsh ride, suspension bottoming, or tire cupping. As such, keeping a Nissan Sentra running smoothly involves timely Shock Absorber replacement in matched pairs to maintain balance across the axle. Choosing a full strut assembly simplifies the job and renews all related wear components to help the Nissan model regain its factory ride character so the Sentra doesn't get rattled by road imperfections.
If you need any OEM Nissan Sentra Shock Absorber, feel free to choose them out of our huge selection of genuine Nissan Sentra Shock Absorber. All our parts are offered at unbeatable prices and are supported by the manufacturer's warranty. In addition, we offer quick shipping to have your parts delivered to your door step in a matter of days.
Nissan Sentra Shock Absorber Parts Questions & Experts Answers
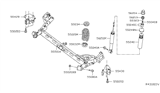
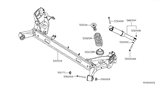
- Q: What steps should you take if the coil springs or shock absorber show signs of wear on the Nissan Sentra?A:If, for example, the struts or coil springs that have wear that include leaks, loss of damping ability, or even mechanical damage, it's important to investigate all your options before working on it since strut/shock absorber assemblies are non-serviceable and need to be replaced in case of a problem. Some strut assemblies may have springs, and their components can be rather time-consuming to source individually; therefore, before dismantling the vehicle, compare the costs and availability of exchange parts. To disassemble, turn the strut thereby pulling the spring assembly out and then fit it in a wooden vise padded with rags and should not over tighten. Adjust a spring compressor in a manner consistent with the manufacturer's guide to reducing tension in the upper spring seat as confirmed by horizontal vibrations. If required, dismantle the piston rod nut with the help of an Allen key, and then unscrew the upper suspension stop and check the rotation of the bearing, if necessary, it needs to be replaced. Raise the spring seat and the upper insulator of the piston rod and examine the rubber spring seat for the deterioration: if it is worn out, replace it. Now raise the compressed spring from the assembly and put it aside, and now remove the dust boot from the piston rod and check the lower insulator for deterioration and, if deteriorated, get a new one. During reassembly, if installing the lower insulator, position it appropriately; and push the damper rod on the dust boot. Start by placing the coil spring on the lower insulator in a manner that the end of coil spring forms a part of the recess. Place the upper insulator and the spring seat in its position and make certain that the marks or the arrows match, replace the dust seal and the suspension support to the piston rod and tighten the nut to the necessary torque. Replacement of the strut/shock absorber and coil spring assembly is best done by placing it in the fender well and tightening and upper mounting bolts to the standard specified torque, which is rather heavy to do alone. After that, position the Steering Knuckle back to the flange of the strut assembly then put the bolt in place and tighten the nuts to the suggested torque. Perform the following actions to complete the removal: Reinstall the stabilizer bar link Put the wheel back on and tighten it to the required torque Tighten the nut of the wheel To final Ch it is recommended to have the front end alignment checked and adjusted if required.

Related Nissan Sentra Parts
 Nissan Sentra Steering Knuckle
 Nissan Sentra Coil Springs
 Nissan Sentra Tie Rod End
 Nissan Sentra Wheelhouse
 Nissan Sentra Fender
Browse by Year
2025 Shock Absorber 2024 Shock Absorber 2023 Shock Absorber 2022 Shock Absorber 2021 Shock Absorber 2020 Shock Absorber 2019 Shock Absorber 2018 Shock Absorber 2017 Shock Absorber 2016 Shock Absorber 2015 Shock Absorber 2014 Shock Absorber 2013 Shock Absorber 2012 Shock Absorber 2011 Shock Absorber 2010 Shock Absorber 2009 Shock Absorber 2008 Shock Absorber 2007 Shock Absorber 2006 Shock Absorber 2005 Shock Absorber 2004 Shock Absorber 2003 Shock Absorber 2002 Shock Absorber 2001 Shock Absorber 2000 Shock Absorber 1999 Shock Absorber 1998 Shock Absorber 1997 Shock Absorber 1996 Shock Absorber 1995 Shock Absorber 1994 Shock Absorber 1993 Shock Absorber 1992 Shock Absorber 1991 Shock Absorber 1990 Shock Absorber 1989 Shock Absorber 1988 Shock Absorber 1987 Shock Absorber 1986 Shock Absorber 1985 Shock Absorber 1984 Shock Absorber 1983 Shock Absorber 1982 Shock Absorber