×
- Hello
- Login or Register
- Quick Links
- Live Chat
- Track Order
- Parts Availability
- RMA
- Help Center
- Contact Us
- Shop for
- Nissan Parts
- Nissan Accessories
My Garage
My Account
Cart
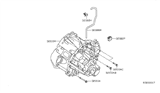
Genuine Nissan Sentra Transmission Assembly
Trans Assembly- Select Vehicle by Model
- Select Vehicle by VIN
Select Vehicle by Model
orMake
Model
Year
Select Vehicle by VIN
For the most accurate results, select vehicle by your VIN (Vehicle Identification Number).
91 Transmission Assemblies found

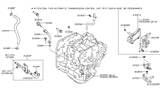
Nissan Sentra Automatic Transaxle
Part Number: 31020-X428D$3126.38 MSRP: $3764.63You Save: $638.25 (17%)Ships in 1-3 Business DaysNissan Sentra Automatic Transmission Assembly
Part Number: 31020-X428E$3126.38 MSRP: $3764.63You Save: $638.25 (17%)Ships in 1-3 Business Days
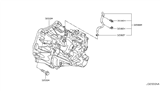
Nissan Sentra Manual Transaxle
Part Number: 32010-00Q3P$2919.72 MSRP: $3534.77You Save: $615.05 (18%)Ships in 1-3 Business Days
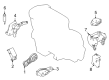
Nissan Sentra Automatic Transaxle
Part Number: 31020-70X8C$3126.38 MSRP: $3764.63You Save: $638.25 (17%)Ships in 1-3 Business Days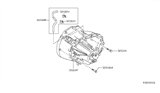
Nissan Sentra Manual Transaxle
Part Number: 32010-02Q3F$2931.46 MSRP: $3548.99You Save: $617.53 (18%)Ships in 1-3 Business DaysNissan Sentra Automatic Transaxle
Part Number: 31020-70X4A$3126.38 MSRP: $3764.63You Save: $638.25 (17%)Ships in 1-3 Business DaysNissan Sentra Automatic Transaxle
Part Number: 31020-3VX7E$3050.53 MSRP: $3672.80You Save: $622.27 (17%)Ships in 1-3 Business Days
Nissan Sentra Manual Transaxle
Part Number: 32010-ET80A$2919.72 MSRP: $3534.77You Save: $615.05 (18%)Ships in 1-3 Business Days
Nissan Sentra Manual Transmission Assembly
Part Number: 32010-64Y16$1873.62 MSRP: $2268.30Limited AvailabilityYou Save: $394.68 (18%)
Nissan Sentra Manual Transaxle
Part Number: 320B0-0M603$1782.87 MSRP: $2158.44Limited AvailabilityYou Save: $375.57 (18%)
Nissan Sentra Manual Transaxle
Part Number: 32010-73A68$2245.56 MSRP: $2718.60Limited AvailabilityYou Save: $473.04 (18%)
Nissan Sentra Manual Transaxle
Part Number: 32010-01A02$1494.77 MSRP: $1948.85Limited AvailabilityYou Save: $454.08 (24%)Nissan Sentra Manual Transaxle
Part Number: 32010-01A01$1494.77 MSRP: $1948.85Limited AvailabilityYou Save: $454.08 (24%)Nissan Sentra Manual Transaxle
Part Number: 32010-02A01$1521.36 MSRP: $1983.52Limited AvailabilityYou Save: $462.16 (24%)Nissan Sentra Manual Transaxle
Part Number: 32010-11A01$1631.40 MSRP: $2126.98Limited AvailabilityYou Save: $495.58 (24%)Nissan Sentra Manual Transaxle
Part Number: 32010-73A88$2245.56 MSRP: $2718.60Limited AvailabilityYou Save: $473.04 (18%)Nissan Sentra Manual Transaxle
Part Number: 32010-73A08$2245.56 MSRP: $2718.60Limited AvailabilityYou Save: $473.04 (18%)Nissan Sentra Manual Transaxle
Part Number: 32010-11M63$2291.67 MSRP: $2774.41Limited AvailabilityYou Save: $482.74 (18%)
Nissan Sentra Automatic Transmission Assembly
Part Number: 31020-X427E$2920.73 MSRP: $3515.66You Save: $594.93 (17%)Nissan Sentra Automatic Transmission Assembly
Part Number: 31020-X427A$2920.73 MSRP: $3515.66You Save: $594.93 (17%)
| Page 1 of 5 |Next >
1-20 of 91 Results
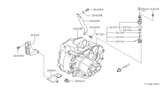
Nissan Sentra Transmission Assembly
Nissan Sentra Transmission Assembly transfers the engine torque to the wheels and chooses the right gear ratio to make the car accelerate smoothly while saving fuel. For decades now, the Sentra compact sedan has either let drivers shift their own gears or let computer-managed hydraulics do the job. In either approach, both have worked towards the same goal of keeping the engine in an efficient torque range. Nissan Sentra cars from earlier times applied to come with a stick shift manual Transmission Assembly with parallel shafts and driver-selected gears for a direct feel and a sporty experience. Several trims also adopted a fully hydraulic automatic design that uses planetary gearsets, fluid coupling, and electronic controls to change ratios without a clutch pedal for easier city driving. In recent model years, car engines have replaced fixed gears with a continuously variable Transmission Assembly that employs belts and pulleys to maintain an ideal engine speed for better economy. Every Nissan driver benefits from whichever style, and the Transmission Assembly is absolutely necessary because without it the vehicle cannot move. The Transmission Assembly is a crucial component in ensuring optimal performance.
If you need any OEM Nissan Sentra Transmission Assembly, feel free to choose them out of our huge selection of genuine Nissan Sentra Transmission Assembly. All our parts are offered at unbeatable prices and are supported by the manufacturer's warranty. In addition, we offer quick shipping to have your parts delivered to your door step in a matter of days.
Nissan Sentra Transmission Assembly Parts Questions & Experts Answers
- Q: How to overhaul the Transmission Assembly on a Nissan Sentra?A:Manual transaxle rebuild is not really a do-it-yourselfer job since many of the small parts have to be dismantled, reassembled and accurate measurements involving clearance or possibility of adjustment with spacers and snap-rings, may have to be done. However, a competent person can easily take out and replace the transaxle; the overhaul process is again best undertaken at the transmission repair shop and may take relatively longer, and cost relatively more than a rebuilt transaxle, which may be ordered through dealer parts or auto parts' shops. Thus, even a novice mechanic can try a rebuild if provided with adequate special tools and is very attentive to details studying the engine exhaustively. The internal and external snap-ring pliers, bearing puller, slide hammer, various sizes of pin punches, dial indicator could be used on this job along with possible hydraulic press tool and a strong working bench-enhanced with vise or transmission stand. Specifically, during disassembly, it is essential to write down all the observations on the location and clamping of various components, as mototes in conjunction with the manufacturer's shop manual with schematic diagrams of how the components are arranged and how they are connected during reassembly. Furthermore, by possessing knowledge of the detrimental area of the transaxle, certain examinations and replacements can be made a lot easier.

Related Nissan Sentra Parts
 Nissan Sentra Torque Converter
 Nissan Sentra Valve Body
 Nissan Sentra Transmission Pan
 Nissan Sentra Needle Bearing
 Nissan Sentra Transmission Oil Cooler
Browse by Year
2023 Transmission Assembly 2022 Transmission Assembly 2021 Transmission Assembly 2020 Transmission Assembly 2019 Transmission Assembly 2018 Transmission Assembly 2017 Transmission Assembly 2016 Transmission Assembly 2015 Transmission Assembly 2014 Transmission Assembly 2013 Transmission Assembly 2012 Transmission Assembly 2011 Transmission Assembly 2010 Transmission Assembly 2009 Transmission Assembly 2008 Transmission Assembly 2007 Transmission Assembly 2006 Transmission Assembly 2005 Transmission Assembly 2004 Transmission Assembly 2003 Transmission Assembly 2002 Transmission Assembly 2001 Transmission Assembly 2000 Transmission Assembly 1999 Transmission Assembly 1998 Transmission Assembly 1997 Transmission Assembly 1996 Transmission Assembly 1995 Transmission Assembly 1994 Transmission Assembly 1993 Transmission Assembly 1992 Transmission Assembly 1991 Transmission Assembly 1990 Transmission Assembly 1989 Transmission Assembly 1988 Transmission Assembly 1987 Transmission Assembly 1986 Transmission Assembly 1985 Transmission Assembly 1984 Transmission Assembly 1983 Transmission Assembly 1982 Transmission Assembly