×
- Hello
- Login or Register
- Quick Links
- Live Chat
- Track Order
- Parts Availability
- RMA
- Help Center
- Contact Us
- Shop for
- Nissan Parts
- Nissan Accessories
My Garage
My Account
Cart
Genuine Nissan Titan Drive Belt
Serpentine Belt- Select Vehicle by Model
- Select Vehicle by VIN
Select Vehicle by Model
orMake
Model
Year
Select Vehicle by VIN
For the most accurate results, select vehicle by your VIN (Vehicle Identification Number).
6 Drive Belts found


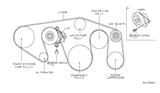
Nissan Titan Alternator Belt
Part Number: 11720-7S00A$75.43 MSRP: $109.25You Save: $33.82 (31%)Ships in 1-3 Business Days


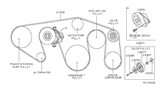
Nissan Titan Serpentine Belt
Part Number: 11720-EZ30A$80.92 MSRP: $117.20You Save: $36.28 (31%)Ships in 1-2 Business Days


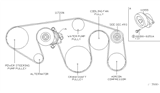
Nissan Titan Fan & Alternator Belt
Part Number: 11720-EZ40B$87.16 MSRP: $126.23You Save: $39.07 (31%)Ships in 1-3 Business Days


Nissan Titan Fan & Alternator Belt
Part Number: 11720-7S000$75.43 MSRP: $109.25You Save: $33.82 (31%)Ships in 1-2 Business Days


Nissan Titan Alternator Belt
Part Number: 11720-EZ40A$87.16 MSRP: $126.23You Save: $39.07 (31%)Ships in 1-3 Business Days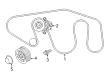
Nissan Titan Drive Belt
The Drive Belt is one of the crucial products, which are directly involved with the drive of Nissan Titan vehicles. This serpentine Drive Belt interconnects it with a number of parts in this engine, namely the alternator and the A/C compressor, this makes sure that they work effectively. The Drive Belt has a general durability of approximately one hundred thousand miles and should be replaced at this range of time despite its ability to carry daily usage, if it shows symptoms of wearing out like fraying or cracking. In the Nissan Titan, for example, the Drive Belt has gone through advancement in the type of belt, there are V-belts and multi-groove belts type, which are uniquely designed to increase traction and reduce slippage to increase efficiency. That the Drive Belt can be applied with Titan first and second generations shows the part is critical to the car's power and safety. Not only does the Drive Belt help to determine the truck's functionality, but it is also a protective feature for the engine and related components from experiencing harm. The automotive market can thus distinguish the characteristics of the Drive Belt by indicating the materials applied and the specific design features incorporated in the vehicle in order to make it a standard carrying the reputation of the Nissan. Therefore, the Drive Belt can be counted as a working tool that defines the car performance and quality, which is important for the owners of Nissan Titan vehicles.
If you need any OEM Nissan Titan Drive Belt, feel free to choose them out of our huge selection of genuine Nissan Titan Drive Belt. All our parts are offered at unbeatable prices and are supported by the manufacturer's warranty. In addition, we offer quick shipping to have your parts delivered to your door step in a matter of days.
Nissan Titan Drive Belt Parts Questions & Experts Answers
- Q: How to inspect and replace the drive belt in a Nissan Titan engine?A:A drivebelt, located at the front of the engine, plays a crucial role in the operation of the engine and its components. It is made of a material that is prone to wear, hence, it should be periodically inspected. All models have a single, ribbed serpentine belt to drive all the engine accessories. With the engine off, open the hood and use your fingers to move along the belt, checking for cracks and separation of the belt plies. Also, check for fraying and glazing, which gives the belt a shiny appearance. Both sides of the belt should be inspected, which means you will have to twist the belt to check the underside. Check the ribs on the underside of the belt. They should all be the same depth, with none of the surface uneven. Inspect the indicator marks next to the automatic belt tensioner. If the stationary mark is aligned with the outer limit of the tensioner's travel, the belt must be replaced. To replace the belt, disconnect the cable from the negative terminal of the battery. Remove the intake air duct and intake air resonator. Rotate the tensioner to relieve the tension on the belt. Remove the belt from the auxiliary components and carefully release the tensioner. Route the new belt over the various pulleys, again rotating the tensioner to allow the belt to be installed, then release the bell tensioner. Make sure the belt fits properly into the pulley grooves - it must be completely engaged. Reconnect the battery. For tensioner replacement, remove the drivebelt. Remove the three bolts and remove the tensioner assembly. Installation is the reverse of removal. Tighten the bolts to the torque.

Related Nissan Titan Parts
 Nissan Titan Rod Bearing
 Nissan Titan Alternator
 Nissan Titan Timing Chain Tensioner
 Nissan Titan Timing Chain Guide
 Nissan Titan Rocker Arm
 Nissan Titan Timing Cover
 Nissan Titan Crankshaft Gear
 Nissan Titan Crankshaft Pulley
 Nissan Titan Piston Ring Set
Browse by Year
2024 Drive Belt 2023 Drive Belt 2022 Drive Belt 2021 Drive Belt 2020 Drive Belt 2019 Drive Belt 2018 Drive Belt 2017 Drive Belt 2016 Drive Belt 2015 Drive Belt 2014 Drive Belt 2013 Drive Belt 2012 Drive Belt 2011 Drive Belt 2010 Drive Belt 2009 Drive Belt 2008 Drive Belt 2007 Drive Belt 2006 Drive Belt 2005 Drive Belt 2004 Drive Belt