×
- Hello
- Login or Register
- Quick Links
- Live Chat
- Track Order
- Parts Availability
- RMA
- Help Center
- Contact Us
- Shop for
- Nissan Parts
- Nissan Accessories
My Garage
My Account
Cart
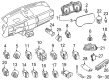
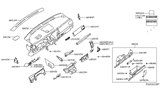
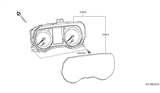
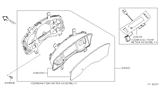
Genuine Nissan Titan Instrument Cluster
Speedometer Instrument Cluster- Select Vehicle by Model
- Select Vehicle by VIN
Select Vehicle by Model
orMake
Model
Year
Select Vehicle by VIN
For the most accurate results, select vehicle by your VIN (Vehicle Identification Number).
389 Instrument Clusters found

Nissan Titan Instrument Combination Meter Assembly
Part Number: 24810-9FV1A$1069.65 MSRP: $1648.15You Save: $578.50 (36%)Ships in 1-3 Business Days
Nissan Titan Lid Cluster BRN
Part Number: 68240-EZ01A$169.91 MSRP: $261.80You Save: $91.89 (36%)Ships in 1-3 Business Days
Nissan Titan Instrument Cluster
Part Number: 24810-9FU0A$394.14 MSRP: $607.31You Save: $213.17 (36%)Ships in 1-3 Business DaysNissan Titan Instrument Cluster
Part Number: 24810-9FU1A$895.63 MSRP: $1380.02You Save: $484.39 (36%)Ships in 1-3 Business Days
Nissan Titan Speedometer Instrument Cluster
Part Number: 24810-7S22B$354.37 MSRP: $546.02Limited AvailabilityYou Save: $191.65 (36%)Nissan Titan Speedometer Instrument Cluster
Part Number: 24810-7S22A$363.37 MSRP: $546.02You Save: $182.65 (34%)Ships in 1-2 Business DaysNissan Titan Speedometer Instrument Cluster
Part Number: 24810-ZR15A$559.67 MSRP: $862.36You Save: $302.69 (36%)Ships in 1-3 Business Days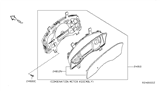
Nissan Titan Speedometer Instrument Cluster
Part Number: 24810-9GE3E$745.36 MSRP: $1148.47You Save: $403.11 (36%)Ships in 1-3 Business DaysNissan Titan Speedometer Instrument Cluster
Part Number: 24810-ZV20C$624.41 MSRP: $962.11You Save: $337.70 (36%)Ships in 1-3 Business DaysNissan Titan Instrument Cluster
Part Number: 24810-EZ04B$531.59 MSRP: $819.09You Save: $287.50 (36%)Ships in 1-3 Business DaysNissan Titan Speedometer Instrument Cluster
Part Number: 24810-ZR10A$561.28 MSRP: $864.84You Save: $303.56 (36%)Ships in 1-3 Business DaysNissan Titan Speedometer Instrument Cluster
Part Number: 24810-ZX90C$705.36 MSRP: $1086.84You Save: $381.48 (36%)Ships in 1-3 Business Days
Nissan Titan Instrument Combination Meter Assembly
Part Number: 24810-9FV0D$1005.18 MSRP: $1548.82You Save: $543.64 (36%)Ships in 1-3 Business Days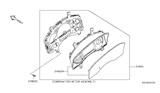
Nissan Titan Speedometer Instrument Cluster
Part Number: 24810-ZX92B$546.88 MSRP: $842.65You Save: $295.77 (36%)Ships in 1-3 Business DaysNissan Titan Speedometer Instrument Cluster
Part Number: 24810-ZR55E$579.03 MSRP: $870.07You Save: $291.04 (34%)Ships in 1-2 Business DaysNissan Titan Speedometer Instrument Cluster
Part Number: 24810-9GE0C$736.14 MSRP: $1134.27You Save: $398.13 (36%)Ships in 1-3 Business DaysNissan Titan Speedometer Instrument Cluster
Part Number: 24810-7S24A$344.31 MSRP: $517.36You Save: $173.05 (34%)Ships in 1-2 Business DaysNissan Titan Speedometer Instrument Cluster
Part Number: 24810-ZX93B$523.64 MSRP: $806.84You Save: $283.20 (36%)Ships in 1-3 Business DaysNissan Titan Speedometer Instrument Cluster
Part Number: 24810-ZX90B$534.93 MSRP: $824.24You Save: $289.31 (36%)Ships in 1-3 Business DaysNissan Titan Speedometer Instrument Cluster
Part Number: 24810-ZR50E$586.07 MSRP: $880.64You Save: $294.57 (34%)Ships in 1-2 Business Days
| Page 1 of 20 |Next >
1-20 of 389 Results
Nissan Titan Instrument Cluster
The Nissan Titan Instrument Cluster is the main display that allows drivers to be aware of essential vehicle information on every trip. The various displays located just behind the steering wheel, including the speedometer and tachometer, are gathered in the Instrument Cluster along with the fuel gauge and warning lights, which report engine status, exterior lighting, seat belt use, and overall driving conditions. The Instrument Cluster offers a convenient space to read the speed, engine revolutions, and remaining fuel. This helps the driver make well-informed and safe decisions at the right time. The housing alert icons light up to indicate occurrences such as low fuel or active headlamps, and the Instrument Cluster design makes it immediately evident. The part of the dashboard ahead of the driver is in a cluster. The data always stays in natural sight lines so it doesn't need the head to move off the road. This benefits visibility in any Titan cabin and can give easy guidance for Nissan owners. This design allows all Nissan Titans to provide feedback that is consistent and uncomplicated to the driver, indicating that the Instrument Cluster helps with reliable Nissan operation throughout the Titan range.
If you need any OEM Nissan Titan Instrument Cluster, feel free to choose them out of our huge selection of genuine Nissan Titan Instrument Cluster. All our parts are offered at unbeatable prices and are supported by the manufacturer's warranty. In addition, we offer quick shipping to have your parts delivered to your door step in a matter of days.
Nissan Titan Instrument Cluster Parts Questions & Experts Answers
- Q: How to remove and install the instrument cluster on Nissan Titan?A:Disconnect the cable from the negative battery terminal. Remove the instrument cluster bezel. Take out the retaining screws and pull the cluster forward. Unplug the electrical connectors and remove the cluster from the vehicle. Installation is the reverse of the removal procedure.

Related Nissan Titan Parts
 Nissan Titan Car Speakers
 Nissan Titan Cup Holder
 Nissan Titan Dome Light
 Nissan Titan Antenna
 Nissan Titan Antenna Base
 Nissan Titan Antenna Cable
 Nissan Titan Antenna Mast
 Nissan Titan Ashtray
 Nissan Titan Cigarette Lighter
 Nissan Titan Glove Box
 Nissan Titan Tachometer
Browse by Year
2024 Instrument Cluster 2023 Instrument Cluster 2022 Instrument Cluster 2021 Instrument Cluster 2020 Instrument Cluster 2019 Instrument Cluster 2018 Instrument Cluster 2017 Instrument Cluster 2016 Instrument Cluster 2015 Instrument Cluster 2014 Instrument Cluster 2013 Instrument Cluster 2012 Instrument Cluster 2011 Instrument Cluster 2010 Instrument Cluster 2009 Instrument Cluster 2008 Instrument Cluster 2007 Instrument Cluster 2006 Instrument Cluster 2005 Instrument Cluster 2004 Instrument Cluster