×
- Hello
- Login or Register
- Quick Links
- Live Chat
- Track Order
- Parts Availability
- RMA
- Help Center
- Contact Us
- Shop for
- Nissan Parts
- Nissan Accessories
My Garage
My Account
Cart
Genuine Nissan Versa Brake Disc
Disc Rotor- Select Vehicle by Model
- Select Vehicle by VIN
Select Vehicle by Model
orMake
Model
Year
Select Vehicle by VIN
For the most accurate results, select vehicle by your VIN (Vehicle Identification Number).
12 Brake Discs found


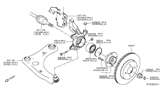
Nissan Versa Disc Brake Rotor Front
Part Number: 40206-1HL0C$86.44 MSRP: $125.18You Save: $38.74 (31%)Ships in 1-3 Business Days


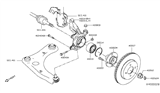
Nissan Versa Rotor Disc Brake Front
Part Number: 40206-AZ61A$79.41 MSRP: $115.00You Save: $35.59 (31%)Ships in 1-3 Business Days


Nissan Versa Disc Brake Rotor Front
Part Number: 40206-1HL0B$86.44 MSRP: $125.18You Save: $38.74 (31%)Ships in 1-3 Business Days
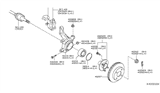
Nissan Versa Disc Brake Rotor Front
Part Number: 40206-5RB0A$84.93 MSRP: $123.00You Save: $38.07 (31%)Ships in 1-3 Business Days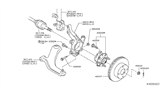
Nissan Versa Rotor Disc Brake Front
Part Number: 40206-ZW90A$84.93 MSRP: $123.00You Save: $38.07 (31%)Ships in 1-3 Business Days
Nissan Versa Disc Brake Rotor Front
Part Number: 40206-1HL0A$84.93 MSRP: $123.00You Save: $38.07 (31%)Ships in 1-3 Business DaysNissan Versa Rotor Disc Brake Front
Part Number: 40206-1HL0E$86.44 MSRP: $125.18You Save: $38.74 (31%)Nissan Versa Rotor Disc Brake Front
Part Number: 40206-AZ60A$79.41 MSRP: $115.00You Save: $35.59 (31%)Ships in 1-3 Business Days


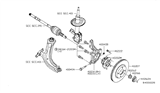

Nissan Versa Brake Disc
Nissan Versa Brake Disc is the friction surface that slows down the wheel by converting motion into heat when a brake pad clamps against it. The wheel rotates on its hub and stays in circular motion until pad pressure creates a stopping force from the wheel. Due to air exposure, the Brake Disc unit is less prone to fade than the drum units, as it remains cooler. The self-adjusting space between the pads and the rotor gives a steady pedal feel and predictable braking. In many cases, the Nissan Versa can gain four-wheel disc effectiveness by swapping rear drums for discs. A vented Brake Disc fitted with internal fins channels air between its faces to shed heat more quickly. The Brake Disc attaches to the hub using wheel studs, allowing the caliper to exert pressure on both sides. The Nissan Versa's disc brakes serve as essential parts that help to maintain control. Through their operation, they resist pulling and grabbing. This helps to aid stability in sudden stops. Moreover, simple visual checks tell owners when their Nissan Versa needs new Brake Disc surfaces.
If you need any OEM Nissan Versa Brake Disc, feel free to choose them out of our huge selection of genuine Nissan Versa Brake Disc. All our parts are offered at unbeatable prices and are supported by the manufacturer's warranty. In addition, we offer quick shipping to have your parts delivered to your door step in a matter of days.
Nissan Versa Brake Disc Parts Questions & Experts Answers
- Q: How to properly replace and install brake discs on Nissan Versa?A:Loosen the wheel lug nuts, raise the vehicle, and support it securely on jackstands. Remove the wheel and install the lug nuts to hold the disc in place; if the lug nuts don't contact the disc when screwed on all the way, install washers under them. Remove the Brake Caliper without disconnecting the brake hose, and suspend the caliper out of the way with a piece of wire after removing the caliper bolts. Visually inspect the disc surface for score marks and other damage; light scratches and shallow grooves are normal, but deep scoring over 0.039-inch requires disc removal and refinishing. Check both sides of the disc, as severe wear may necessitate replacement. To check disc runout, place a dial indicator about 1/2-inch from the outer edge of the disc, set it to zero, and turn the disc; the reading should not exceed the allowable runout limit. Resurfacing the discs when replacing brake pads is advisable to ensure a smooth finish and eliminate brake pedal pulsation. The disc must not be machined to a thickness under the specified minimum allowable refinish thickness, which can be checked with a micrometer. Remove the two caliper mounting bracket bolts and detach the caliper mounting bracket. Remove the lug nuts and the disc from the hub; if a rear disc won't come off, remove the rubber plug from the parking brake adjuster hole and use a small screwdriver to retract the parking brake shoes. Place the disc in position over the threaded studs, install the caliper mounting bracket over the disc, and tighten the bolts to the specified torque. Install the caliper and tighten the bolts to the specified torque, then install the wheel, lower the vehicle to the ground, and tighten the lug nuts to the specified torque. Depress the brake pedal a few times to bring the brake pads into contact with the disc, and check the operation of the brakes carefully before driving the vehicle.

Related Nissan Versa Parts
 Nissan Versa Brake Bleeder Screw
 Nissan Versa Speed Sensor
 Nissan Versa Brake Pad Set
 Nissan Versa Parking Brake Cable
 Nissan Versa Brake Line
 Nissan Versa Brake Booster
 Nissan Versa Brake Master Cylinder
 Nissan Versa Wheel Cylinder Repair Kit
 Nissan Versa ABS Control Module
Browse by Year
2025 Brake Disc 2024 Brake Disc 2023 Brake Disc 2022 Brake Disc 2021 Brake Disc 2020 Brake Disc 2019 Brake Disc 2018 Brake Disc 2017 Brake Disc 2016 Brake Disc 2015 Brake Disc 2014 Brake Disc 2013 Brake Disc 2012 Brake Disc 2011 Brake Disc 2010 Brake Disc 2009 Brake Disc 2008 Brake Disc 2007 Brake Disc