×
- Hello
- Login or Register
- Quick Links
- Live Chat
- Track Order
- Parts Availability
- RMA
- Help Center
- Contact Us
- Shop for
- Nissan Parts
- Nissan Accessories
My Garage
My Account
Cart
Genuine Nissan Versa Hood
Engine Hood- Select Vehicle by Model
- Select Vehicle by VIN
Select Vehicle by Model
orMake
Model
Year
Select Vehicle by VIN
For the most accurate results, select vehicle by your VIN (Vehicle Identification Number).
7 Hoods found


Nissan Versa Hood
Part Number: FEA00-9KKMA$395.93 MSRP: $610.05You Save: $214.12 (36%)Ships in 1-3 Business Days
Nissan Versa Hood Assembly
Part Number: FEA00-9KAMA$373.14 MSRP: $574.95You Save: $201.81 (36%)Ships in 1-2 Business DaysNissan Versa Hood (BOM)
Part Number: F5100-9KKMA$358.37 MSRP: $552.18You Save: $193.81 (36%)Ships in 1-3 Business Days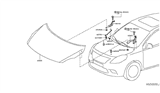
Nissan Versa Hood
Part Number: FEA00-3BAMA$373.14 MSRP: $574.95You Save: $201.81 (36%)Ships in 1-2 Business Days


Nissan Versa Hood
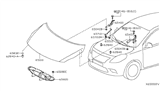
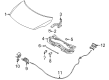
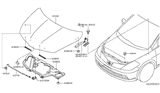
The Nissan Versa Hood is a strong but clever shield that protects the engine bay from road dirt, rain, and other debris while allowing the driver access to the engine for regular checks. The Hood has a rear hinge and opens up in such a way that the owner can easily change the oil or check the belts inside every Versa engine bay. The Hood can quickly lock back down and seal the compartment against harmful elements. The design and construction of the car are intended to deliver safety on impact, as the Hood panel is designed to crumple on impact. How does this increase safety? It helps absorb the impact; hence, it does not reach the vital organs or parts of the car. Across various model years, buyers primarily come across three material choices, giving the Hood its own identity. Steel versions of Hoods are traditionally sold as the tough option, but these add weight. Aluminum trims pounds to improve fuel economy and are more resistant to rust, while fiberglass gives a light feel and can be molded into more expressive shapes. No matter what the materials, every Hood aligns its smooth outer paint line with fenders to maintain the compact silhouette of the Nissan top-selling Versa hatch or sedan, keeping it clean and aerodynamic. Nissan's final component quietly protects performance mile after mile with these attributes.
If you need any OEM Nissan Versa Hood, feel free to choose them out of our huge selection of genuine Nissan Versa Hood. All our parts are offered at unbeatable prices and are supported by the manufacturer's warranty. In addition, we offer quick shipping to have your parts delivered to your door step in a matter of days.
Nissan Versa Hood Parts Questions & Experts Answers
- Q: How should you properly remove and install a hood while ensuring alignment and fit on Nissan Versa?A:The hood is relatively massive, at least in our particular plant, and removing/instaling it can be a bit cumbersome and strenuous; thus at least two persons are expected to handle this process. In the first step, blankets and pads should be used to cover the cowl area of the body and Fenders to prevent scratching the paint. On the hood hinge it is recommendable to place a mark or write on it to help demarcate where it should be placed when fixing it and detach any wire or cable that may hinder the removal of the same. Let an assistant hold one of the hoods while you hold the other; press down on the needed hinge-to-hood nuts while leaning on the hood. Remove the hood and, for mounting, do the reverse of the above instructions. For adjustment, the fore-and-aft and side-to-side alignment can be made by shifting the hinge plate slot when the bolts or nuts are loosened. Write a pen around the hinge plate to define the degree of freedom and then using an Allen key, remove the bolts or nuts and fix the hood in the right position before sliding the Allen key back to tighten the hinge bolts. If needed then entire Hood Latch assembly will be moved up and down as well as side to side on the radiator support to make it sure that the hood closes properly and aligns to the fenders. Place some paint around the hoghead latch mounting bolts and then loosen them, reposition the hood latch assembly and tighten around the mounting bolts again and do some fitment check. Lastly, correct alignment of the hood bumpers on the radiator support should bring the hood to the position where it touches the fender when closed while the hood latch assembly and hood hinges should be lubricated with white, lithium-base grease from time to time to minimize binding and wear of the components.


