×
- Hello
- Login or Register
- Quick Links
- Live Chat
- Track Order
- Parts Availability
- RMA
- Help Center
- Contact Us
- Shop for
- Nissan Parts
- Nissan Accessories
My Garage
My Account
Cart
Genuine Nissan Xterra Control Arm
Suspension Arm- Select Vehicle by Model
- Select Vehicle by VIN
Select Vehicle by Model
orMake
Model
Year
Select Vehicle by VIN
For the most accurate results, select vehicle by your VIN (Vehicle Identification Number).
22 Control Arms found


Nissan Xterra Link Complete-Front Suspension, Upper RH
Part Number: 54524-EA000$110.30 MSRP: $159.75You Save: $49.45 (31%)Ships in 1-2 Business Days


Nissan Xterra Front Suspension Link Complete Lower Right Hand
Part Number: 54500-EA00A$128.39 MSRP: $185.95You Save: $57.56 (31%)Ships in 1-2 Business Days


Nissan Xterra Link Complete-Front Suspension, Upper LH
Part Number: 54525-EA000$108.45 MSRP: $157.07You Save: $48.62 (31%)Ships in 1-3 Business Days


Nissan Xterra Link Complete Front Suspension, Lower Lh
Part Number: 54501-EA00A$110.70 MSRP: $160.32You Save: $49.62 (31%)


Nissan Xterra Front Suspension Link Complete Lower Right Hand
Part Number: 54500-9CD0A$128.39 MSRP: $185.95You Save: $57.56 (31%)Ships in 1-3 Business Days


Nissan Xterra Link Complete Front Suspension, Lower Lh
Part Number: 54501-9CD0A$110.70 MSRP: $160.32You Save: $49.62 (31%)Ships in 1-3 Business Days


| Page 1 of 2 |Next >
1-20 of 22 Results
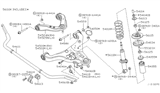
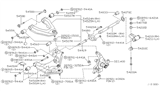
Nissan Xterra Control Arm
The Control Arm connects the frame of your Nissan Xterra to the front wheel assembly. This allows the front wheels to move up and down with the terrain. The Control Arm also supports your shock absorbers, springs, and sway bar. The Control Arm pivots on bushings where it joins the chassis. It then connects to the knuckle via bushings or a ball joint to create a hinge that guides the movement of the wheel and keeps it aligned. The Control Arm body transmits the suspension load to the chassis via the spring or shock absorber, which receives the load. Construction techniques for Control Arms include stamped steel, cast iron, or cast aluminum. All three construction techniques achieve a logical choice of shape and material to maximize strength while minimizing weight. Each Control Arm has bushings and ball joints that can wear and require servicing. The core body of any Control Arm is usually long-lasting. However, severe rust or impact can bend or weaken it, leading to a replacement. The function on a Nissan Xterra remains unchanged whether one or two arms are applied per wheel, providing a sturdy pivoting connection that allows the Nissan Xterra wheels to follow the road while the Nissan Xterra suspension maintains stable geometry.
If you need any OEM Nissan Xterra Control Arm, feel free to choose them out of our huge selection of genuine Nissan Xterra Control Arm. All our parts are offered at unbeatable prices and are supported by the manufacturer's warranty. In addition, we offer quick shipping to have your parts delivered to your door step in a matter of days.
Nissan Xterra Control Arm Parts Questions & Experts Answers
- Q: How to remove and install the upper control arm on Nissan Xterra?A:Loosen the wheel lug nuts, raise the front of the vehicle and support it securely on jackstands. Remove the wheel. Position a floor jack under the lower control arm in the area underneath the balljoint. Raise the jack slightly to take the spring pressure off the upper control arm. Remove the Shock Absorber. Mark the relationship of the adjusting cams to the brackets on the frame. To disconnect the upper control arm from the Steering Knuckle, remove the cotter pin, loosen the upper balljoint nut a few turns (don't remove it), install a balljoint separator and break the balljoint loose from the knuckle. Now remove the nut. If you don't have a press-type balljoint removal tool, a "pickle fork" type balljoint separator can be used, but keep In mind that this type of tool will probably destroy the balljoint boot. Remove the upper control arm pivot bolts and nuts, noting which way the bolts are installed. Remove the control arm. Position the arm in the frame brackets and install the bolts and nuts, but don't tighten them yet. Attach the balljoint to the steering knuckle and tighten the ballstud nut to the torque. Install a new cotter pin. If necessary, tighten the nut a little more to align the slots In the nut with the hole In the ballstud; don't loosen the nut to allow cotter pin insertion. Place a floor jack under the outer end of the lower control arm and raise it to simulate normal ride height. Make sure the marks you made on the adjustment cams prior to disassembly are aligned, then tighten the nuts to the torque. The remainder of installation is the reverse of removal. Tighten the wheel lug nuts to the torque. Have the front end alignment checked and, if necessary, adjusted.


