×
- Hello
- Login or Register
- Quick Links
- Live Chat
- Track Order
- Parts Availability
- RMA
- Help Center
- Contact Us
- Shop for
- Nissan Parts
- Nissan Accessories
My Garage
My Account
Cart
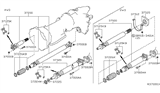
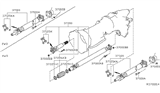
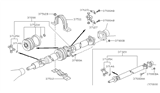
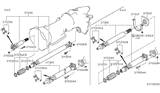
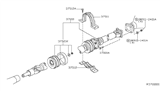
Genuine Nissan Xterra Drive Shaft
Axle Shaft- Select Vehicle by Model
- Select Vehicle by VIN
Select Vehicle by Model
orMake
Model
Year
Select Vehicle by VIN
For the most accurate results, select vehicle by your VIN (Vehicle Identification Number).
35 Drive Shafts found


Nissan Xterra Propeller Shaft
Part Number: 37200-ZZ70A$439.50 MSRP: $620.77You Save: $181.27 (30%)Ships in 1-3 Business Days


Nissan Xterra Shaft Rear PROPELLER
Part Number: 37300-ZL82A$688.44 MSRP: $972.37You Save: $283.93 (30%)Ships in 1-3 Business Days
Nissan Xterra PROPELLAR Shaft
Part Number: 37300-ZL80A$743.39 MSRP: $1049.98You Save: $306.59 (30%)Ships in 1-3 Business Days
Nissan Xterra Shaft Rear PROPELLER
Part Number: 37300-ZL81A$465.95 MSRP: $658.12You Save: $192.17 (30%)Ships in 1-3 Business Days


Nissan Xterra Shaft Assembly-Front PROPELLER
Part Number: 37200-9Z400$369.72 MSRP: $497.33You Save: $127.61 (26%)Ships in 1-3 Business Days
Nissan Xterra Shaft Assembly Propeller
Part Number: 37200-ZP90A$439.50 MSRP: $620.77You Save: $181.27 (30%)Ships in 1-3 Business Days


Nissan Xterra Shaft Assembly-Front PROPELLER
Part Number: 37200-7S100$439.50 MSRP: $620.77You Save: $181.27 (30%)Ships in 1-3 Business Days


Nissan Xterra Rear Propeller Shaft Assembly
Part Number: 37300-EA105$465.95 MSRP: $658.12You Save: $192.17 (30%)
Nissan Xterra Shaft Assembly Propeller
Part Number: 37000-ZL81B$640.06 MSRP: $904.03You Save: $263.97 (30%)Ships in 1-3 Business Days
Nissan Xterra Shaft Assembly Propeller
Part Number: 37000-7Z600$706.61 MSRP: $921.26You Save: $214.65 (24%)Ships in 1-3 Business DaysNissan Xterra Shaft Assembly Propeller
Part Number: 37000-ZL80A$481.89 MSRP: $628.28You Save: $146.39 (24%)Ships in 1-3 Business DaysNissan Xterra Shaft Rear PROPELLER
Part Number: 37300-ZP72A$688.44 MSRP: $972.37You Save: $283.93 (30%)Ships in 1-3 Business DaysNissan Xterra Rear Propeller Shaft Assembly
Part Number: 37300-EA115$688.44 MSRP: $972.37You Save: $283.93 (30%)Ships in 1-3 Business DaysNissan Xterra Rear Propeller Shaft Assembly
Part Number: 37300-EA100$743.39 MSRP: $1049.98You Save: $306.59 (30%)Ships in 1-3 Business DaysNissan Xterra Shaft Assembly Propeller
Part Number: 37000-ZP71A$640.06 MSRP: $904.03You Save: $263.97 (30%)Ships in 1-3 Business DaysNissan Xterra Shaft Assembly Propeller
Part Number: 37000-ZL81A$640.06 MSRP: $904.03You Save: $263.97 (30%)Ships in 1-3 Business DaysNissan Xterra Shaft Rear PROPELLER
Part Number: 37300-ZP70A$743.39 MSRP: $1049.98You Save: $306.59 (30%)Ships in 1-3 Business DaysNissan Xterra Propeller Shaft Assembly
Part Number: 37000-EA110$640.06 MSRP: $904.03You Save: $263.97 (30%)Nissan Xterra Shaft Rear PROPELLER
Part Number: 37300-ZP71A$465.95 MSRP: $658.12You Save: $192.17 (30%)Ships in 1-3 Business DaysNissan Xterra Shaft Assembly-Front PROPELLER
Part Number: 37200-4S100$369.72 MSRP: $497.33You Save: $127.61 (26%)
| Page 1 of 2 |Next >
1-20 of 35 Results
Nissan Xterra Drive Shaft
The Nissan Xterra Drive Shaft transfers rotational energy from the transmission or transfer case to the Xterra's axles that move it. Typically, a Drive Shaft is a hollow metal tube with yokes at either end holding on to flexible joints, usually universal joints, so that the shaft can pivot as the suspension rises and falls. A second Drive Shaft may join the transfer case to the front differential on four wheel drive Xterras, while double cardan or constant velocity joints can work out the steeper angles. Changing angles due to suspension travel are compensated for by flexible joints, but worn or seized joints will result in looseness, noise, and vibration. When there is an imbalance due to a dent or missing balance weight or due to mud on the Drive Shaft, then bouncing occurs, which increases in intensity with speed. If the operating angles are incorrect, then it shakes at a low speed. To ensure durability, the design of Nissan keeps the tube light to limit inertia yet at the same time strong enough to handle torsion and shear stress. A properly balanced and lubed Drive Shaft on your Nissan Xterra can enhance power transmission and everyday dependability.
If you need any OEM Nissan Xterra Drive Shaft, feel free to choose them out of our huge selection of genuine Nissan Xterra Drive Shaft. All our parts are offered at unbeatable prices and are supported by the manufacturer's warranty. In addition, we offer quick shipping to have your parts delivered to your door step in a matter of days.
Nissan Xterra Drive Shaft Parts Questions & Experts Answers
- Q: How to remove, inspect, and reinstall the drive shaft in a Nissan Xterra?A:Raise the vehicle and support it securely on jack stands. Place the transmission in Neutral with the parking brake off. Make reference marks on the driveshaft flange and the pinion flange in line with each other. If you're working on a1999 or later 2WD Pathfinder, also mark the front of the driveshaft to the transmission flange. Remove the rear universal joint nuts and bolts. If the vehicle has a two-piece driveshaft, unbolt the center support bearing from the cross member. Lower the rear of the driveshaft and slide the front of the driveshaft out of the transmission or transfer case. Wrap a plastic bag over the transmission or transfer case housing and hold it in place with a rubber band. Remove the plastic bag from the transmission or transfer case and wipe the area clean. Slide the front of the driveshaft into the transmission or transfer case or, if you're working on a 1999 or later 2WD Pathfinder, line up the match marks, install the bolts and tighten them to the torque. On models with a two-piece driveshaft, position the center support bearing on the cross member, install the fasteners and tighten them to the torque. Raise the rear of the driveshaft into position, checking to be sure the marks are in alignment. Install the bolts and nuts, tightening them to the torque. For 4WD models, mark the relationship of the driveshaft to the front differential companion flange and to the transfer case companion flange. Remove the bolts and nuts from the flanges, then lower the shaft from the vehicle. Attach the ends of the shaft to the differential and transfer case companion flanges, install the bolts and nuts and tighten them to the torque. Install the skid plate (if equipped).

Related Nissan Xterra Parts
 Nissan Xterra Lug Nuts
 Nissan Xterra Wheel Stud
 Nissan Xterra Torque Converter
 Nissan Xterra Wheel Bearing
 Nissan Xterra Wheel Seal
 Nissan Xterra Shift Cable
 Nissan Xterra Axle Shaft
 Nissan Xterra Wheel Hub
 Nissan Xterra Transmission Assembly
 Nissan Xterra Transfer Case
 Nissan Xterra Shift Indicator