×
- Hello
- Login or Register
- Quick Links
- Live Chat
- Track Order
- Parts Availability
- RMA
- Help Center
- Contact Us
- Shop for
- Nissan Parts
- Nissan Accessories
My Garage
My Account
Cart
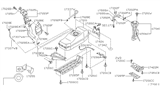
Genuine Nissan Xterra Fuel Tank
Gas Tank- Select Vehicle by Model
- Select Vehicle by VIN
Select Vehicle by Model
orMake
Model
Year
Select Vehicle by VIN
For the most accurate results, select vehicle by your VIN (Vehicle Identification Number).
11 Fuel Tanks found


Nissan Xterra Fuel Tank Assembly
Part Number: 17202-5S620$678.76 MSRP: $958.70You Save: $279.94 (30%)Ships in 1-3 Business Days

Nissan Xterra Fuel Tank Assembly
Part Number: 17202-5S610$678.76 MSRP: $958.70You Save: $279.94 (30%)Ships in 1-3 Business Days
Nissan Xterra Fuel Tank Assembly
Part Number: 17202-ZP00A$841.07 MSRP: $1187.95You Save: $346.88 (30%)Ships in 1-3 Business DaysNissan Xterra Fuel Tank Assembly
Part Number: 17202-EA000$841.07 MSRP: $1187.95You Save: $346.88 (30%)Ships in 1-3 Business DaysNissan Xterra Fuel Tank Assembly
Part Number: 17202-9Z520$678.76 MSRP: $958.70You Save: $279.94 (30%)Ships in 1-3 Business Days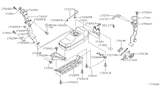
Nissan Xterra Fuel Tank Assembly
Part Number: 17202-7Z420$316.69 MSRP: $447.30Limited AvailabilityYou Save: $130.61 (30%)Nissan Xterra Fuel Tank Assembly
Part Number: 17202-7Z400$316.69 MSRP: $447.30Limited AvailabilityYou Save: $130.61 (30%)Nissan Xterra Fuel Tank Assembly
Part Number: 17202-5S810$316.69 MSRP: $447.30Limited AvailabilityYou Save: $130.61 (30%)Nissan Xterra Fuel Tank Assembly
Part Number: 17202-9Z500$678.76 MSRP: $958.70You Save: $279.94 (30%)Ships in 1-2 Business DaysNissan Xterra Fuel Tank Assembly
Part Number: 17202-7B400$797.43 MSRP: $1126.32You Save: $328.89 (30%)
Nissan Xterra Fuel Tank
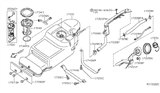
The Fuel Tank of Nissan Xterra is a vessel that safely stores liquid fuel. The Fuel Tank also stores vapor. The electric fuel pump and gauge sender are located inside the Fuel Tank. Internal baffles reduce slosh, keep fuel close to the pickup, and reduce noise. In the Nissan Xterra, it acts to prevent vapor escape as part of the evaporative emission control system component. The Fuel Tank must be a sealed reservoir and be able to hold pressure. The Fuel Tank's position under the rear of the Nissan opens up exposure to rain, snow, road salt, dirt, debris, and other durability issues. It can be fabricated from stamped and welded steel or aluminum sheets or created from blow-molded high-density polyethylene plastic, and each unit undergoes leak testing in the factory. There can be perforation of metal types due to external and internal corrosion. Plastic types can also crack owing to extreme temperatures, vibration, or impact. Overall, metal straps prone to corrosion are applied to suspend the Fuel Tank in every Xterra, and they must remain sound in the Nissan Xterra.
If you need any OEM Nissan Xterra Fuel Tank, feel free to choose them out of our huge selection of genuine Nissan Xterra Fuel Tank. All our parts are offered at unbeatable prices and are supported by the manufacturer's warranty. In addition, we offer quick shipping to have your parts delivered to your door step in a matter of days.
Nissan Xterra Fuel Tank Parts Questions & Experts Answers
- Q: How to safely remove a fuel tank from a Nissan Xterra?A:Before you take out the fuel tank, drain the pressure, disconnect the battery cable from the negative terminal, and pump the fuel into your approved container to move it off. Disconnect all leads related to the fuel pump and fuel level sending unit, then access the fuel tank on Xterra models by taking off the rear seat and fuel pump/fuel level sending unit cover. Jack up the vehicle and prop it so that it won't move during work. Detach and move aside the fuel filler tube protector and the fuel tank shield using the bolts at the front and back. Unclamp and take apart the fuel tank filler line and vapor line connections from their meeting point with the fuel filler neck and tank. Remove both the fuel supply and return pipes as well as the evaporative emissions canister hose. Put the floor jack under the tank with a wood planking between the jack pad and the tank, and lift it until it holds up the tank. Unbolt all bolts that hold the fuel tank in place, both the front and back bobble bolts. Move the jack down while helping the fuel tank exit the bottom of the vehicle, and take the tank off. When you change the tank or get it cleaned or fixed, make sure you do it correctly. Other tasks will be required when you remove and replace this fuel pump/sending unit. Since clean engine oil acts as a lubricant, simply push the gas line back over the fuel tank, just like you did when taking it off.


