×
- Hello
- Login or Register
- Quick Links
- Live Chat
- Track Order
- Parts Availability
- RMA
- Help Center
- Contact Us
- Shop for
- Nissan Parts
- Nissan Accessories
My Garage
My Account
Cart
Genuine Nissan Xterra Hood Latch
Engine Hood Latch- Select Vehicle by Model
- Select Vehicle by VIN
Select Vehicle by Model
orMake
Model
Year
Select Vehicle by VIN
For the most accurate results, select vehicle by your VIN (Vehicle Identification Number).
2 Hood Latches found


Nissan Xterra Hood Lock Male Assembly
Part Number: 65601-EA500$57.07 MSRP: $90.16You Save: $33.09 (37%)Ships in 1-2 Business Days


Nissan Xterra Hood Latch
The term "Hood Latch" refers to the closure device that secures the vehicle's hood in the closed position. The Nissan Xterra Hood Latch protects the engine bay from accidental opening. Moreover, it prevents water and other contaminants from getting inside and keeps the engine bay safe from unauthorized access. The mechanism is mounted underneath the front edge of the hood and works with an interior release handle, the release cable, and the latch assembly itself to form a locking system that restrains the panel until the driver pulls on the cabin handle. The Hood Latch is the first line of defense against theft as it prevents the removal of parts and is also a safety feature that prevents the hood from striking the windshield or blocking vision at highway speeds. The Hood Latch incorporates a catch and spring arrangement built to original dimensions, opening easily for service while providing strong retention on every Nissan Xterra. The premium versions may use steel, plastic housing, and lock cylinders featuring plate tumbler sidebars or stainless shutters to keep dirt and moisture out of all Nissan Xterra applications. Regular inspection of the Hood Latch promotes reliable closure. Also, replacing a worn Hood Latch restores factory-level security for the Nissan Xterra.
If you need any OEM Nissan Xterra Hood Latch, feel free to choose them out of our huge selection of genuine Nissan Xterra Hood Latch. All our parts are offered at unbeatable prices and are supported by the manufacturer's warranty. In addition, we offer quick shipping to have your parts delivered to your door step in a matter of days.
Nissan Xterra Hood Latch Parts Questions & Experts Answers
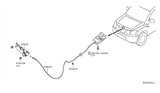
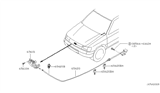
- Q: How to replace the hood cable and hood latch on the Nissan Xterra?A:Remove the bolts and detach the latch assembly. Loosen the hood latch bolts, then move the latch as necessary to adjust the hood-closed position. Unhook the spring and pry the cable end from the latch. To disconnect the cable from the hood latch mechanism, disengage the cable housing end from the slot in the latch and twist the cable end out of the latch arm. Installation is the reverse of removal. Adjust the latch so the hood engages securely when closed and the hood Bumpers are slightly compressed. Disconnect the release cable from the hood latch assembly. Unclip the release cable from the engine wiring harness. Attach a length of wire to the cable to assist with the installation of the new cable. Working in the passenger compartment, remove the driver's kick panel or the knee bolster. On some models the hood release handle and cable are a one-piece design and must be replaced as a unit. Hood release handle and cable mounting bolts-one piece design. On other models the hood release cable is a two-piece design. It can be removed from the handle by using pliers to pull the cable housing end from the tab on the handle frame and rotating the cable end from the slot on the handle. If the handle assembly itself must be replaced, detach the cable as described above and simply remove the mounting bolts to remove the handle. Trace the cable forward to the grommet where the cable goes through the firewall and pry the grommet out of the firewall. Pull the handle and cable rearward into the passenger compartment. Disconnect the guide wire from the old cable and fasten it to the new cable. With the new cable attached to the wire, pull the wire back through the firewall until the new cable reaches the latch assembly. Make sure that the grommet is properly seated on both sides of the hole in the firewall. Push on the grommet with your fingers from the passenger compartment side to seat the grommet in the firewall correctly. The remainder of installation is the reverse of removal.


