My Garage
Cart
Make sure this part fits

Nissan 13501-40F81 Front Cover Assembly

1989-1997 Nissan 1350140F81

Customer Questions & Expert Answers (3)
13501-40F81 Nissan Front Cover Assembly Product Photo 1 of 1
  • Part Description
    Cover Assembly-Front,Timing Chain
  • Lookup Code
    13035
  • Position
    Front
  • Replaces
    13501-40F00, 13501-40F80
  • Manufacturer
    Nissan
  • Manufacturer's Notes
    This part is discontinued.
Make sure this part fits
  • Related Parts
  • Product Specifications
  • Vehicle Fitment
  • Customer Questions & Expert Answers
  • Product Specifications

    BrandGenuine Nissan
    Lookup Code13035
    Manufacturer Part Number13501-40F81
    Part DescriptionCover Assembly-Front,Timing Chain
    Other NamesFront Cover, Timing Cover
    Item Dimensions5.4 x 11.5 x 13.9 inches
    Item Weight5.90 Pounds
    PositionFront
    ConditionNew
    Fitment TypeDirect Replacement
    Replaces13501-40F00, 13501-40F80
    ManufacturerNissan
    SKU13501-40F81
    WarrantyThis genuine Nissan part is guaranteed by Nissan's factory warranty.
    Shipping & ReturnShipping Policy Return Policy
    Warning: California's Proposition 65
  • Vehicle Fitment

    Year Make Model Trim & Engine Important vehicle option details
    1989-1991 Nissan 240SX4 Cyl 2.4LKA24E
    1989-1994 Nissan Hardbody Pickup (D21)DX|4 Cyl 2.4LKA24E
    1995-1997 Nissan Hardbody Pickup (D21U)Long Body XE, Short Body XE|4 Cyl 2.4LKA24E
  • Customer Questions & Expert Answers

    Q:
    Will this part fit my car? Posted by NissanPartsDeal Specialist
    A:
    You can Select Your Vehicle to check if 13501-40F81 fits your vehicle.
    Posted by NissanPartsDeal Specialist
    Q:
    How to remove and install the front Timing Cover on Nissan 240sx? Posted by Customer
    A:
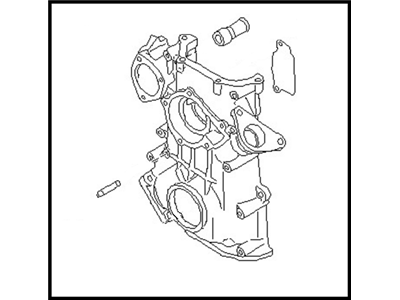
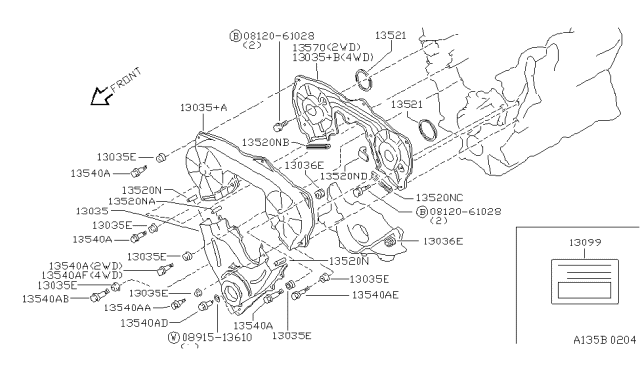
    For various Nissan engines, remove and install the front cover,first by disconnecting the negative battery cable, draining coolant, and removing the radiator with upper and lower hoses. Loosen the adjusting screw for the alternator drive belt and remove it, then take away the alternator bracket bolts to free up room for the alternator. Distributor removal can be done if necessary. Removing the oil pump attaching screws will result in removal of both pump and its drive spindle. After taking out cooling fan pulley, fan pulley and drive belt, one can now proceed to remove water pump crankshaft pulley bolt and then remove crankshaft pulley. Take out screws that hold front cover on front end of cylinder block, front of oil pan to bottom of front cover and through down into top of front cover; there are also other bolts for that purpose too. Carefully pry off front cover from engine. When installing new gaskets for oil pan as well as top front cover make sure they are applied with sealer in correct position on engine. Lightly grease crankshaft oil seal before fitting front cover with care. Then tighten all bolts back to their torque accordingly including all those attaching oil pan together with installing the same after priming up with oil followed by pumping it properly into place. Install new gasket on water pump followed by mounting water pump onto engine along with tightening crankshaft pulley bolt; then finally reassemble everything else removed such as distributor, alternator, drive belts and radiator amongst others. Finish by reconnecting upper and lower radiator hoses followed by refilling cooling system, reconnecting negative battery cable/start engine/check ignition timing/inspect for leaks as appropriate etc. For KA24DE engine on 240SX model these include draining engine oil or coolant, supporting vehicle safely & removing cylinder head assembly. Take off No 1 piston at TDC compression stroke then unbolt air conditioning compressor drive belts; alternator drive belts; power steering pump; compressor idler pulley; crankshaft pulley; oil pump; rocker arm cover and oil pan. The front cover bolts are removed, making sure that the front cover is carefully pried off from the head and block surface. Clean surfaces, replace oil seals in block then install as described above including installing new rubber plugs into timing cover oil seal holes and carefully fitting the front cover. Reassemble components, refill fluids, and tune engine, if necessary.
    Posted by NissanPartsDeal Specialist
    Q:
    How to remove and install the timing belt and Timing Cover on Nissan 240sx? Posted by Customer
    A:
    When removing and reinstalling the timing belt in various engines, first disconnect the battery ground cable and relieve fuel pressure. On CA20E engine, remove air intake ducts and on 1987 VG30E engine remove engine undercovers, drain coolant. Remove the front right side wheel and tire assembly as well as the engine side cover. Also, remove the engine coolant reservoir tank, radiator hoses, as well as remove the A.S.C.D (speed control device). Next, remove all of the engine's drive belts that includes power steering drive belt which might require loosening of idler pulley from right side wheel housing. Remove idler bracket of compressor drive belt and crankshaft pulley. Set No 1 cylinder to TDC on compression stroke before carrying out Timing Belt Removal then we need to take off front upper and lower timing belt covers. Loosen timing belt tensioner and return spring then take out timing belt itself. When installing a new one examine it carefully for any cracks or breaks. Install belt tensioner and return spring ensuring number one cylinder is at TDC on compression. Making sure that tensioner bolts are not tightly secured before you install the drive belts. Place the timing belt into position aligning its timing marks with punch marks found on camshaft pulleys and crankshaft pulley respectively. Ensure that arrow marked on belt points towards front belt covers. Tighten up the bolt holding together spring and tensioner making sure that tensioner pully turns smoothly as desired so that this can be realized no matter what type of car has been used since fasteners will have different specifications for each model car or truck under consideration here specifically in context with this section where after rotating crankshaft two turns clockwise both bolts must be tightened down achieving proper tension thereby requiring installation of upper lower covers followed by adjustment of all driving belts if necessary; however, while dealing with 1988 model year VG30E engine there are some slight differences in the sequence with timing belt installation and adjustment thereof. For a Stanza with a CA series engine, start by disconnecting battery cables, remove upper and lower alternator securing bolts to allow belt removal. Loosen the idler pulley locknut and adjust air conditioner compressor belt. Also, remove crankshaft pulley, alternator belts, crankshaft damper; water pump pulley; upper and lower timing belt covers with their gaskets if they are good otherwise replace them. To install these components tighten front cover bolts, crank pulley damper bolt crank pulley bolt and water pump pulley bolts at their specified values after which adjust and install all drive belts before connecting battery cables then finally start engine. For instance while carrying out replacement of timing belt or crankshaft oil seal first see to it that No 1 piston is at TDC on compression stroke but you may as well have to take off spark plug so as not forget position of timing marks on camshaft sprocket belt as well as crank shaft sprocket too before you begin just loosen or remove timing belt tensioner marking direction of belt rotation once it is removed from sprockets front oil seal should be stripped out from its mounting area which involves pulling off crank shaft sprocket then carefully prying new seals out for cleaning surface where old ones were placed inside along with replacing broken or damaged parts such as all component does not only include seal alone but also other related items including tensioner itself therefore should be torqued in order maintain proper tightness between this piece as well ensure no leakage occurs through these areas which usually get worn overtime culminating into major problems if not addressed promptly by repair technicians like yours who might know how much go about doing job quickly without causing any additional damages caused during removal process though some fastener specifications could vary depending make model vehicle concerned here especially when reinstalling cover other previous steps hopefully gone smoothly but just to make sure timing is right then road test your vehicle so that it runs smoothly once again after all has been done.
    Posted by NissanPartsDeal Specialist
    If you have any questions about this product, please don't hesitate to ask us. We will be happy to help you!

Genuine Nissan Part 13501-40F81, the Right Choice

To ensure reliability, purchase Nissan part # 13501-40F81 Front Cover Assembly. It can be referred to as Timing Cover. The first option would be to use OEM parts. Designed by Nissan manufacturer and are produced with stringent factory specifications, undergoing the quality control procedures. This part fits 1989-1991 240SX, 1989-1994 Hardbody Pickup (D21), 1995-1997 Hardbody Pickup (D21U).

NissanPartsDeal.com is a leading supplier of genuine Nissan parts and accessories, such as 1350140F81 Front Cover Assembly. Welcome to our vast selection of competitively priced genuine Nissan parts available online. We provide each OEM part with a manufacturer's warranty and a straightforward return policy. Place your order now and receive your parts quickly, shipped directly to your doorstep.

Why choose Nissan Parts Deal

  • Dedicated Service

    Your complete satisfaction is our #1 goal

  • Lowest Prices

    Best deals on genuine OE parts from dealerships

  • Fast Delivery

    Orders are processed and delivered promptly