×
- Hello
- Login or Register
- Quick Links
- Live Chat
- Track Order
- Parts Availability
- RMA
- Help Center
- Contact Us
- Shop for
- Nissan Parts
- Nissan Accessories
My Garage
My Account
Cart
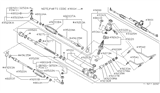
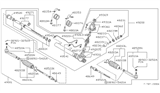
Genuine Nissan 240SX Tie Rod End
Steering Rod End- Select Vehicle by Model
- Select Vehicle by VIN
Select Vehicle by Model
orMake
Model
Year
Select Vehicle by VIN
For the most accurate results, select vehicle by your VIN (Vehicle Identification Number).
3 Tie Rod Ends found


Nissan 240SX Socket Kit-Tie Rod Outer
Part Number: 48520-15U25$100.03 MSRP: $144.87You Save: $44.84 (31%)Ships in 1-3 Business Days

Nissan 240SX Tie Rod End
The steering rack is connected to the steering knuckle by the Nissan 240SX Tie Rod End. It allows force to be transmitted to the wheels as the driver turns the steering wheel. The steering rack end is connected to an inner Tie Rod End as well as an outer Tie Rod End. This is how the steering mechanism has a joint that is able to move allowing the rack gear to slide but while remaining at a steady angle to the knuckle. This joint keeps wheel alignment steady, which helps keep handling predictable and the wheels stable on the ground. A properly functioning joint helps maintain factory 240SX geometry and tread contact with the road. As the steering wheel turns, the column drives a pinion that slides the rack sideways; the sliding motion is carried through the Tie Rod End assembly to angle the wheels. The Nissan steering linkage may wear excessively, resulting in looseness, binding, or poor return. Likewise, a solid Nissan 240SX steering component results in precise steering feel. The Tie Rod End is the last mechanical connection between the wheel and steering gear, making the right Nissan 240SX Tie Rod End an important choice despite the presence of hydraulic or electric power assistance on the wheel.
If you need any OEM Nissan 240SX Tie Rod End, feel free to choose them out of our huge selection of genuine Nissan 240SX Tie Rod End. All our parts are offered at unbeatable prices and are supported by the manufacturer's warranty. In addition, we offer quick shipping to have your parts delivered to your door step in a matter of days.
Nissan 240SX Tie Rod End Parts Questions & Experts Answers
- Q: How to remove and install a tie rod end on Nissan 240sx?A:Support the front part of your vehicle with jackstands while raising it, then take off the wheel. Use your hand to feel for the tied rod end that is loose and damaged while it still has fabric wrapping on the Ball Joint. Unscrew the cotter pin, add the tie rod ball joint, note where your steering linkage sits, then move on. Loosen the tie rod-to-steering gear locknut. Unfasten the Steering Knuckle's tie rod ball joint by fitting the ball joint remover perfectly shaped tool HT72520000, or your equivalent solution. Free up the locknut and remove the tie rod end from the tie rod. Remember to count how many times it turns completely. Position the new tie rod end when putting it back on your car, just like you took off the old end, keeping it in the same spot compared to your steering connection. Slide the ball joint and nut in place, tighten them, and insert a fresh cotter pin. Then tighten the ball joint stud nut exactly as specified. When checking front wheel alignment, make sure you know the recommended torque for attaching steering knuckle to tie rod end. On a 240SX, the correct torque range is between 22 and 36 foot-pounds. Also, replace any broken pin and nut connectors.


