×
- Hello
- Login or Register
- Quick Links
- Live Chat
- Track Order
- Parts Availability
- RMA
- Help Center
- Contact Us
- Shop for
- Nissan Parts
- Nissan Accessories
My Garage
My Account
Cart
Genuine Nissan 300ZX Brake Master Cylinder
- Select Vehicle by Model
- Select Vehicle by VIN
Select Vehicle by Model
orMake
Model
Year
Select Vehicle by VIN
For the most accurate results, select vehicle by your VIN (Vehicle Identification Number).
15 Brake Master Cylinders found


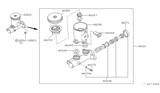


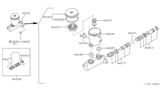

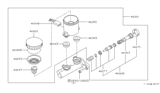
Nissan 300ZX Brake Master Cylinder
This Brake Master Cylinder is one of the prominent braking systems, widely applied for the different models of Nissan 300ZX. This critical part translates the pressure applied by the driver's foot into hydraulic pressure so that the braking system works as intended and to the required standard. The Brake Master Cylinder is usually of the dual circuit, two-piston type, which improves on safety because even if one circuit is damaged, good braking is still possible. The attachment compatibility to various 300ZX models such as the ones with integrated or even expatriate fluid container display flexibility. The integral reservoirs, though usually constructed of cast iron are far more rigid as are the nylon or plastic external versions though are easier to clean. Leak and moisture check up is mandatory and it is emphasized that Brake Master Cylinder affects the vehicle's brake function longevity. This Nissan 300ZX specific part, the Brake Master Cylinder, has some distinct features which put it above other competitor products found in the automotive market, namely corrosion resistant materials and precise hydraulic control, thus giving the driver a better driving experience. The Brake Master Cylinder also promotes braking efficiency as well as safety of this model and therefore its importance cannot be underestimated among the Nissan 300ZX clients inclusive of the spirited up graders and the regular users. Due to these outstanding features, the Brake Master Cylinder continues to be an important component of Nissan 300ZX to this date.
If you need any OEM Nissan 300ZX Brake Master Cylinder, feel free to choose them out of our huge selection of genuine Nissan 300ZX Brake Master Cylinder. All our parts are offered at unbeatable prices and are supported by the manufacturer's warranty. In addition, we offer quick shipping to have your parts delivered to your door step in a matter of days.
Nissan 300ZX Brake Master Cylinder Parts Questions & Experts Answers
- Q: How to disconnect and replace the Brake Master Cylinder on the Nissan 300ZX?A:Disconnect the negative cable at the battery and place it out of the way to prevent accidental contact with the negative terminal. Place newspapers or rags under the Brake Master Cylinder to catch any leaking brake fluid, then disconnect the low fluid level sensor electrical connector. Use a flare nut wrench to loosen the nuts securing the Brake Lines to the Brake Master Cylinder and remove the two nuts securing the Brake Master Cylinder to the vacuum servo unit. Carefully lift the cylinder off the mounting studs, remove the brake lines, and immediately cover the holes to prevent fluid leakage before lifting the cylinder out of the engine compartment. Plug the fluid lines to prevent further leakage. Before installing the new Brake Master Cylinder, bench bleed it by mounting it in a vice, ensuring not to clamp too tightly. Insert threaded plugs into the brake line outlet holes and snug them down to prevent air leakage. Fill the reservoir with the recommended brake fluid, then remove one plug and push the piston assembly into the Brake Master Cylinder bore to expel air, using a large Phillips screwdriver if necessary. Replace the plug before releasing pressure on the piston assembly and repeat until only brake fluid is expelled. An alternative method involves covering the hole with a finger instead of replacing the plug, allowing brake fluid to be drawn in before depressing the piston again. After completing the bleeding for one outlet, replace the plug and snug it before moving to the other port. Install the Brake Master Cylinder onto the vacuum servo retaining studs and fasten it, then attach the fluid lines using a flare nut wrench and reconnect the low fluid level sensor electrical connector. Top up the fluid level in the Brake Master Cylinder reservoir between the Max and Min marks, bleed the entire brake system, and remove the newspapers from underneath the Brake Master Cylinder, taking care not to drip fluid on painted surfaces. Finally, reconnect the negative ground cable at the battery.

Related Nissan 300ZX Parts
 Nissan 300ZX Brake Booster
 Nissan 300ZX Master Cylinder Repair Kit
 Nissan 300ZX Brake Fluid Pump
 Nissan 300ZX Brake Fluid Level Sensor
Browse by Year
1996 Brake Master Cylinder 1995 Brake Master Cylinder 1994 Brake Master Cylinder 1993 Brake Master Cylinder 1992 Brake Master Cylinder 1991 Brake Master Cylinder 1990 Brake Master Cylinder 1989 Brake Master Cylinder 1988 Brake Master Cylinder 1987 Brake Master Cylinder 1986 Brake Master Cylinder 1985 Brake Master Cylinder 1984 Brake Master Cylinder