×
- Hello
- Login or Register
- Quick Links
- Live Chat
- Track Order
- Parts Availability
- RMA
- Help Center
- Contact Us
- Shop for
- Nissan Parts
- Nissan Accessories
My Garage
My Account
Cart
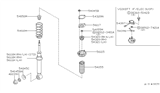
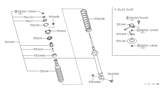
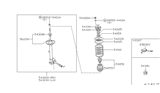
Genuine Nissan 300ZX Shock Absorber
Suspension Shock Absorber- Select Vehicle by Model
- Select Vehicle by VIN
Select Vehicle by Model
orMake
Model
Year
Select Vehicle by VIN
For the most accurate results, select vehicle by your VIN (Vehicle Identification Number).
43 Shock Absorbers found


Nissan 300ZX Shock Absorber Kit
Part Number: 56110-33P86$217.21 MSRP: $409.87You Save: $192.66 (48%)Ships in 1-2 Business DaysNissan 300ZX Shock Absorber Kit
Part Number: 56110-33P85$290.19 MSRP: $409.87You Save: $119.68 (30%)Nissan 300ZX Shock Absorber Kit
Part Number: 56110-33P26$290.19 MSRP: $409.87You Save: $119.68 (30%)Nissan 300ZX Shock Absorber Kit
Part Number: 56110-33P25$290.19 MSRP: $409.87You Save: $119.68 (30%)


| Page 1 of 3 |Next >
1-20 of 43 Results
Nissan 300ZX Shock Absorber
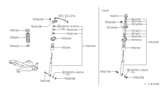
The Nissan 300ZX Shock Absorber assists in controlling the motion of the suspension. It uses a hydraulic piston to convert the motion into heat and allows the vehicle not to bounce on uneven surfaces on the road. One Shock Absorber works with coil springs to limit bounce and reduce body roll in corners while curbing nose dive when braking. The 300ZX has a reputation for predictable handling and ride comfort. The internal valves control the flow of fluid thousands of times over short distances; consequently, wear can develop even though one may not observe leakage. Symptoms of internal valve wear include a harsh ride, suspension bottoming, or cupped tires. Each Shock Absorber is housed in a sealed body. If a boot is torn, dirt can score the shaft, damaging the upper hydraulic seal. A bumper around the top prevents full compression of the suspension. The upper strut mount possesses a bearing that allows the unit to pivot with the wheels. It holds the spring and, because of the bonded rubber, insulates noise. This gives the Nissan 300ZX smooth steering. Replacing a fatigued Shock Absorber restores the original Nissan 300ZX ride quality. A good Shock Absorber is essential.
If you need any OEM Nissan 300ZX Shock Absorber, feel free to choose them out of our huge selection of genuine Nissan 300ZX Shock Absorber. All our parts are offered at unbeatable prices and are supported by the manufacturer's warranty. In addition, we offer quick shipping to have your parts delivered to your door step in a matter of days.
Nissan 300ZX Shock Absorber Parts Questions & Experts Answers
- Q: How to replace a shock absorber on Nissan 300ZX?A:Raise the vehicle and support it with jackstands under the spring seat stays to bear the weight of the suspension arm after removing the shock absorber. Remove the wheel and then take out the bolt securing the shock absorber to the spring seat stay. Access the top of the shock absorber by removing the speaker cover from the rear compartment and take off the shock absorber mounting insulator nuts, pushing down on the stud bolts to release the insulator. For adjustable shock models, disconnect the electrical connector. Use a wrench to hold the shock absorber piston rod while removing the top nut with a socket. Work the bottom of the shock absorber out of the spring seat stay and lower it from the vehicle, noting the sequence of the insulator dust cover and washers, as well as the sub-harness location if applicable. Install the new shock absorber, ensuring the insulator and cover are in the correct order, and insert the top through the opening, reconnecting the electrical connector if equipped. Let the mounting insulator hang down, hold the piston with a wrench, and install the rod top bolt. Install the lower shock absorber to spring seat stay bolt and loosely tighten the nut before replacing the wheel. Remove the jackstands and lower the vehicle, then tighten the bottom shock absorber retainer and replace the speaker cover.


