×
- Hello
- Login or Register
- Quick Links
- Live Chat
- Track Order
- Parts Availability
- RMA
- Help Center
- Contact Us
- Shop for
- Nissan Parts
- Nissan Accessories
My Garage
My Account
Cart
Genuine Nissan Armada Control Arm
Suspension Arm- Select Vehicle by Model
- Select Vehicle by VIN
Select Vehicle by Model
orMake
Model
Year
Select Vehicle by VIN
For the most accurate results, select vehicle by your VIN (Vehicle Identification Number).
57 Control Arms found


Nissan Armada Front Suspension Link Complete Lower Right Hand
Part Number: 54500-ZQ00A$168.74 MSRP: $249.85You Save: $81.11 (33%)Ships in 1-2 Business Days


Nissan Armada Link Complete-Rear Suspension Lower,Front
Part Number: 551A0-ZQ00A$183.48 MSRP: $271.68You Save: $88.20 (33%)Ships in 1-3 Business Days


Nissan Armada Link Complete-Rear Suspension Lower,Front
Part Number: 551A1-ZQ00A$190.82 MSRP: $282.55You Save: $91.73 (33%)Ships in 1-3 Business Days

Nissan Armada Link Complete-Front Suspension, Lower LH
Part Number: 54501-ZQ00A$168.74 MSRP: $249.85You Save: $81.11 (33%)Ships in 1-2 Business Days


Nissan Armada Link Complete-Front Suspension, Upper LH
Part Number: 54525-ZQ00A$181.89 MSRP: $269.32You Save: $87.43 (33%)Ships in 1-2 Business Days


Nissan Armada Link Complete-Front Suspension, Upper RH
Part Number: 54524-ZQ00A$150.55 MSRP: $222.92You Save: $72.37 (33%)Ships in 1-2 Business Days

Nissan Armada Front Suspension Link Complete Lower Right Hand
Part Number: 54500-1LA0D$213.82 MSRP: $316.60You Save: $102.78 (33%)Ships in 1-3 Business Days


Nissan Armada Link Complete-Front Suspension, Upper RH
Part Number: 54524-7S000$155.72 MSRP: $230.57You Save: $74.85 (33%)Ships in 1-3 Business Days

Nissan Armada Link Complete-Front Suspension, Lower LH
Part Number: 54501-1LA0D$213.82 MSRP: $316.60You Save: $102.78 (33%)Ships in 1-3 Business Days

Nissan Armada Link Complete-Rear Suspension Lower,Front
Part Number: 551A0-7S001$183.48 MSRP: $271.68You Save: $88.20 (33%)Ships in 1-3 Business Days


Nissan Armada Link Complete-Front Suspension, Upper RH
Part Number: 54524-ZC30A$150.55 MSRP: $222.92You Save: $72.37 (33%)Ships in 1-3 Business Days

Nissan Armada Rear Suspension Arm Left Hand
Part Number: 55502-1LA0A$217.68 MSRP: $322.32You Save: $104.64 (33%)Ships in 1-3 Business Days

Nissan Armada Arm, Rear Suspension
Part Number: 55501-1LA0A$216.64 MSRP: $320.78You Save: $104.14 (33%)Ships in 1-3 Business Days


Nissan Armada Link Complete-Front Suspension, Upper LH
Part Number: 54525-7S000$155.72 MSRP: $230.57You Save: $74.85 (33%)Ships in 1-3 Business Days


Nissan Armada Link Complete-Front Suspension Upper, Lh
Part Number: 54525-ZC30A$181.89 MSRP: $269.32You Save: $87.43 (33%)Ships in 1-3 Business Days

Nissan Armada Link Complete-Rear Suspension Lower,Rear
Part Number: 551B0-5ZA0A$133.02 MSRP: $192.65You Save: $59.63 (31%)Ships in 1-3 Business Days


Nissan Armada Link Complete-Rear Suspension Lower,Front
Part Number: 551A1-7S001$190.82 MSRP: $282.55You Save: $91.73 (33%)Ships in 1-3 Business Days

Nissan Armada Link COMPL - Rear Suspension Lower, Rear
Part Number: 551B0-5ZA1A$133.02 MSRP: $192.65You Save: $59.63 (31%)Ships in 1-3 Business DaysNissan Armada Link Complete-Front Suspension Upper
Part Number: 54524-1LA0A$181.89 MSRP: $269.32You Save: $87.43 (33%)Ships in 1-3 Business Days
Nissan Armada Rear Suspension Arm Assembly Left Hand
Part Number: 55502-5ZA0A$217.68 MSRP: $322.32You Save: $104.64 (33%)Ships in 1-3 Business Days
| Page 1 of 3 |Next >
1-20 of 57 Results
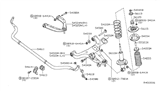
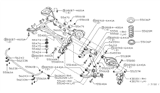
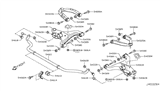
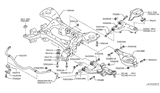
Nissan Armada Control Arm
The frontal assemblies of the Nissan Armada Control Arm connect the vehicle frame to each front wheel assembly. It oscillates with the action of the springs. It is attached to the chassis with rubber bushings. It connects the knuckle through a bushing or ball joint. This creates a pivot between the knuckle and the chassis. The pivot allows vertical wheel movement. However, it restricts undesirable front to rear movement. The arm also provides attachment sites for springs, shocks, and sway bars. It carries suspension loads of the spring or shock absorber, such as MacPherson strut or torsion bar systems. Many Nissan Control Arm units are generally stamped from steel, while some are cast from iron or aluminum to add strength and reduce weight. This component is tough and remains durable, with bushings and ball joints being the main wear items. A damaged Control Arm may allow excess play and noise. Regular checks of the Control Arm help identify issues. On the Nissan Armada, timely replacement helps keep the Armada suspension responsive, while a replacement Control Arm helps support safe, stable handling for every Nissan driver.
If you need any OEM Nissan Armada Control Arm, feel free to choose them out of our huge selection of genuine Nissan Armada Control Arm. All our parts are offered at unbeatable prices and are supported by the manufacturer's warranty. In addition, we offer quick shipping to have your parts delivered to your door step in a matter of days.
Nissan Armada Control Arm Parts Questions & Experts Answers
- Q: How to remove and install the lower control arm on an Nissan Armada equipped with rear auto-leveling suspension?A:On Armada models equipped with a rear auto-leveling suspension, turn the ignition key to the OFF position before raising the vehicle. The manufacturer recommends using new locknuts on the control arm pivot bolts and the bat/joint pinch bolt during installation. Loosen the wheel lug nuts, raise the vehicle and support it securely on jackstands placed under the frame rails. Remove the wheel. If you're working on a 4WD model, remove the driveaxle. Detach the stabilizer bar link from the lower control arm. Remove the shock absorber lower mounting bolt. To remove the lower control arm, remove the pinch-bolt securing the lower balljoint, then use a small puller, or equivalent, to push the ballstud out of the control arm. It's also possible to pry the control arm from the Steering Knuckle to separate them. Mark the positions of the lower control arm pivot fasteners on both sides relative to the frame, then hold the bolts and remove the locknuts and discard them. Carefully inspect the control arm bushings for hardening, excessive wear and cracks. If they appear to be worn or deteriorated, replace the control arm. Installation is the reverse of removal. Use new locknuts for the balljoint pinch-bolt and the control arm pivot bolts. Align the marks made, then tighten all fasteners. Have the front wheel alignment checked and, if necessary, adjusted.

Related Nissan Armada Parts
 Nissan Armada Control Arm Bushing
 Nissan Armada Shift Cable
 Nissan Armada Axle Beam
 Nissan Armada Control Arm Shaft Kit
 Nissan Armada Radius Arm
 Nissan Armada Radius Arm Bushing
 Nissan Armada Trailing Arm
Browse by Year
2025 Control Arm 2024 Control Arm 2023 Control Arm 2022 Control Arm 2021 Control Arm 2020 Control Arm 2019 Control Arm 2018 Control Arm 2017 Control Arm 2015 Control Arm 2014 Control Arm 2013 Control Arm 2012 Control Arm 2011 Control Arm 2010 Control Arm 2009 Control Arm 2008 Control Arm 2007 Control Arm 2006 Control Arm 2005 Control Arm 2004 Control Arm