×
- Hello
- Login or Register
- Quick Links
- Live Chat
- Track Order
- Parts Availability
- RMA
- Help Center
- Contact Us
- Shop for
- Nissan Parts
- Nissan Accessories
My Garage
My Account
Cart
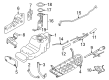
Genuine Nissan Armada Fuel Pump
Gas Pump- Select Vehicle by Model
- Select Vehicle by VIN
Select Vehicle by Model
orMake
Model
Year
Select Vehicle by VIN
For the most accurate results, select vehicle by your VIN (Vehicle Identification Number).
15 Fuel Pumps found


Nissan Armada Electric In Tank Fuel Pump
Part Number: 17040-ZV60B$467.81 MSRP: $714.00You Save: $246.19 (35%)Ships in 1-3 Business Days
Nissan Armada Complete Fuel Pump
Part Number: 17040-7S000$454.87 MSRP: $694.25You Save: $239.38 (35%)Ships in 1-3 Business Days


Nissan Armada Complete Fuel Pump
Part Number: 17040-7S00A$454.87 MSRP: $694.25You Save: $239.38 (35%)Ships in 1-3 Business Days


Nissan Armada In Tank Fuel Pump
Part Number: 17040-3ZD0B$681.80 MSRP: $963.00You Save: $281.20 (30%)Ships in 1-3 Business Days


Nissan Armada Complete Fuel Pump
Part Number: 17040-ZE00B$456.54 MSRP: $696.80You Save: $240.26 (35%)Ships in 1-3 Business Days

Nissan Armada Complete Fuel Pump
Part Number: 17040-ZH000$467.81 MSRP: $714.00You Save: $246.19 (35%)Ships in 1-3 Business Days

Nissan Armada Complete Fuel Pump
Part Number: 17040-ZE00A$456.54 MSRP: $696.80You Save: $240.26 (35%)Ships in 1-3 Business Days
Nissan Armada Pump Assy-Fuel, High Pressure
Part Number: 16630-1LA1A$781.57 MSRP: $1202.12You Save: $420.55 (35%)Ships in 1-3 Business DaysNissan Armada Complete Fuel Pump
Part Number: 17040-ZQ60C$456.54 MSRP: $696.80You Save: $240.26 (35%)Ships in 1-3 Business Days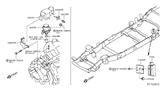
Nissan Armada High Pressure Fuel Pump Assembly
Part Number: 16630-1LA0A$781.57 MSRP: $1202.12You Save: $420.55 (35%)Ships in 1-3 Business DaysNissan Armada Complete Fuel Pump
Part Number: 17040-ZQ60B$467.81 MSRP: $714.00You Save: $246.19 (35%)Ships in 1-3 Business DaysNissan Armada High Pressure Fuel Pump Assembly
Part Number: 16630-1LA0B$781.57 MSRP: $1202.12You Save: $420.55 (35%)Ships in 1-3 Business DaysNissan Armada Complete Fuel Pump
Part Number: 17040-ZH00A$467.81 MSRP: $714.00You Save: $246.19 (35%)Ships in 1-3 Business Days
Nissan Armada In Tank Fuel Pump
Part Number: 17040-7JA0A$516.77 MSRP: $788.72You Save: $271.95 (35%)Ships in 1-2 Business Days
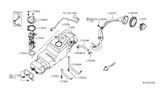
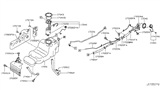
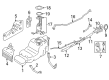
Nissan Armada Fuel Pump
The Nissan Armada Fuel Pump is something that arguably speaks a lot about the general reliability and performance of the Nissan Armada series. Serving to transfer fuel from the tank to the engine's fuel injection system, this electric Fuel Pump contributes to the desired pressure and optimum filtration of fuel to enhance combustion taking place in the engine. Being installed inside the fuel tank and close to it for cooling purposes, it is also fire-proof and can be considered as safe for the drivers. The Fuel Pump works well with various Nissan Armada models to make sure that every car receives the feature of the pump. Standard application of features such as electronic control unit monitoring and pulse width modulation, this Fuel Pump is recognized in the market through increasing efficiency and the product's lifespan. This is more evident when it comes to contemporary engines where higher pressures are required to ensure proper fuel delivery. The Fuel Pump applied in the Nissan Armada series is known to have rugged performance and comfortable features to continually deliver its towing and horsepower capabilities. Here, the Nissan Armada Fuel Pump is a critical component because it guarantees a constant supply of fuel, hence improving the car's safety and driving. Being a key operating part of the full-size SUV, it can be deemed as an essential element of the vehicle due to its dependability, high-level engineering, and compatibility with the majority of the Nissan Armada car models.
If you need any OEM Nissan Armada Fuel Pump, feel free to choose them out of our huge selection of genuine Nissan Armada Fuel Pump. All our parts are offered at unbeatable prices and are supported by the manufacturer's warranty. In addition, we offer quick shipping to have your parts delivered to your door step in a matter of days.
Nissan Armada Fuel Pump Parts Questions & Experts Answers
- Q: How to disconnect the fuel pump module and Fuel Level Sensor in Nissan Armada?A:Unplug the battery cable from the terminal that's negative. Relieve the fuel system pressure. In Armada models, you need to take out the second-row left seat, the second-row center seat or remove the center console and low part beneath it, before removing the third-row seats. Pull off the seat belts connecting the second and third rows to their flooring. Take out the trim on the left (8-pillars), the part behind the left row-two seat using the trim panel on the rear, and pull out the door sill plate on the left side. Take off the floor carpeting to see where the inspection hole cover is hiding. You must turn both retainers counterclockwise by one quarter to pull off the inspection hole cover. Take off both the fuel pump's electrical connection and lines. Keep track of where the fuel pump module is sitting by the Fuel Tank, and use large water pump pliers to turn the module's lock ring counterclockwise to release it easily. Take out the fuel pump module from the tank, moving it around as needed to keep the float arm for the fuel level sensor safe. Sometimes you need to disconnect the fuel level sensor from the pump module before removing it. Check the condition of the fuel pump/fuel level sensor O-ring, and put in a new one if needed. When you move a fuel level sensor to another fuel pump module, follow the sensor harness to its wire end and pull it off. Grasp the locking clips on each side of the sensor with pliers, push down to open them, and move the sensor straight up out of the pump. When pressing the sensor into place, check that the locks go in without forcing. Installation is the reverse of removal.

Related Nissan Armada Parts
 Nissan Armada Fuel Injector O-Ring
 Nissan Armada Fuel Tank
 Nissan Armada Throttle Body
 Nissan Armada Fuel Injector
 Nissan Armada Fuel Level Sensor
 Nissan Armada Fuel Rail
 Nissan Armada Turbocharger
Browse by Year
2025 Fuel Pump 2024 Fuel Pump 2023 Fuel Pump 2022 Fuel Pump 2021 Fuel Pump 2020 Fuel Pump 2019 Fuel Pump 2018 Fuel Pump 2017 Fuel Pump 2015 Fuel Pump 2014 Fuel Pump 2013 Fuel Pump 2012 Fuel Pump 2011 Fuel Pump 2010 Fuel Pump 2009 Fuel Pump 2008 Fuel Pump 2007 Fuel Pump 2006 Fuel Pump 2005 Fuel Pump 2004 Fuel Pump