×
- Hello
- Login or Register
- Quick Links
- Live Chat
- Track Order
- Parts Availability
- RMA
- Help Center
- Contact Us
- Shop for
- Nissan Parts
- Nissan Accessories
My Garage
My Account
Cart
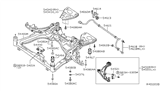
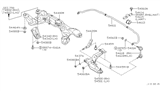
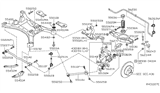
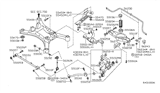
Genuine Nissan Maxima Control Arm
Suspension Arm- Select Vehicle by Model
- Select Vehicle by VIN
Select Vehicle by Model
orMake
Model
Year
Select Vehicle by VIN
For the most accurate results, select vehicle by your VIN (Vehicle Identification Number).
72 Control Arms found


Nissan Maxima Transverse Link Complete Right Hand
Part Number: 54500-9HP0A$248.88 MSRP: $368.52You Save: $119.64 (33%)Ships in 1-2 Business Days


Nissan Maxima Transverse Link Complete Left Hand
Part Number: 54501-9HP0A$246.73 MSRP: $365.33You Save: $118.60 (33%)Ships in 1-2 Business Days


Nissan Maxima Lower Control Arm
Part Number: 551B1-3TA0D$49.36 MSRP: $71.48You Save: $22.12 (31%)Ships in 1-3 Business Days

Nissan Maxima Link Complete Rear Suspension Lower Rear RH
Part Number: 551B0-3TA0D$49.36 MSRP: $71.48You Save: $22.12 (31%)Ships in 1-2 Business Days

Nissan Maxima Transverse Link Complete Right Hand
Part Number: 54500-9N00B$215.16 MSRP: $318.58You Save: $103.42 (33%)Ships in 1-3 Business Days


Nissan Maxima Transverse Link Complete Left Hand
Part Number: 54501-9N00B$215.16 MSRP: $318.58You Save: $103.42 (33%)Ships in 1-3 Business Days


Nissan Maxima Transverse Link Complete Right Hand
Part Number: 54500-7Y00A$176.51 MSRP: $261.35You Save: $84.84 (33%)Ships in 1-3 Business Days


Nissan Maxima Transverse Link Complete Right Hand
Part Number: 54500-9N00A$215.16 MSRP: $318.58You Save: $103.42 (33%)Ships in 1-3 Business Days


Nissan Maxima Transverse Link Complete Left Hand
Part Number: 54501-2Y412$166.53 MSRP: $246.58You Save: $80.05 (33%)Ships in 1-3 Business Days


Nissan Maxima Rear Suspension Arm Assembly Right Hand
Part Number: 55501-9N00A$248.28 MSRP: $367.63You Save: $119.35 (33%)Ships in 1-3 Business Days


Nissan Maxima Transverse Link Complete Left Hand
Part Number: 54501-7Y00A$192.56 MSRP: $285.12You Save: $92.56 (33%)Ships in 1-3 Business Days


Nissan Maxima Link Complete, Rear Suspension
Part Number: 551B1-3TA0C$49.36 MSRP: $71.48You Save: $22.12 (31%)Ships in 1-3 Business Days


Nissan Maxima Transverse Link Complete Right Hand
Part Number: 54500-2Y412$166.53 MSRP: $246.58You Save: $80.05 (33%)Ships in 1 Business Day


Nissan Maxima Transverse Link Complete Left Hand
Part Number: 54501-9N00A$215.16 MSRP: $318.58You Save: $103.42 (33%)Ships in 1-3 Business Days


Nissan Maxima Link Complete-Rear Suspension Lower,Rear
Part Number: 551B0-9N00A$210.54 MSRP: $311.75You Save: $101.21 (33%)Ships in 1-3 Business Days

Nissan Maxima Rear Suspension Arm Left Hand
Part Number: 55502-ZD90B$180.76 MSRP: $255.22You Save: $74.46 (30%)Ships in 1-2 Business Days


Nissan Maxima Rear Suspension Arm Assembly Left Hand
Part Number: 55502-9N00A$261.47 MSRP: $399.07You Save: $137.60 (35%)Ships in 1-3 Business Days


Nissan Maxima Transverse Link Complete Right Hand
Part Number: 54500-7Y000$176.51 MSRP: $261.35You Save: $84.84 (33%)Ships in 1-3 Business Days
Nissan Maxima Link-Upper
Part Number: 55120-9HS0A$110.94 MSRP: $160.67You Save: $49.73 (31%)Ships in 1-3 Business DaysNissan Maxima Link Complete Rear Suspension Lower Rear RH
Part Number: 551B0-3TA0C$49.36 MSRP: $71.48You Save: $22.12 (31%)Ships in 1-3 Business Days
| Page 1 of 4 |Next >
1-20 of 72 Results
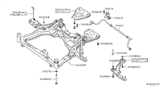
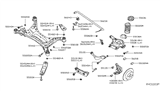
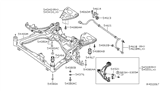
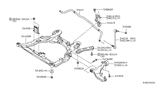
Nissan Maxima Control Arm
This product is the Nissan Maxima Control Arm that contributes to suspension system of the sedan car mostly in the Nissan Maxima models. As an intermediate between the front wheel assemblies and the frame of a car, the Control Arm preserves the radial position of the wheels, which is needed for a stable steering and better control. The Maxima Control Arm has featured multiple types of models right from the conventional A-arm and the modern wishbone type aiding the Nissan car to be more efficient and safe. The A-arm is usually used as the lower link while the wishbone design provides better control of the position of the wheel to reduce any unwanted movements. These show that much attention has been paid to the aspect of the Control Arm and the results are extended reliability to the Maxima class vehicles apart from the greatly improved feel while driving them. The Nissan Maxima Control Arm can work for multiple generations of the Maxima, thus the part is suitable for both the lovers of tuning and an ordinary driver. Other factors that set Maxima Control Arm out in the automobile market include the intricate parts like the rubber bushings and the diagonal radius rods in the MacPherson strut suspensions. Suspension loads are well handled by the Nissan Maxima Control Arm by transferring them to springs or shock absorbers hence enhancing a comfortable ride while at the same time ensuring safety thus placing the car as a reliable automobile for those who are in search of a car that offers performance.
If you need any OEM Nissan Maxima Control Arm, feel free to choose them out of our huge selection of genuine Nissan Maxima Control Arm. All our parts are offered at unbeatable prices and are supported by the manufacturer's warranty. In addition, we offer quick shipping to have your parts delivered to your door step in a matter of days.
Nissan Maxima Control Arm Parts Questions & Experts Answers
- Q: How to remove Control Arm on Nissan Maxima?A:To remove the control arm, first loosen the wheel lug nuts on the side to be dismantled, raise the front of the vehicle, support it securely on jack stands, and remove the wheel. Disconnect the stabilizer bar link from the control arm, and for 1993 and 1994 models, remove the stabilizer bar. For 1993 and 1994 models, unbolt the Ball Joint from the control arm, while for 1995 and later models, remove the cotter pin and loosen the ball joint stud nut before separating the ball joint stud from the Steering Knuckle using a ball joint separator. Separate the arm from the steering knuckle by prying it down with a prybar or large screwdriver. If replacing a control arm on 2003 and earlier models, loosen the nut from the control arm bushing pin and remove the bolts from it. Next, remove the rear bushing clamp bolts and then the control arm, and if necessary, on 1993 and 1994 models, remove the control arm gusset. Inspect the front and rear bushings for cracks and tears, and if damaged or worn, check for replacement availability; if replacements are not available, replace the control arm. Inspect the control arm for straightness and replace it if bent. Installation is the reverse of removal, ensuring all fasteners are tightened to the specified torque. On 2003 and earlier models, the bushing pin bolts and rear bushing clamp bolts must be tightened in a specific order, and before fully tightening, raise the outer end of the control arm with a floor jack to simulate normal ride height. Finally, install a new cotter pin through the ball joint stud, install the wheel and lug nuts, lower the vehicle, and tighten the lug nuts to the specified torque.

Related Nissan Maxima Parts
 Nissan Maxima Shift Cable
 Nissan Maxima Control Arm Bushing
 Nissan Maxima Radius Arm
 Nissan Maxima Axle Beam
 Nissan Maxima Control Arm Bracket
 Nissan Maxima Ball Joint
 Nissan Maxima Radius Arm Bushing
 Nissan Maxima Trailing Arm
Browse by Year
2023 Control Arm 2022 Control Arm 2021 Control Arm 2020 Control Arm 2019 Control Arm 2018 Control Arm 2017 Control Arm 2016 Control Arm 2014 Control Arm 2013 Control Arm 2012 Control Arm 2011 Control Arm 2010 Control Arm 2009 Control Arm 2008 Control Arm 2007 Control Arm 2006 Control Arm 2005 Control Arm 2004 Control Arm 2003 Control Arm 2002 Control Arm 2001 Control Arm 2000 Control Arm 1999 Control Arm 1998 Control Arm 1997 Control Arm 1996 Control Arm 1995 Control Arm 1994 Control Arm 1993 Control Arm 1992 Control Arm 1991 Control Arm 1990 Control Arm 1989 Control Arm 1988 Control Arm 1987 Control Arm 1986 Control Arm 1985 Control Arm