×
- Hello
- Login or Register
- Quick Links
- Live Chat
- Track Order
- Parts Availability
- RMA
- Help Center
- Contact Us
- Shop for
- Nissan Parts
- Nissan Accessories
My Garage
My Account
Cart
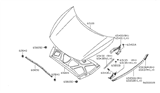
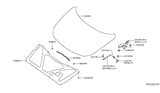
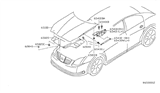
Genuine Nissan Maxima Hood
Engine Hood- Select Vehicle by Model
- Select Vehicle by VIN
Select Vehicle by Model
orMake
Model
Year
Select Vehicle by VIN
For the most accurate results, select vehicle by your VIN (Vehicle Identification Number).
14 Hoods found


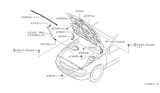
Nissan Maxima Hood
Part Number: F5100-9N0MA$505.48 MSRP: $778.85You Save: $273.37 (36%)Ships in 1-3 Business Days
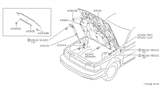
Nissan Maxima Hood
Part Number: 65100-4RA0A$396.52 MSRP: $610.96You Save: $214.44 (36%)Ships in 1-2 Business Days
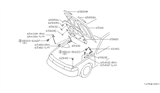
Nissan Maxima Hood
Part Number: F5100-5Y7CM$495.21 MSRP: $763.04You Save: $267.83 (36%)Ships in 1-3 Business Days
Nissan Maxima Hood
Part Number: 65100-ZK330$476.12 MSRP: $733.62You Save: $257.50 (36%)Ships in 1-3 Business DaysNissan Maxima Hood
Part Number: 65100-7Y030$579.83 MSRP: $893.42You Save: $313.59 (36%)Ships in 1-3 Business Days
Nissan Maxima Hood
The Hood of the Nissan Maxima is a solid, hinged cover that allows the driver to easily access the engine. This provides protection from the elements, debris, and crash energy for vital engine components. In the early years, a Hood made of steel was applied first. Later on, Nissan began using the lighter aluminum or fiberglass panels found on many modern Nissan sedans. The Hood uses a front latch and safety catch that keeps it secure at speed but flips open wide for routine checkups. The Hood has been designed to crumble in the event of a collision and thus absorb energy. The Maxima has undergone slight changes in the years that it has been manufactured, especially when it comes to the full metal Hood, which has seen the addition of various composite materials that decrease weight and increase rust resistance. These improvements contribute to better fuel economy and steering response. The two styles have the same profile but differ in weight, corrosion resistance, and how easily one may restore small dents or scratches. To keep the Hood surface smooth and the good looks that a Nissan loyalist expects from a sharp-looking Maxima, regular washes, a quick touch-up paint, and a coat of wax should be done.
If you need any OEM Nissan Maxima Hood, feel free to choose them out of our huge selection of genuine Nissan Maxima Hood. All our parts are offered at unbeatable prices and are supported by the manufacturer's warranty. In addition, we offer quick shipping to have your parts delivered to your door step in a matter of days.
Nissan Maxima Hood Parts Questions & Experts Answers
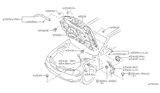
- Q: How to remove and install a hood, and what adjustments are necessary for proper alignment on Nissan Maxima?A:The hood is relatively heavy and the procedure of putting it on and off is a little cumbersome so this should be done by at least two people. Start by drawing lines around the bolt heads of the hinge or the whole length or the body hinse for correct alignment, or place blankets or pads over the cowl section of the body and the fenders in order to avoid scratching them when lifting off the hood. Ensure you unfire all cables or wires that should not be useful while you are removing the item. With an assistant supporting the hood, undo the support strut studs from the hood using a wrench, and the hinge to hood screws or bolts and remove the hood. For installation, you just have to do the entire process in the opposite of the said steps. Depending on that, one has to loosen the bolts or nuts and then translate the hinge plate slot in order to come to the fore-and-aft and side-to-side adjustments. Use a pencil and draw a line around the hinge plate so as to know how much the car hood has travelled, undo the bolts/nuts and place the car hood to the right position by using the hinge bolts tighten them and slowly lower the car hood to check for the position. In case of need, the whole Hood Latch assembly can be shifted up and down and from side to side on the radiator support so that the hood is tight to the car and level with the fenders. Mark around the hood latch mounting bolts to identify them easily, then, using a wrench, loosen the bolts, shift the latch assembly accordingly, and then tighten the bolt back again until you can completely align the hood with the fenders. Lastly, set the hood bumpers into their saddles on the radiator support, to home the hood dead against the fenders, and occasionally grease the thumbscrew hood latch assembly and the hood hinges with white, lithium-base grease for freedom and reduced wear and fatigue.

Related Nissan Maxima Parts
 Nissan Maxima Emblem
 Nissan Maxima Grille
 Nissan Maxima Hood Hinge
 Nissan Maxima Hood Cable
 Nissan Maxima Hood Latch
Browse by Year
2023 Hood 2022 Hood 2021 Hood 2020 Hood 2019 Hood 2018 Hood 2017 Hood 2016 Hood 2014 Hood 2013 Hood 2012 Hood 2011 Hood 2010 Hood 2009 Hood 2008 Hood 2007 Hood 2006 Hood 2005 Hood 2004 Hood 2003 Hood 2002 Hood 2001 Hood 2000 Hood 1999 Hood 1998 Hood 1997 Hood 1996 Hood 1995 Hood 1994 Hood 1993 Hood 1992 Hood 1991 Hood 1990 Hood 1989 Hood 1988 Hood 1987 Hood 1986 Hood 1985 Hood