×
- Hello
- Login or Register
- Quick Links
- Live Chat
- Track Order
- Parts Availability
- RMA
- Help Center
- Contact Us
- Shop for
- Nissan Parts
- Nissan Accessories
My Garage
My Account
Cart
Genuine Nissan Maxima Hood Cable
Hood Release Cable- Select Vehicle by Model
- Select Vehicle by VIN
Select Vehicle by Model
orMake
Model
Year
Select Vehicle by VIN
For the most accurate results, select vehicle by your VIN (Vehicle Identification Number).
9 Hood Cables found


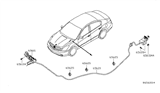
Nissan Maxima Cable Assembly-Hood Lock
Part Number: 65621-JA000$33.89 MSRP: $53.55You Save: $19.66 (37%)Ships in 1-2 Business Days


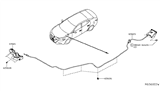
Nissan Maxima Hood Lock Control Cable Assembly
Part Number: 65621-4RA0A$115.95 MSRP: $178.65You Save: $62.70 (36%)Ships in 1-2 Business Days


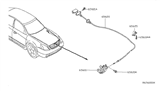
Nissan Maxima Cable Assembly-Hood Lock
Part Number: 65621-8J000$25.16 MSRP: $37.84You Save: $12.68 (34%)Ships in 1-2 Business Days


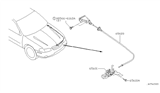
Nissan Maxima Cable Assembly-Hood Lock
Part Number: 65621-2Y900$89.95 MSRP: $138.60You Save: $48.65 (36%)Nissan Maxima Cable Hood Lock
Part Number: 65621-ZK30A$25.16 MSRP: $37.84You Save: $12.68 (34%)Ships in 1 Business Day


Nissan Maxima Hood Cable
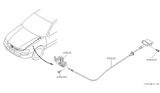
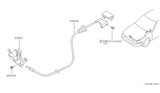
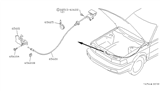
By pulling on the cabin release handle, the Nissan Maxima Hood Cable allows the driver to quickly pop the hood. This translates that gentle tug into a pull on the front latch for quick access. The assembly commences with the lever located next to the driver seat. This is then followed by a primary Hood Cable that travels through the firewall to a junction located near the grille. More precisely, secondary Hood Cable lines branch off from this junction to each individual latch point. This process completes the motion path. Through the years, the simple two-stage design has remained essentially unchanged, meaning every Maxima generation has made use of the flexible steel strands in a protective sheath instead of opting for rods or electronic releases, a decision Nissan has kept for its flagship sedan. Over time, moisture, heat, and vibration will crack the outer covering, allowing water to seep in and corrode the wire. The Hood Cable can stretch or snap, resulting in the hood being stuck shut. Since a jammed hood obstructs access to coolant, belts, and other essential components, owners should be alert to a spongy feel in the release handle or delayed response to the latch, both early signs of a Hood Cable wearing out. When replacing a damaged cable, the one-pull opening becomes smooth again and the simple mechanical reliability which Nissan designed into the Maxima is maintained.
If you need any OEM Nissan Maxima Hood Cable, feel free to choose them out of our huge selection of genuine Nissan Maxima Hood Cable. All our parts are offered at unbeatable prices and are supported by the manufacturer's warranty. In addition, we offer quick shipping to have your parts delivered to your door step in a matter of days.
Nissan Maxima Hood Cable Parts Questions & Experts Answers
- Q: How to remove and install the Hood Cable and Hood Latch assembly on the Nissan Maxima?A:To release the latch, unlock the latch assembly with the bolts on it, slide the latch, and tighten the bolts again; in this way, close the hood and see that it fits to the frame of the car fenders, performing the steps repeatedly until the hood fits tight on the fenders. Disconnect the spring, and with the aid of wire cutter, remove the head of the cable by unscrewing it from the latch with a screwdriver or by use of needle-nose pliers or similar tool to release the hood latch cable from the rear part of the latch assembly. For the installation process, just use the procedure that is opposite to that mentioned for the removal process. One has to unscrew the cable from the back of the latch assembly using needle-nose pliers or a screwdriver then undo its fastening on the left inner fender. Inside the car, unbolt the hood-release cable and handle assembly from the instrument panel by unthreading the screws with three bolts that hold the interior hood latched handle. Bring/pull the cable through firewall grommet to the passenger area and put the other end of the new cable through the grommet in the engine area then pull it in. It is in this portion of the installation that the steps correspond to the reverse of those mentioned in the removal process.

Related Nissan Maxima Parts
 Nissan Maxima Emblem
 Nissan Maxima Grille
 Nissan Maxima Hood Hinge
 Nissan Maxima Hood Latch
 Nissan Maxima Hood
Browse by Year
2023 Hood Cable 2022 Hood Cable 2021 Hood Cable 2020 Hood Cable 2019 Hood Cable 2018 Hood Cable 2017 Hood Cable 2016 Hood Cable 2014 Hood Cable 2013 Hood Cable 2012 Hood Cable 2011 Hood Cable 2010 Hood Cable 2009 Hood Cable 2008 Hood Cable 2007 Hood Cable 2006 Hood Cable 2005 Hood Cable 2004 Hood Cable 2003 Hood Cable 2002 Hood Cable 2001 Hood Cable 2000 Hood Cable 1999 Hood Cable 1998 Hood Cable 1997 Hood Cable 1996 Hood Cable 1995 Hood Cable 1994 Hood Cable 1993 Hood Cable 1992 Hood Cable 1991 Hood Cable 1990 Hood Cable 1989 Hood Cable 1988 Hood Cable 1987 Hood Cable 1986 Hood Cable 1985 Hood Cable