×
- Hello
- Login or Register
- Quick Links
- Live Chat
- Track Order
- Parts Availability
- RMA
- Help Center
- Contact Us
- Shop for
- Nissan Parts
- Nissan Accessories
My Garage
My Account
Cart
Genuine Nissan Murano Sway Bar Kit
Stabilizer Sway Bar Set- Select Vehicle by Model
- Select Vehicle by VIN
Select Vehicle by Model
orMake
Model
Year
Select Vehicle by VIN
For the most accurate results, select vehicle by your VIN (Vehicle Identification Number).
12 Sway Bar Kits found


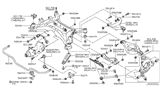
Nissan Murano Front Stabilizer
Part Number: 54611-5AA1A$222.67 MSRP: $314.50You Save: $91.83 (30%)Ships in 1-3 Business Days


Nissan Murano Front Stabilizer
Part Number: 54611-CB00A$144.18 MSRP: $213.18You Save: $69.00 (33%)Ships in 1-2 Business Days


Nissan Murano Front Stabilizer
Part Number: 54611-1AA0A$309.33 MSRP: $436.90You Save: $127.57 (30%)Ships in 1-3 Business Days
Nissan Murano Rear Stabilizer
Part Number: 56230-5AA0A$318.43 MSRP: $449.77You Save: $131.34 (30%)Ships in 1-3 Business Days

Nissan Murano Rear Bar Torsion
Part Number: 56230-1AA0C$303.39 MSRP: $417.90You Save: $114.51 (28%)Ships in 1-2 Business Days
Nissan Murano Rear Stabilizer
Part Number: 56230-CA000$332.28 MSRP: $469.32You Save: $137.04 (30%)Ships in 1-3 Business Days
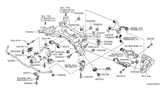
Nissan Murano Rear Stabilizer
Part Number: 56230-1AD0A$275.64 MSRP: $389.32You Save: $113.68 (30%)Ships in 1-3 Business DaysNissan Murano Front Stabilizer
Part Number: 54611-CB000$150.93 MSRP: $213.18You Save: $62.25 (30%)Ships in 1-3 Business DaysNissan Murano Front Stabilizer
Part Number: 54611-CA000$150.93 MSRP: $213.18You Save: $62.25 (30%)Ships in 1-3 Business Days
Nissan Murano STABILIZER ASSY FRONT
Part Number: 54610-6SA0D$269.87 MSRP: $381.17You Save: $111.30 (30%)

Nissan Murano Sway Bar Kit
The Nissan Murano Sway Bar Kit connects the left and right suspension, limiting the roll of the body and allowing the vehicle to respond more predictably. The Sway Bar Kit is equipped with a sway bar that is similar to a torsion spring piece. Because of this, when one wheel moves up or down relative to the other, the bar resists twisting and forces both wheels to move closer to the same height. This prevents the side of your vehicle from tilting too much in a corner or due to a bump in the road. Bushings and end links secure the bar to the chassis and control arms. If worn, it will produce a clunking sound, extra body lean, and less precise steering. The Sway Bar Kit comes with new ones to restore proper roll stiffness. The Murano is designed to have the factory intended balance between ride comfort and handling, thanks to all parts being engineered to original equipment specifications for Nissan vehicles. The Nissan Murano Sway Bar Kit restores links, which lets the SUV maintain grip through curves and feel stable during sudden maneuvers. Optimal of all, everyday ride quality is unaffected. The Sway Bar Kit comes with the bar, bushings, and links, so it is ready for installation. It is a great option for any Nissan Murano experiencing sway bar wear.
If you need any OEM Nissan Murano Sway Bar Kit, feel free to choose them out of our huge selection of genuine Nissan Murano Sway Bar Kit. All our parts are offered at unbeatable prices and are supported by the manufacturer's warranty. In addition, we offer quick shipping to have your parts delivered to your door step in a matter of days.
Nissan Murano Sway Bar Kit Parts Questions & Experts Answers
- Q: How to remove and reinstall the front subframe and sway bar kit on Nissan Murano?A:Support the engine from above with an engine support fixture, then loosen the front wheel lug nuts, raise the front of the vehicle, and securely support it on jackstands before removing the wheels. Next, remove the front section of the exhaust pipe and, for AWD models, remove the driveshaft. Separate the control arm balljoint from the Steering Knuckle and detach the tie-rod ends from the steering knuckles. Detach the links from the ends of the sway bar kit and disconnect the electrical connector from the power steering pressure switch. Remove the pinch bolt from the lower steering column and separate the shaft from the steering gear while keeping the Steering Wheel pointed straight ahead to avoid damaging the airbag spiral cable. Remove the front engine mount upper mounting nut and the rear engine mount through-bolt to allow the subframe to be lowered, then free any hoses from clips securing them to the subframe. Mark the position of the subframe to the chassis, support it with two floor jacks, remove the rear mounting fasteners, and loosen the front mounting fasteners a few turns before carefully lowering the rear of the subframe. Remove the bolts from the sway bar kit clamps and take out the sway bar kit, inspecting the clamp bushings and link bushings for any cracks or tears, replacing them if necessary, ensuring the slit in the bushing faces the front of the vehicle and that the clamps are installed in their original positions. Installation is the reverse of removal, ensuring all suspension and steering fasteners are tightened to the specified torque values, and it is recommended to replace the subframe fasteners and sway bar kit clamp bolts with new ones, tightening the wheel lug nuts to the appropriate torque.

Related Nissan Murano Parts
 Nissan Murano Sway Bar Bushing
 Nissan Murano Sway Bar Link
 Nissan Murano Sway Bar Bracket
 Nissan Murano Steering Wheel
 Nissan Murano Steering Column
Browse by Year
2025 Sway Bar Kit 2024 Sway Bar Kit 2023 Sway Bar Kit 2022 Sway Bar Kit 2021 Sway Bar Kit 2020 Sway Bar Kit 2019 Sway Bar Kit 2018 Sway Bar Kit 2017 Sway Bar Kit 2016 Sway Bar Kit 2015 Sway Bar Kit 2014 Sway Bar Kit 2013 Sway Bar Kit 2012 Sway Bar Kit 2011 Sway Bar Kit 2010 Sway Bar Kit 2009 Sway Bar Kit 2008 Sway Bar Kit 2007 Sway Bar Kit 2006 Sway Bar Kit 2005 Sway Bar Kit 2004 Sway Bar Kit 2003 Sway Bar Kit