×
- Hello
- Login or Register
- Quick Links
- Live Chat
- Track Order
- Parts Availability
- RMA
- Help Center
- Contact Us
- Shop for
- Nissan Parts
- Nissan Accessories
My Garage
My Account
Cart
Genuine Nissan Pathfinder Ball Joint
Control Arm Joint- Select Vehicle by Model
- Select Vehicle by VIN
Select Vehicle by Model
orMake
Model
Year
Select Vehicle by VIN
For the most accurate results, select vehicle by your VIN (Vehicle Identification Number).
6 Ball Joints found


Nissan Pathfinder Joint Assembly - Ball, Lower
Part Number: 40160-0W025$88.48 MSRP: $124.97You Save: $36.49 (30%)Ships in 1-2 Business Days


Nissan Pathfinder Ball Joint
Part Number: 40160-93G25$99.96 MSRP: $141.18You Save: $41.22 (30%)Ships in 1-3 Business Days

Nissan Pathfinder Ball Joint
Part Number: 40160-50W25$99.96 MSRP: $141.18You Save: $41.22 (30%)Ships in 1-3 Business Days


Nissan Pathfinder Ball Joint
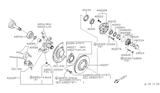
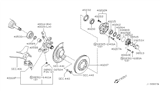
The Nissan Pathfinder Ball Joint connects the control arm of the SUV to the steering knuckle to allow the steering to move and the suspension to travel. The Ball Joint consists of a metal socket that houses a rotating stud. The stud turns inside a steel or alloy shell, while a rubber boot seals lubricant at the joint and protects it from sand, dirt, and moisture. The Ball Joint aids in ensuring the straight tracking of the Pathfinder, absorbing bumps, and following driver input without unnecessary play. This is accomplished by allowing the control arm to move vertically while the spindle pivots horizontally. Some units are referred to as upper or lower based on the mounting position, while others are load bearing or follower depending on whether they bear the weight of the vehicle or merely keep it in alignment. But primarily, all of them have the same purpose. Regular Nissan Pathfinder Ball Joint checks confirm the Ball Joint stays sealed. The Ball Joint on a Nissan Pathfinder can wear out, which causes noises, uneven tire wear, or steering vibration. The wear can be caused by a boot failure, a lack of lubrication, or long mileage.
If you need any OEM Nissan Pathfinder Ball Joint, feel free to choose them out of our huge selection of genuine Nissan Pathfinder Ball Joint. All our parts are offered at unbeatable prices and are supported by the manufacturer's warranty. In addition, we offer quick shipping to have your parts delivered to your door step in a matter of days.
Nissan Pathfinder Ball Joint Parts Questions & Experts Answers
- Q: How to check and replace the ball joints on my Nissan Pathfinder?A:When you disconnect a balljoint from the wheel, check your Control Arm balljoints for looseness by turning the ballstud with your hand inside its socket; if it wiggles, replace the balljoint. Before testing, lift the front end of the vehicle and put jackstands below the frame rails to hold the weight. Look at the rubber dust boot around the balljoint, both for broken or cracked parts and any leaking grease. If you find damage, replace the balljoint. Press a large wooden stick underneath the balljoint, resting on the wheel, while looking for movement signals between the Steering Knuckle and balljoint at the top. For the bottom, stroke between the control arm and knuckle to check if they shift. When you feel any movement while prodding, it means your balljoint has lost its effectiveness. Have a helper wiggle the tire from top to bottom, touching the balljoint nut; if you feel any looseness, check for a worn balljoint stud or middle hole in the steering knuckle that has widened, requiring new steering knuckle and balljoint parts. Before you take the wheel off, loosen the nuts, lift up the front of the car, and make sure it's on strong jackstands. Take off the nuts between the balljoint and control arm, then remove the balljoint from that connection. For 4WD models, remove the driveaxle. Gently use a two-jaw tool to break the balljoint free from the steering knuckle, but leave the nut on; remove the cotter pin first. An alternative tool that splits the balljoint from the knuckle works too, but may damage the boot covering the balljoint. Put the new balljoint into place, the same way you took the old one out. Make sure you snug the balljoint-to-control arm nuts and the balljoint-to-steering knuckle nut to the standard torque requirements. When putting the balljoint and steering knuckle together, advance the steering knuckle nut until the slots in the nut and the hole in ballstud line up. Use a new cotter pin to hold it in place. Seal the wheel up and drive carefully with adjustments needed.


