×
- Hello
- Login or Register
- Quick Links
- Live Chat
- Track Order
- Parts Availability
- RMA
- Help Center
- Contact Us
- Shop for
- Nissan Parts
- Nissan Accessories
My Garage
My Account
Cart
Genuine Nissan Pathfinder Control Arm
Suspension Arm- Select Vehicle by Model
- Select Vehicle by VIN
Select Vehicle by Model
orMake
Model
Year
Select Vehicle by VIN
For the most accurate results, select vehicle by your VIN (Vehicle Identification Number).
57 Control Arms found


Nissan Pathfinder Transverse Link Complete Right Hand
Part Number: 54500-3JA0D$333.01 MSRP: $508.25You Save: $175.24 (35%)Ships in 1-2 Business Days


Nissan Pathfinder Link Complete-Front Suspension, Upper RH
Part Number: 54524-EA000$110.30 MSRP: $159.75You Save: $49.45 (31%)Ships in 1-2 Business Days


Nissan Pathfinder Front Suspension Link Complete Lower Right Hand
Part Number: 54500-EA00A$128.39 MSRP: $185.95You Save: $57.56 (31%)Ships in 1-2 Business Days


Nissan Pathfinder Link Complete-Front Suspension, Upper LH
Part Number: 54525-EA000$108.45 MSRP: $157.07You Save: $48.62 (31%)Ships in 1-3 Business Days


Nissan Pathfinder Link Complete-Rear Suspension Lower,Rear
Part Number: 551B0-3JA0A$69.95 MSRP: $101.30You Save: $31.35 (31%)Ships in 1-3 Business Days


Nissan Pathfinder Link Complete Front Suspension, Lower Lh
Part Number: 54501-EA00A$110.70 MSRP: $160.32You Save: $49.62 (31%)


Nissan Pathfinder Rear Suspension Arm Right Hand
Part Number: 55501-3JA0B$265.32 MSRP: $392.85You Save: $127.53 (33%)Ships in 1-3 Business Days


Nissan Pathfinder Transverse Link Complete Right Hand
Part Number: 54500-3JA0A$333.01 MSRP: $508.25You Save: $175.24 (35%)Ships in 1-2 Business Days


Nissan Pathfinder Transverse Link Complete Right Hand
Part Number: 54500-3JA0B$333.01 MSRP: $508.25You Save: $175.24 (35%)Ships in 1-2 Business Days


Nissan Pathfinder Transverse Link Complete Left Hand
Part Number: 54501-3JA0B$338.27 MSRP: $516.28You Save: $178.01 (35%)Ships in 1-3 Business Days


Nissan Pathfinder Transverse Link Complete Right Hand
Part Number: 54500-0W001$193.92 MSRP: $287.13You Save: $93.21 (33%)Ships in 1-3 Business DaysNissan Pathfinder Transverse Link Complete Left Hand
Part Number: 54501-3JA0D$338.27 MSRP: $516.28You Save: $178.01 (35%)
Nissan Pathfinder Transverse Link Complete Right Hand
Part Number: 54500-6SA0A$331.49 MSRP: $505.93You Save: $174.44 (35%)Ships in 1-3 Business DaysNissan Pathfinder Transverse Link Complete Left Hand
Part Number: 54501-6SA0A$319.01 MSRP: $486.88You Save: $167.87 (35%)Ships in 1-3 Business DaysNissan Pathfinder Transverse Link Complete Right Hand
Part Number: 54500-3JA0C$333.01 MSRP: $508.25You Save: $175.24 (35%)Ships in 1-3 Business Days
Nissan Pathfinder Rear Suspension Arm Left Hand
Part Number: 55502-3JA0B$245.43 MSRP: $363.40You Save: $117.97 (33%)Ships in 1-3 Business DaysNissan Pathfinder Transverse Link Complete Left Hand
Part Number: 54501-3JA0C$338.27 MSRP: $516.28You Save: $178.01 (35%)Ships in 1-3 Business Days


| Page 1 of 3 |Next >
1-20 of 57 Results
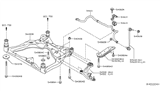
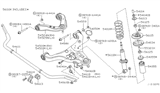
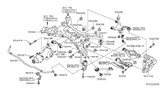
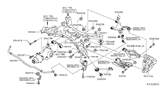
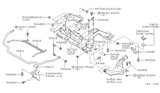
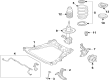
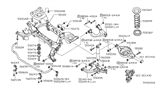
Nissan Pathfinder Control Arm
The Nissan Pathfinder Control Arm is the principal link between the frame of the automobile and each front wheel assembly. With the use of the Control Arm, the suspension can react efficiently to the changing contours of the road. The Control Arm is fitted with bushings on the chassis end and either bushings or a ball joint on the knuckle end. Thus, it pivots to allow the wheel to go up and down without altering the radial position. Pathfinder models employ upper and lower Control Arm designs. Typically, the lower design handles the majority of suspension loads, while the upper version assists in guiding wheel movement and maintaining alignment. Commonly made of stamped steel, cast iron, or cast aluminum, each Control Arm is made of a strong material that doesn't bend or deform due to impacts. In many cases, the wear will occur in the bushing or ball joint; however, severe rust or collision damage may necessitate complete replacement in order to maintain proper Nissan Pathfinder steering stability and ride comfort. Inspection of each Control Arm on a regular basis helps detect looseness and provides Nissan ride quality.
If you need any OEM Nissan Pathfinder Control Arm, feel free to choose them out of our huge selection of genuine Nissan Pathfinder Control Arm. All our parts are offered at unbeatable prices and are supported by the manufacturer's warranty. In addition, we offer quick shipping to have your parts delivered to your door step in a matter of days.
Nissan Pathfinder Control Arm Parts Questions & Experts Answers
- Q: How to remove and install lower control arms on Nissan Pathfinder?A:First, loosen the wheel lug nuts on all wheels; pick up your car with jackstands, then set it under the subframe rails to hold it firmly. Remove the wheel. Just remove the nuts between the balljoint and lower control arm, and you can then take off the balljoint as three bolts come out. To separate the control arm and subframe, you first remove two bolts: the pivot bolt nut and the rear bushing bracket bolts. Then you disconnect the balljoint from the control arm assembly. Pop the front pivot bolt nut from the lower arm and take off the rear bushing bracket bolts to disconnect the control arm from the frame. You need to take off the drive axle before you can get to the balljoint when you're replacing the one between the Steering Knuckle and the 4WD model. Check the bushings for any signs of dryness, torn surfaces, or breaking. The forward control arm bushing needs special tools to remove and replace, while mechanics can replace the worn or damaged bushing when they take the control arm to their shop. The rear bushing can move off its position on the control arm by simply slipping it away from the pin. Installation is the reverse of removal. Change the nut and bracket bolts one step at a time, but wait until you lower and raise the vehicle at a normal ride height before tightening them to the right torques. When finished, make sure you tighten all wheel lug nuts according to the specified force value.

Related Nissan Pathfinder Parts
 Nissan Pathfinder Shift Cable
 Nissan Pathfinder Control Arm Bushing
 Nissan Pathfinder Control Arm Shaft Kit
 Nissan Pathfinder Radius Arm
 Nissan Pathfinder Radius Arm Bushing
 Nissan Pathfinder Ball Joint
 Nissan Pathfinder Axle Beam
 Nissan Pathfinder Trailing Arm
 Nissan Pathfinder Control Arm Bracket
Browse by Year
2025 Control Arm 2024 Control Arm 2023 Control Arm 2022 Control Arm 2020 Control Arm 2019 Control Arm 2018 Control Arm 2017 Control Arm 2016 Control Arm 2015 Control Arm 2014 Control Arm 2013 Control Arm 2012 Control Arm 2011 Control Arm 2010 Control Arm 2009 Control Arm 2008 Control Arm 2007 Control Arm 2006 Control Arm 2005 Control Arm 2004 Control Arm 2003 Control Arm 2002 Control Arm 2001 Control Arm 2000 Control Arm 1999 Control Arm 1998 Control Arm 1997 Control Arm 1996 Control Arm 1995 Control Arm 1994 Control Arm 1993 Control Arm 1992 Control Arm 1991 Control Arm 1990 Control Arm 1989 Control Arm 1988 Control Arm 1987 Control Arm