×
- Hello
- Login or Register
- Quick Links
- Live Chat
- Track Order
- Parts Availability
- RMA
- Help Center
- Contact Us
- Shop for
- Nissan Parts
- Nissan Accessories
My Garage
My Account
Cart
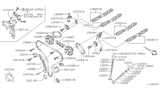
Genuine Nissan Pathfinder Camshaft
Cam- Select Vehicle by Model
- Select Vehicle by VIN
Select Vehicle by Model
orMake
Model
Year
Select Vehicle by VIN
For the most accurate results, select vehicle by your VIN (Vehicle Identification Number).
26 Camshafts found


Nissan Pathfinder Camshaft Assembly
Part Number: 13020-6KA0A$463.32 MSRP: $654.41You Save: $191.09 (30%)Ships in 1-3 Business Days

Nissan Pathfinder Camshaft Assembly
Part Number: 13001-0W000$166.07 MSRP: $234.57Limited AvailabilityYou Save: $68.50 (30%)
Nissan Pathfinder Camshaft Assembly
Part Number: 13020-6KA0B$463.34 MSRP: $654.43You Save: $191.09 (30%)Ships in 1-3 Business Days
Nissan Pathfinder Camshaft Assembly
Part Number: 13020-6KA0C$388.68 MSRP: $548.98You Save: $160.30 (30%)Ships in 1-3 Business Days
Nissan Pathfinder CAMSHAFT-Int & Exhaust Set (8ZH2)
Part Number: A3020-ZE00A$965.45 MSRP: $1363.63Limited AvailabilityYou Save: $398.18 (30%)
Nissan Pathfinder Camshaft Assembly
Part Number: 13020-9N02A$364.24 MSRP: $514.47You Save: $150.23 (30%)Ships in 1-2 Business Days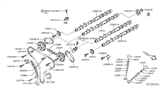
Nissan Pathfinder Camshaft Assembly
Part Number: 13020-9HP0D$421.59 MSRP: $595.47You Save: $173.88 (30%)Ships in 1-3 Business DaysNissan Pathfinder Camshaft Assembly
Part Number: B3020-ZE00A$965.45 MSRP: $1363.63Limited AvailabilityYou Save: $398.18 (30%)
Nissan Pathfinder Camshaft Assembly
Part Number: 13001-3KY5G$486.88 MSRP: $687.68You Save: $200.80 (30%)Ships in 1-3 Business Days


Nissan Pathfinder Camshaft Assembly
Part Number: 13020-4W002$191.79 MSRP: $270.88You Save: $79.09 (30%)
Nissan Pathfinder Camshaft Assembly
Part Number: 13020-6KA0D$407.36 MSRP: $575.37You Save: $168.01 (30%)


Nissan Pathfinder CAMSHAFT Kit (6ZV7)
Part Number: 13020-EA025$641.15 MSRP: $905.58You Save: $264.43 (30%)
Nissan Pathfinder Camshaft Assembly
Part Number: 13020-9N02B$461.60 MSRP: $651.98You Save: $190.38 (30%)Nissan Pathfinder Camshaft Assembly
Part Number: 13061-0W000$201.13 MSRP: $284.08You Save: $82.95 (30%)

Nissan Pathfinder Camshaft Assembly
Part Number: 13020-9HP0C$454.16 MSRP: $641.47You Save: $187.31 (30%)


| Page 1 of 2 |Next >
1-20 of 26 Results
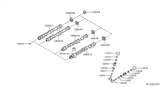
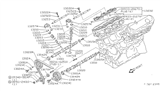
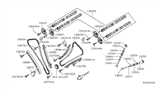
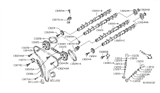
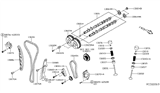
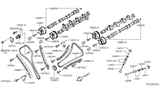
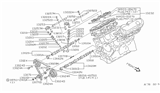
Nissan Pathfinder Camshaft
The Nissan Pathfinder Camshaft is an essential component and is what determines the productivity and durability of the Nissan Pathfinder series which has been on the lineup of SUV vehicles since 1985. This Camshaft is applied in controlling the opening and closing of intake and exhaust valves in a way that will highly allow the entry of air fueld mixture for burning and dispose off satisfactory combustion products. Designed to be long lasting the Nissan Pathfinder Camshaft comes in over head valve (OHV), single over head cam (SOHC), and double over head cam (DOHC), depending on the model and Pathfinder version, from the R50, R51, R52, to the current model R53. Some of the critical engine specifications that depend on the Camshaft include lift besides duration and lobe separation angle, which determine an automobile's power and fuel consumption capability. Such reliability and performance make the Nissan Pathfinder Camshaft to stand out as a brand in the market and a significant part of improving on the safety and efficiency of the automobile. Moreover, the Camshaft that controls the operation of the valves relative to the position of the piston is essential for achieving a smooth running of the vehicle thus making the Nissan Pathfinder appealing to families and recreational users of the vehicle. Nissan has truly put its highly foot forward, especially when it comes to engineering and construction of the Pathfinder Camshaft, which supports the vehicle's good looks and high performance in the highly secure manner possible.
If you need any OEM Nissan Pathfinder Camshaft, feel free to choose them out of our huge selection of genuine Nissan Pathfinder Camshaft. All our parts are offered at unbeatable prices and are supported by the manufacturer's warranty. In addition, we offer quick shipping to have your parts delivered to your door step in a matter of days.
Nissan Pathfinder Camshaft Parts Questions & Experts Answers
- Q: How to remove camshafts and Lash Adjuster on 2.4L four cylinder Nissan Pathfinder?A:Make sure that the camshafts and Lash Adjusters go through a thorough inspection, and check the camshaft endplay before removing them. To begin with, remove the battery cable, valve cover, and air intake duct. The engine should be positioned at TDC for cylinder one by marking the Timing Chain links and sprockets for future use with other markings on those sprockets such as "I" (intake) and "E" (exhaust). With the sprocket bolts of camshaft slightly loosened while keeping them in place using a wrench to maintain their alignments with "TDC" marks on Crankshaft Pulley. Remove sprocket retaining bolts, timing chain disengaged, and finally take out camshaft sprockets. Proceed to loosen and remove the camshaft bearing caps while keeping them in order. After lifting them mark I or E in addition to knowing how they will be used again in the future. Take off each Lash Adjuster placing it together with its respective shim inside a bag which is labeled or marked box. In case there are new cams being installed one should apply moly-based engine assembly lubricant on them then fit them into the cylinder head. Tighten bearing caps and bolts down according to a specific order. Combine timing chain links with those teeth of camshaft sprocket; match marks must follow while installing these sprockets over dowels on those hubs of camshaft then fix the bolts of these camshafts' sprockets in place. Make sure that these gears match up properly with each of these camshafts resulting in tightening these sprocket bolts as indicated by their torques. After that, reverse steps taken during its removal process so as to complete installation.

Related Nissan Pathfinder Parts
 Nissan Pathfinder Cylinder Head Bolts
 Nissan Pathfinder Cylinder Head Gasket
 Nissan Pathfinder Crankshaft Gear
 Nissan Pathfinder Cam Gear
 Nissan Pathfinder Timing Cover
 Nissan Pathfinder Intake Valve
 Nissan Pathfinder Cylinder Head
 Nissan Pathfinder Crankshaft
 Nissan Pathfinder Crankshaft Pulley
 Nissan Pathfinder Rocker Arm
 Nissan Pathfinder Spool Valve
 Nissan Pathfinder Exhaust Valve
Browse by Year
2025 Camshaft 2024 Camshaft 2023 Camshaft 2022 Camshaft 2020 Camshaft 2019 Camshaft 2018 Camshaft 2017 Camshaft 2016 Camshaft 2015 Camshaft 2014 Camshaft 2013 Camshaft 2012 Camshaft 2011 Camshaft 2010 Camshaft 2009 Camshaft 2008 Camshaft 2007 Camshaft 2006 Camshaft 2005 Camshaft 2004 Camshaft 2003 Camshaft 2002 Camshaft 2001 Camshaft 2000 Camshaft 1999 Camshaft 1998 Camshaft 1997 Camshaft 1996 Camshaft 1995 Camshaft 1994 Camshaft 1993 Camshaft 1992 Camshaft 1991 Camshaft 1990 Camshaft 1989 Camshaft 1988 Camshaft 1987 Camshaft