×
- Hello
- Login or Register
- Quick Links
- Live Chat
- Track Order
- Parts Availability
- RMA
- Help Center
- Contact Us
- Shop for
- Nissan Parts
- Nissan Accessories
My Garage
My Account
Cart
Genuine Nissan Quest Control Arm
Suspension Arm- Select Vehicle by Model
- Select Vehicle by VIN
Select Vehicle by Model
orMake
Model
Year
Select Vehicle by VIN
For the most accurate results, select vehicle by your VIN (Vehicle Identification Number).
17 Control Arms found


Nissan Quest Transverse Link Complete Right Hand
Part Number: 54500-1JA0A$247.91 MSRP: $367.08You Save: $119.17 (33%)Ships in 1-2 Business Days


Nissan Quest Transverse Link Complete Left Hand
Part Number: 54501-1JA0A$333.88 MSRP: $509.58You Save: $175.70 (35%)Ships in 1-3 Business Days


Nissan Quest Front Suspension Link Complete Lower Right Hand
Part Number: 54500-CK000$174.99 MSRP: $272.07You Save: $97.08 (36%)Ships in 1 Business Day


Nissan Quest Link Complete - Rear Suspension Lower, Rear
Part Number: 551B0-1JA0A$365.59 MSRP: $557.98You Save: $192.39 (35%)Ships in 1-3 Business Days


Nissan Quest Rear Suspension Arm Assembly Right Hand
Part Number: 55501-1JA0B$276.91 MSRP: $422.63You Save: $145.72 (35%)Ships in 1-3 Business Days


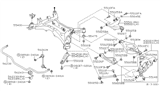


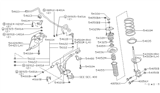


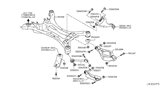


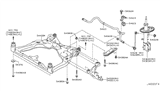
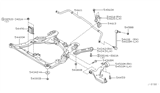
Nissan Quest Control Arm
The Nissan Quest Control Arm connects the minivan's frame to its front wheel assembly so that the wheel can move up and down while being kept in the proper position. As a pivoting link, the Control Arm provides support for the suspension components' shocks, springs, and sway bars so the Nissan Quest suspension parts can work together to absorb road bumps at the spring before the forces get to the cabin. The Control Arm is mounted at one end to the chassis with bushings that are made of rubber to absorb vibration. At the other end, it connects to the steering knuckle with a bushing or ball joint that allows for articulated movement. This allows for vertical wheel travel while limiting unwanted forward or backward movement, thus it keeps the steering geometry and tire contact. The part directs suspension forces to the shock or spring. Regular inspection helps ensure the Nissan Quest Control Arm stays free of excessive wear on its joints. Thus, a strong Control Arm is essential to ensure safe handling of the Nissan Quest.
If you need any OEM Nissan Quest Control Arm, feel free to choose them out of our huge selection of genuine Nissan Quest Control Arm. All our parts are offered at unbeatable prices and are supported by the manufacturer's warranty. In addition, we offer quick shipping to have your parts delivered to your door step in a matter of days.
Nissan Quest Control Arm Parts Questions & Experts Answers
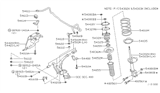
- Q: How to remove and install a control arm on Nissan Quest?A:When proceeding to dismantle the control arm, it is necessary to slightly loosen the wheel lug nuts of the side to be removed, then lift the car with a jack and fix it on supports, and finally, take off the wheel. Subsequent to that, remove the nut on the control arm which holds the stabilizer bar link in place before removing the Ball Joint from the control arm. First, unscrew the front pivot bolt nut or bolt that is secured to the control arm gusset, then take out the rear bushing clamp bolts to remove the control arm. If it is required, unbolt and take off the lower arm gussets which are simply fixed to the frame by five bolts, and take them off the car. For disassembly, for front/rear bushings crack/tear, replace the damaged one and then using the press for bushing to be inserted into the control arm. Check that the control arm is not bent and replace the control arm if it is bent and the same applies for the control arm gusset. For removal, if the control arm gussets were removed, before leaving the job install them and snug the bolts to the appropriate torque in the sequence shown. The process of installation is quite the opposite of the process of their removal, after the onstructions to ensure that certain torsion is reached to the necessary bolt fasteners and a new cotter pin passed through balljoint stud. Lastly, place the wheel back on, lower the car and then finally, non powerfully tighten the lug nuts to the appropriate torque.

Related Nissan Quest Parts
 Nissan Quest Shift Cable
 Nissan Quest Control Arm Bushing
 Nissan Quest Control Arm Bracket
 Nissan Quest Radius Arm
 Nissan Quest Radius Arm Bushing
 Nissan Quest Axle Beam
 Nissan Quest Ball Joint
 Nissan Quest Trailing Arm
Browse by Year
2017 Control Arm 2016 Control Arm 2015 Control Arm 2014 Control Arm 2013 Control Arm 2012 Control Arm 2011 Control Arm 2010 Control Arm 2009 Control Arm 2008 Control Arm 2007 Control Arm 2006 Control Arm 2005 Control Arm 2004 Control Arm 2003 Control Arm 2002 Control Arm 2001 Control Arm 2000 Control Arm 1999 Control Arm 1998 Control Arm 1997 Control Arm 1996 Control Arm 1995 Control Arm 1994 Control Arm 1993 Control Arm