×
- Hello
- Login or Register
- Quick Links
- Live Chat
- Track Order
- Parts Availability
- RMA
- Help Center
- Contact Us
- Shop for
- Nissan Parts
- Nissan Accessories
My Garage
My Account
Cart
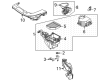
Genuine Nissan Rogue Air Filter
Air Cleaner- Select Vehicle by Model
- Select Vehicle by VIN
Select Vehicle by Model
orMake
Model
Year
Select Vehicle by VIN
For the most accurate results, select vehicle by your VIN (Vehicle Identification Number).
8 Air Filters found


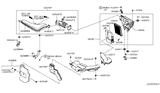
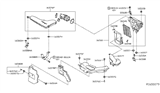
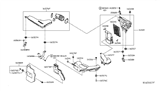
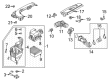
Nissan Rogue Air Filter
Part Number: 16546-30P00$27.77 MSRP: $40.22You Save: $12.45 (31%)Ships in 1-3 Business Days


Nissan Rogue Air Filter
Part Number: 16546-4BA1J$25.48 MSRP: $36.90You Save: $11.42 (31%)Ships in 1-2 Business Days


Nissan Rogue Air Cleaner Element
Part Number: 16546-4BA1A$25.48 MSRP: $36.90You Save: $11.42 (31%)Ships in 1-2 Business Days

Nissan Rogue Air Filter
Part Number: 16546-4BC2A$25.48 MSRP: $36.90You Save: $11.42 (31%)Ships in 1-2 Business Days

Nissan Rogue Air Filter
Part Number: 16546-4BC1A$25.48 MSRP: $36.90You Save: $11.42 (31%)Ships in 1-3 Business Days


Nissan Rogue Air Cleaner Element
Part Number: 16546-4BA2A$25.48 MSRP: $36.90You Save: $11.42 (31%)Ships in 1 Business Day
Nissan Rogue Air Cleaner Element
Part Number: 16546-6RC1A$26.21 MSRP: $39.85You Save: $13.64 (35%)Ships in 1-3 Business Days
Nissan Rogue Air Cleaner Element
Part Number: 16546-6RA0A$33.89 MSRP: $51.54You Save: $17.65 (35%)Ships in 1-3 Business Days
Nissan Rogue Air Filter
Nissan Rogue Air Filter is an important part that explains the durability and the efficiency of one of the highly successful models from Nissan, the compact crossover SUV. As the central component of of an air filtration system, this also prevents dirt and debris from nearing the engine hence it simply allows clean air to flow through to the engine. Nissan Rogue Air Filter has the capacity to filter particles with sizes of 5 microns, therefore, it has the responsibility of maintaining fuel efficiency under tough conditions. While this Air Filter is compatible with the first, second and the third Rogue models, it is crucial part that can increase performance as well as safety. The highly popular are pleated paper filters, which provide acceptable efficiency and are rather inexpensive, however, there are also cotton gauze or synthetic fabric performance filters, which can handle up to 50 000 miles on a single filter. These advanced filters control the dirt all along their thickness and they do not alter the air flow or the filtration which is a definite plus as compared to one-ply paper filters. This component adds the vehicle efficiency and improves the drier experience with Nissan Rogue by making sure that the engine functions well in order to have an Air Filter. The Nissan Rogue Air Filter is special in the automotive market because of its quality and performance making it a necessity as to extending the durability of the Nissan Rogue.
If you need any OEM Nissan Rogue Air Filter, feel free to choose them out of our huge selection of genuine Nissan Rogue Air Filter. All our parts are offered at unbeatable prices and are supported by the manufacturer's warranty. In addition, we offer quick shipping to have your parts delivered to your door step in a matter of days.
Nissan Rogue Air Filter Parts Questions & Experts Answers
- Q: Where is the air filter located and How to replace it in Nissan Rogue?A:The air filter is inside the air filter housing on the left hand side near to the radiator of the vehicle. To remove the air filter from the housing of the Honda for the models prior the 2014 year, first, you have to unlock the two tabs on the sides of the top cover, then you have to pull the air filter out. In some models the filter element may be mounted in a holder; in this case, remove it and install the new element in the holder Then, it is necessary to install the holder with the element in the casing. Another is the removal of the air filter housing duct where in for the 2015 and later models one has to pull the locking tabs located at the bottom of the duct and disconnect it by applying pressure on the tabs. Pop the two locking clips from the sides of the housing, then pull the housing and the duct up to the right and left to be split in half, and take out the filter from the case. Check the outer surface of the filter element; if this area is dirty, remove the element and replace it if the interior is moderately dusty, it can be blown clean from the back surface to the front with compressed air. Not being able to wash it or oil it since it is a pleated paper type filter, if it cannot be cleaned satisfactorily, dispose of it and get a new one. It is also advisable not to spill or pour anything in the housing of the component when the cover is off. Do not operate the vehicle without an air filter because it can cause much wear-and-tear on the engine and the presence of fire risks. Clean out the inside of the air filter housing and replace this with the new filter into the holder or housing making sure it fits appropriately. Depending on the model of the car, for the models before 2014, the filter cover should be slid into the housing until the tabs engage. Familiar with the models produced after 2015, replace the housing assembly back to its position, align the clips and fix them into the right positions to close the assembly and connect the tubes at the base of the housing.

Related Nissan Rogue Parts
 Nissan Rogue Oil Filter
 Nissan Rogue Cabin Air Filter
 Nissan Rogue Mass Air Flow Sensor
 Nissan Rogue Intake Manifold Gasket
 Nissan Rogue Air Duct
 Nissan Rogue Throttle Position Sensor
 Nissan Rogue Intake Manifold
 Nissan Rogue MAP Sensor