×
- Hello
- Login or Register
- Quick Links
- Live Chat
- Track Order
- Parts Availability
- RMA
- Help Center
- Contact Us
- Shop for
- Nissan Parts
- Nissan Accessories
My Garage
My Account
Cart
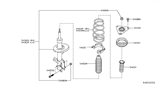
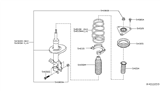
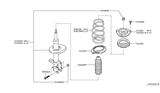
Genuine Nissan Rogue Coil Springs
Strut Spring- Select Vehicle by Model
- Select Vehicle by VIN
Select Vehicle by Model
orMake
Model
Year
Select Vehicle by VIN
For the most accurate results, select vehicle by your VIN (Vehicle Identification Number).
45 Coil Springs found


Nissan Rogue Spring Front RH
Part Number: 54010-9TA1C$133.59 MSRP: $188.68You Save: $55.09 (30%)Ships in 1-3 Business Days

Nissan Rogue Spring Front RH
Part Number: 54010-9TA0E$136.89 MSRP: $193.35You Save: $56.46 (30%)Ships in 1-3 Business Days


Nissan Rogue Rear Suspension Spring
Part Number: 55020-4BA0D$84.51 MSRP: $119.37You Save: $34.86 (30%)Ships in 1-3 Business Days
Nissan Rogue Spring FRT RH
Part Number: 54010-9TG0A$127.43 MSRP: $179.98You Save: $52.55 (30%)Ships in 1-3 Business Days
Nissan Rogue Front Spring
Part Number: 54010-3UB0D$234.02 MSRP: $330.53You Save: $96.51 (30%)Ships in 1-3 Business Days
Nissan Rogue Rear Suspension Spring
Part Number: 55020-6RA1C$234.89 MSRP: $331.77You Save: $96.88 (30%)Ships in 1-3 Business Days

Nissan Rogue Rear Suspension Spring
Part Number: 55020-6RA1D$232.60 MSRP: $328.53You Save: $95.93 (30%)Ships in 1-3 Business Days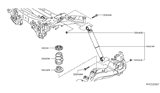
Nissan Rogue Rear Suspension Spring
Part Number: 55020-4BA1E$61.45 MSRP: $86.80You Save: $25.35 (30%)Ships in 1-3 Business Days
Nissan Rogue Front Spring
Part Number: 54010-6RA1B$101.34 MSRP: $143.13You Save: $41.79 (30%)Ships in 1-3 Business DaysNissan Rogue Front Spring
Part Number: 54010-1VK0E$203.63 MSRP: $280.48You Save: $76.85 (28%)Ships in 1-2 Business DaysNissan Rogue Rear Suspension Spring
Part Number: 55020-6RR1E$246.61 MSRP: $348.32You Save: $101.71 (30%)Ships in 1-3 Business DaysNissan Rogue Spring Front RH
Part Number: 54010-9TA1A$133.59 MSRP: $188.68You Save: $55.09 (30%)Ships in 1-3 Business Days
Nissan Rogue Front Spring
Part Number: 54010-4BA2C$61.47 MSRP: $86.82You Save: $25.35 (30%)Ships in 1-3 Business DaysNissan Rogue Front Spring
Part Number: 54010-4BA2B$68.88 MSRP: $97.28You Save: $28.40 (30%)Ships in 1-3 Business Days
Nissan Rogue Rear Suspension Spring
Part Number: 55020-4BF0B$70.63 MSRP: $99.77You Save: $29.14 (30%)Ships in 1-3 Business Days

Nissan Rogue Rear Suspension Spring
Part Number: 55020-4BA5C$78.87 MSRP: $111.40You Save: $32.53 (30%)Ships in 1-3 Business DaysNissan Rogue Front Spring
Part Number: 54010-6RR0C$111.24 MSRP: $157.12You Save: $45.88 (30%)Ships in 1-3 Business DaysNissan Rogue Rear Suspension Spring
Part Number: 55020-4BA5D$116.71 MSRP: $164.85You Save: $48.14 (30%)Ships in 1-3 Business DaysNissan Rogue Spring FRT RH
Part Number: 54010-9TG1A$137.15 MSRP: $193.72You Save: $56.57 (30%)Ships in 1-3 Business Days


Nissan Rogue Rear Suspension Spring
Part Number: 55020-4BF0C$138.51 MSRP: $195.63You Save: $57.12 (30%)
| Page 1 of 3 |Next >
1-20 of 45 Results
Nissan Rogue Coil Springs
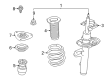
The Nissan Rogue Coil Springs allow the suspension to absorb bumps, which help support the weight of the crossover. By compressing and extending over road irregularities, these assemblies maintain a ride height that preserves wheel alignment. This optimizes ride and handling and prevents sagging, bottoming, and abnormal tire wear. Every Nissan Rogue on the road requires healthy Coil Springs. The main specifications include free length, which is the unloaded height, and spring rate, which is the force required to compress it one inch. The rate must be soft enough for comfort but stiff enough to avoid topping and bottoming. If the shape of a spring changes or it breaks, the Nissan body can sit lower at one end, meaning it must be replaced for proper stance and ride quality. Each Rogue regains stable handling and even weight distribution with new Coil Springs designed to manufacturer standards. The Coil Springs help to return the original geometry by proper positioning of loads. The Nissan Rogue has a predictably responsive steering feel and smooth ride over a variety of surfaces, thanks to properly operating Coil Springs. These springs help to maintain the vehicle's original ride and handling balance.
If you need any OEM Nissan Rogue Coil Springs, feel free to choose them out of our huge selection of genuine Nissan Rogue Coil Springs. All our parts are offered at unbeatable prices and are supported by the manufacturer's warranty. In addition, we offer quick shipping to have your parts delivered to your door step in a matter of days.
Nissan Rogue Coil Springs Parts Questions & Experts Answers
- Q: How to remove and install the rear coil springs and associated components on the rear suspension on a Nissan Rogue?A:Loosen the rear wheel lug nuts, raise the rear of the vehicle, support it securely on jackstands, and remove the wheel. Position a floor jack under the coil spring seat portion of the Trailing Arm, then raise the jack slightly. Remove the brake caliper, caliper mounting bracket, and brake disc. Remove the ABS wheel speed sensor. Unbolt the upper and lower Control Arms from the trailing arm. Detach the stabilizer bar link from the lower control arm. Separate the parking brake cable and brake pipe from the trailing arm, and disconnect the height sensor if equipped. Remove both Shock Absorber lower mounting bolts. On AWD models, remove the driveaxle. Carefully lower the suspension arm using the floor jack until the coil spring is fully extended, then remove the coil spring, the rubber mount, and the rubber seat. Installation is the reverse of removal, noting to raise the trailing arm with a floor jack until it is at normal ride height, then tighten the suspension component bolts/nuts to the specified torque, tighten the brake fasteners to the specified torque, and on AWD models, tighten the driveaxle hub nut to the specified torque. Finally, tighten the wheel lug nuts to the specified torque. If there is difficulty aligning the upper and lower control arm bolt holes with the holes in the trailing arm, a come-along can be used to connect the trailing arm on both sides, allowing for adjustment and alignment with a long drift punch for bolt insertion.

Related Nissan Rogue Parts
 Nissan Rogue Shock Absorber
 Nissan Rogue Shock And Strut Mount
 Nissan Rogue Coil Spring Insulator
 Nissan Rogue Strut Bearing
 Nissan Rogue Bump Stop
 Nissan Rogue Front Cross-Member
 Nissan Rogue Rear Crossmember
Browse by Year
2025 Coil Springs 2024 Coil Springs 2023 Coil Springs 2022 Coil Springs 2021 Coil Springs 2020 Coil Springs 2019 Coil Springs 2018 Coil Springs 2017 Coil Springs 2016 Coil Springs 2015 Coil Springs 2014 Coil Springs 2013 Coil Springs 2012 Coil Springs 2011 Coil Springs 2010 Coil Springs 2009 Coil Springs 2008 Coil Springs