×
- Hello
- Login or Register
- Quick Links
- Live Chat
- Track Order
- Parts Availability
- RMA
- Help Center
- Contact Us
- Shop for
- Nissan Parts
- Nissan Accessories
My Garage
My Account
Cart
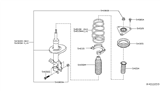
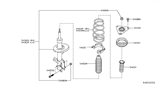
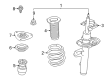
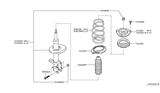
Genuine Nissan Rogue Shock Absorber
Suspension Shock Absorber- Select Vehicle by Model
- Select Vehicle by VIN
Select Vehicle by Model
orMake
Model
Year
Select Vehicle by VIN
For the most accurate results, select vehicle by your VIN (Vehicle Identification Number).
43 Shock Absorbers found


Nissan Rogue Rear Shock Absorber Kit
Part Number: E6210-JM01A$135.13 MSRP: $200.09You Save: $64.96 (33%)Ships in 1-3 Business Days


Nissan Rogue Strut Kit Front Right Hand
Part Number: E4302-4BF1C$173.45 MSRP: $256.83You Save: $83.38 (33%)Ships in 1-2 Business Days


Nissan Rogue Strut Kit Front Right Hand
Part Number: E4302-5HL0A$367.19 MSRP: $560.42You Save: $193.23 (35%)Ships in 1-3 Business Days


Nissan Rogue Strut Kit Front Left Hand
Part Number: E4303-5HL0A$367.19 MSRP: $560.42You Save: $193.23 (35%)Ships in 1-3 Business Days

Nissan Rogue Strut Kit Front Left Hand
Part Number: E4303-4BF1C$173.45 MSRP: $256.83You Save: $83.38 (33%)Ships in 1-2 Business Days


Nissan Rogue Shock Absorber Kit Rear
Part Number: E6210-4BA1C$136.97 MSRP: $198.37You Save: $61.40 (31%)Ships in 1-3 Business Days
Nissan Rogue Strut Kit Front Left Hand
Part Number: E4303-4BA1C$188.70 MSRP: $279.40You Save: $90.70 (33%)Ships in 1-3 Business Days
Nissan Rogue Strut Kit Front Left Hand
Part Number: E4303-5HA3A$367.19 MSRP: $560.42You Save: $193.23 (35%)Ships in 1-3 Business Days

Nissan Rogue Shock Absorber Kit Rear
Part Number: E6210-5HL0A$128.30 MSRP: $185.82You Save: $57.52 (31%)Ships in 1-2 Business Days
Nissan Rogue Strut Kit Front Right Hand
Part Number: E4302-4BA1D$188.80 MSRP: $279.55You Save: $90.75 (33%)Ships in 1-3 Business Days


Nissan Rogue Strut Kit Front Right Hand
Part Number: E4302-5HA3A$367.19 MSRP: $560.42You Save: $193.23 (35%)Ships in 1-3 Business Days
Nissan Rogue Strut Kit Front Left Hand
Part Number: E4303-4BA1D$188.80 MSRP: $279.55You Save: $90.75 (33%)Ships in 1-3 Business Days


Nissan Rogue Shock Absorber Kit Rear
Part Number: E6210-5HA0B$128.30 MSRP: $185.82You Save: $57.52 (31%)Ships in 1-2 Business Days
Nissan Rogue STRUT Kit Ft RH
Part Number: E4302-6RA1D$219.45 MSRP: $324.93You Save: $105.48 (33%)Ships in 1-3 Business DaysNissan Rogue Front Left Strut Kit
Part Number: E4303-6RA1D$219.45 MSRP: $324.93You Save: $105.48 (33%)Ships in 1-3 Business DaysNissan Rogue Shock Absorber Kit Rear
Part Number: E6210-5HA1B$139.97 MSRP: $207.25You Save: $67.28 (33%)
Nissan Rogue Rear Shock Absorber Kit
Part Number: E6210-4BA1D$121.68 MSRP: $278.42You Save: $156.74 (57%)Ships in 1-3 Business Days
Nissan Rogue Front Suspension Strut Kit Left Hand
Part Number: E4303-1VK0A$145.56 MSRP: $215.53You Save: $69.97 (33%)Ships in 1-3 Business Days


| Page 1 of 3 |Next >
1-20 of 43 Results
Nissan Rogue Shock Absorber
The Shock Absorber is an essential part of Nissan Rogue features which delivers it from suspension system specializing that is prominent for its integrity and high efficiency. Built to reduce the effectiveness of the shock impulses, the Shock Absorber also improves the steadiness and smoothness of the vehicle's ride. The Shock Absorber dissipates energy through heat, and thus reduces high amplitude oscillations, thus in combination with the springs controlling the vibrations. Different Nissan Rogue models have applied Shock Absorber of twin tube and mono tube which has varying feature and aspect. Twin-tube shocks are popular due to their simplicity and ease in manufacturing while the mono-tube shocks are more superior in heat management and therefore better in their performance. There is features like position sensitive damping or PSD or magnetorheological damper that make Shock Absorber more sophisticated and more capable in a variety of driving situations to improve comfort and control. This flexibility not only increases performance but boosts up the safety of Nissan Rogue and that's why Nissan Rogue stands out in the automotive industry. The Nissan Rogue which entered the automotive market in 2007 has gone through many generations of production and remains one of the top-selling compact crossovers SUV due to its excellent Shock Absorber. Consequently, the Shock Absorber continues a crucial role as one of Nissan's key components, which embody quality and innovations for driving experiences.
If you need any OEM Nissan Rogue Shock Absorber, feel free to choose them out of our huge selection of genuine Nissan Rogue Shock Absorber. All our parts are offered at unbeatable prices and are supported by the manufacturer's warranty. In addition, we offer quick shipping to have your parts delivered to your door step in a matter of days.
Nissan Rogue Shock Absorber Parts Questions & Experts Answers
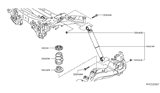
- Q: How to remove and install the rear shock absorber on Nissan Rogue?A:Turn the rear wheel lug nuts counterclockwise to loosen them, then safely lift the rear end of the vehicle and securely support it with jackstands While block the front wheels so that they can not move around. Lift the rear wheel and hold one end of the lower rear Control Arm using a floor jack placed at the coil spring pocket. Then, undo the nut and bolt of shock absorber upper mounting; in the same manner as above replace the nut and bolt of shock absorber lower mounting to take out the shock absorber. For installation, reverse the removal procedure, with a specific addition of raising the control arm with the jack to the normal ride height as you tighten the mounting fasteners to the recommended torque. Last, reconnect the wheel, and lug nuts, then raise the car and tighten the lug nuts to the right torque.

Related Nissan Rogue Parts
 Nissan Rogue Coil Springs
 Nissan Rogue Steering Knuckle
 Nissan Rogue Tie Rod End
 Nissan Rogue Wheelhouse
 Nissan Rogue Fender
Browse by Year
2025 Shock Absorber 2024 Shock Absorber 2023 Shock Absorber 2022 Shock Absorber 2021 Shock Absorber 2020 Shock Absorber 2019 Shock Absorber 2018 Shock Absorber 2017 Shock Absorber 2016 Shock Absorber 2015 Shock Absorber 2014 Shock Absorber 2013 Shock Absorber 2012 Shock Absorber 2011 Shock Absorber 2010 Shock Absorber 2009 Shock Absorber 2008 Shock Absorber