×
- Hello
- Login or Register
- Quick Links
- Live Chat
- Track Order
- Parts Availability
- RMA
- Help Center
- Contact Us
- Shop for
- Nissan Parts
- Nissan Accessories
My Garage
My Account
Cart
Genuine Nissan Versa Oxygen Sensor
Oxygen O2 Sensor- Select Vehicle by Model
- Select Vehicle by VIN
Select Vehicle by Model
orMake
Model
Year
Select Vehicle by VIN
For the most accurate results, select vehicle by your VIN (Vehicle Identification Number).
11 Oxygen Sensors found


Nissan Versa Heated Oxygen Sensor
Part Number: 226A0-5RB0A$169.82 MSRP: $251.46You Save: $81.64 (33%)Ships in 1-3 Business Days


Nissan Versa Air And Fuel Ratio Sensor Assembly
Part Number: 22693-1AA0B$166.75 MSRP: $246.90You Save: $80.15 (33%)Ships in 1-3 Business Days


Nissan Versa Air Fuel Ratio Sensor
Part Number: 22693-1KT0A$266.79 MSRP: $407.18You Save: $140.39 (35%)Ships in 1-3 Business Days


Nissan Versa Heated Oxygen Sensor
Part Number: 226A0-1KT0A$221.55 MSRP: $328.05You Save: $106.50 (33%)Ships in 1-3 Business Days
Nissan Versa Heated Oxygen Sensor
Part Number: 22693-1FN0A$263.50 MSRP: $402.17You Save: $138.67 (35%)Ships in 1-2 Business Days


Nissan Versa Air Fuel Ratio Sensor
Part Number: 22693-3TA0A$228.34 MSRP: $338.10You Save: $109.76 (33%)Ships in 1-2 Business Days


Nissan Versa Air Fuel Ratio Oxygen Sensor
Part Number: 22693-1KT5A$266.79 MSRP: $407.18You Save: $140.39 (35%)Ships in 1-3 Business Days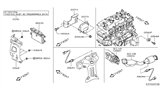
Nissan Versa Sensor Assembly Air Fuel Ratio
Part Number: 22693-5RB0A$294.47 MSRP: $449.43You Save: $154.96 (35%)Ships in 1-3 Business Days
Nissan Versa Heated Oxygen Sensor
Part Number: 226A0-ET000$220.04 MSRP: $325.82You Save: $105.78 (33%)Ships in 1-3 Business Days
Nissan Versa Air Fuel Ratio Sensor
Part Number: 22693-ET000$230.46 MSRP: $341.23You Save: $110.77 (33%)Ships in 1-3 Business Days

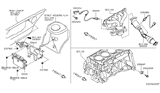
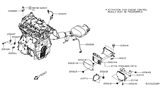
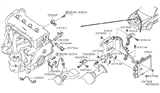
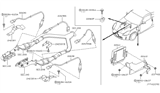
Nissan Versa Oxygen Sensor
The Nissan Versa Oxygen Sensor helps keep the air/fuel mixture within emissions limits by monitoring the level of oxygen in the exhaust. The component in question is a zirconia element. Moreover, this element possesses platinum electrodes. It protects this element with a ceramic seal. In addition, there is a threaded steel shell that safeguards the ceramic seal. Meanwhile, it has vents forming openings. This structure lets gas come in contact with the tip and allows oxygen from outside air at the top. When it is heated by its internal heater to approximately 600°F, the element produces a voltage between 0.1 and 0.9 volt. High voltage means a rich mixture, while low voltage means a lean mixture. The computer adjusts the injector pulse width accordingly. The Nissan part allows for closed-loop operation of the catalytic converter. All Nissan Versas utilize, at a minimum, two sensors: an upstream Oxygen Sensor situated ahead of the converter and a downstream Oxygen Sensor that functions as a catalyst monitor. The downstream unit must show a steady state 0.45-volt waveform. A similarity to the upstream pattern indicates a loss of converter efficiency. Oxygen Sensor contamination or aging is capable of increasing emissions and activating warning lights on the Nissan Versa. Additionally, the Versa Oxygen Sensor's performance is crucial for optimal engine operation.
If you need any OEM Nissan Versa Oxygen Sensor, feel free to choose them out of our huge selection of genuine Nissan Versa Oxygen Sensor. All our parts are offered at unbeatable prices and are supported by the manufacturer's warranty. In addition, we offer quick shipping to have your parts delivered to your door step in a matter of days.
Nissan Versa Oxygen Sensor Parts Questions & Experts Answers
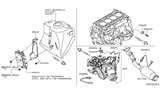
- Q: How to service an oxygen sensor on Nissan Versa?A:Be very careful when servicing an oxygen sensor as it has a permanently attached pigtail and electrical connector which should not be removed. Damage or removal of the pig-tail or electrical connector can adversely affect operation of the sensor. Grease, dirt and other contaminants should be kept away from the electrical connector and the louvered end of the sensor. Do not use cleaning solvents of any kind on the oxygen sensor. Do not drop or roughly handle the sensor. The silicone boot must be installed in the correct position to prevent the boot from being melted and to allow the sensor to operate properly. To replace the upstream oxygen sensor, remove the engine cover and exhaust manifold heat shield. Locate the upstream oxygen sensor electrical connector and disconnect it. Follow the wiring harness to the electrical connector, then unplug it. Detach the sensor wiring harness from any clips. Unscrew the sensor with an oxygen sensor socket if one is available. You may have to raise the vehicle and support it securely on jackstands to reach it. If you're going to install the old sensor, apply anti-seize compound to the threads to ease future removal. If you're installing a new sensor, the threads will already have anti-seize on them. Installation is the reverse of removal. Tighten the sensor securely. For the downstream oxygen sensor, raise the vehicle and support it securely on jackstands. Disconnect the wiring harness from the pigtail of the sensor. The downstream oxygen sensor is installed on the top of the exhaust pipe after the Catalytic Converter, under a heat shield - a crows foot, ratchet and an extension are required to remove the sensor. Unscrew the sensor using an extension and a crows-foot wrench. If you're going to install the old sensor, apply anti-seize compound to the threads to ease future removal. If you're installing a new sensor, the threads will already have anti-seize on them. Installation is the reverse of removal. Tighten the sensor securely.

Related Nissan Versa Parts
 Nissan Versa Engine Control Module
 Nissan Versa Catalytic Converter
 Nissan Versa Knock Sensor
 Nissan Versa Canister Purge Valve
 Nissan Versa Vapor Canister
 Nissan Versa Vehicle Speed Sensor
 Nissan Versa Vapor Pressure Sensor
 Nissan Versa Ambient Temperature Sensor
 Nissan Versa Brake Fluid Level Sensor
Browse by Year
2025 Oxygen Sensor 2024 Oxygen Sensor 2023 Oxygen Sensor 2022 Oxygen Sensor 2021 Oxygen Sensor 2020 Oxygen Sensor 2019 Oxygen Sensor 2018 Oxygen Sensor 2017 Oxygen Sensor 2016 Oxygen Sensor 2015 Oxygen Sensor 2014 Oxygen Sensor 2013 Oxygen Sensor 2012 Oxygen Sensor 2011 Oxygen Sensor 2010 Oxygen Sensor 2009 Oxygen Sensor 2008 Oxygen Sensor 2007 Oxygen Sensor