×
- Hello
- Login or Register
- Quick Links
- Live Chat
- Track Order
- Parts Availability
- RMA
- Help Center
- Contact Us
- Shop for
- Nissan Parts
- Nissan Accessories
My Garage
My Account
Cart
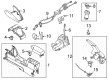
Genuine Nissan Versa Shift Cable
Transmission Shift Cable- Select Vehicle by Model
- Select Vehicle by VIN
Select Vehicle by Model
orMake
Model
Year
Select Vehicle by VIN
For the most accurate results, select vehicle by your VIN (Vehicle Identification Number).
13 Shift Cables found


Nissan Versa Automatic Transmission Shifter Cable
Part Number: 34935-EM30A$106.54 MSRP: $150.48You Save: $43.94 (30%)Ships in 1-2 Business Days


Nissan Versa Control Cable Assembly
Part Number: 34935-3VY0A$95.01 MSRP: $134.20You Save: $39.19 (30%)Ships in 1-3 Business Days

Nissan Versa Automatic Transmission Shifter Cable
Part Number: 34935-3AA0A$134.91 MSRP: $190.55You Save: $55.64 (30%)Ships in 1-3 Business Days


Nissan Versa Manual Transmission Control Cable Assembly
Part Number: 34413-3AM0A$342.84 MSRP: $484.23You Save: $141.39 (30%)Ships in 1-2 Business Days
Nissan Versa Control Cable Assembly
Part Number: 34935-1HK1A$78.34 MSRP: $110.65You Save: $32.31 (30%)Ships in 1-3 Business Days


Nissan Versa Control Cable Assembly
Part Number: 34935-EL70A$70.89 MSRP: $100.14You Save: $29.25 (30%)Ships in 1-3 Business Days
Nissan Versa Transmission Control Device Assembly
Part Number: 34413-00Q1F$169.01 MSRP: $238.72You Save: $69.71 (30%)Ships in 1-3 Business Days
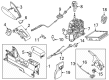
Nissan Versa Cable Assy-Control
Part Number: 34935-9VB0A$78.34 MSRP: $110.65You Save: $32.31 (30%)Ships in 1-3 Business DaysNissan Versa Control Cable Assembly
Part Number: 34935-9KZ0A$104.78 MSRP: $148.00You Save: $43.22 (30%)Ships in 1-3 Business DaysNissan Versa Control Cable Assembly
Part Number: 34935-9ME0A$76.16 MSRP: $107.57You Save: $31.41 (30%)Ships in 1-3 Business DaysNissan Versa Shift Control Cable
Part Number: 34413-9ME0A$309.55 MSRP: $437.22You Save: $127.67 (30%)Ships in 1-3 Business Days
Nissan Versa Cable Assy-Key Interlock
Part Number: 34908-5RA0A$14.01 MSRP: $19.32You Save: $5.31 (28%)Ships in 1-3 Business Days
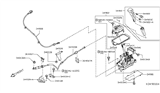
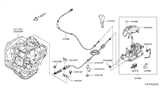
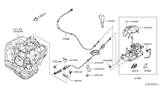
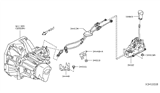
Nissan Versa Shift Cable
The Nissan Versa Shift Cable enables the driver to move the shifter and have the transmission respond instantly for confident gear changes. The interior lever is mechanically linked to the gearbox. By pushing or pulling the lever, the inner wire along with its housing glides through and flips either the transmission range lever or the shift forks into the chosen slot. The Nissan Versa manual transmission models applied different designs for the Shift Cable. Those with manual transmissions had a twin cable setup. One cable was for fore-aft motion, while the other cable was for side-to-side motion. The automatic versions, on the other hand, only had a single Shift Cable. This cable went to the PRNDL arm. Both cable types allow for accurate, low-effort motion. However, the twin Shift Cable setup balances forces for the classic H-pattern. Earlier rod linkages were applied for this purpose, but now with cables, it is lighter, easier to route through crowded engine bays, and better at absorbing vibration. To keep the jacket smooth and free from road grit, it should be regularly lubricated. However, it will eventually wear. Timely replacement of the Shift Cable is essential for every Nissan Versa driver. When a Shift Cable stretches, bends, or snaps, the lever can feel loose, refuse to enter gear, or even leave the car stuck in neutral.
If you need any OEM Nissan Versa Shift Cable, feel free to choose them out of our huge selection of genuine Nissan Versa Shift Cable. All our parts are offered at unbeatable prices and are supported by the manufacturer's warranty. In addition, we offer quick shipping to have your parts delivered to your door step in a matter of days.
Nissan Versa Shift Cable Parts Questions & Experts Answers
- Q: What procedures apply to Nissan Versa for shift cable replacement?A:The above procedures apply to the models with 4-speed AT and CVT transaxles. For removal and install applications on 2012 and prior models, first engage the parking brake and shift the gear shift to Park then you can disconnect the battery and also take off the air intake housing with ducts to get to the front of the transaxle. Loosen the shift cable from the manual lever by unscrewing the locknut: Raise the car on safety jack stands. Pull out the exhaust and heat shield to reach the shift cable, and then unscrew the black cover plate to free up the shifter cable from the pivot and bracket. Pull out the shift cable; release the cable support bracket. The removal process is done in the opposite way of installation, after which cables are adjusted. To perform diagnostics on 2012 and later models, start by disconnecting the battery and battery tray and then the module for the transmission, followed by the power distribution center bracket. Disconnect the end of the cable from the shifter assembly and also, make a removal of the center console as well as the bracket that is on top of the cable grommet. Push the locking tabs to release the grommet and then unbolt the nut fixing the shift cable to the lever on the transaxle side, with the nuts that retain the cable to the bracket, the clip must be removed. Lift the vehicle up on jackstands and if necessary, take off the exhaust as well as the heat shield to gain access. Take out all the screws which hold the shift cable bracket and, with the help of the shift lever, draw the cable through the floor to get rid of it. The process of installation is the opposite to that of removal and is succeeded by the process of cable adjustment. For adjustment, first, the Air Filter Housing has to be removed, then shift lever should be placed in position, locknut then loosened, and the transaxle manual shift lever has to be engaged in Park position. Tighten the locknut while holding the manual lever; shift from "P" to "R or 1" the shift lever should move smoothly and the shift indicator should indicate the corresponding position. Last but not the least, make sure that the engine can be started.

Related Nissan Versa Parts
 Nissan Versa Valve Body
 Nissan Versa Neutral Safety Switch
 Nissan Versa Clutch Disc
 Nissan Versa Flywheel
 Nissan Versa Clutch Master Cylinder
 Nissan Versa Clutch Slave Cylinder
 Nissan Versa Bellhousing
 Nissan Versa Pressure Plate
 Nissan Versa Release Bearing
 Nissan Versa Shift Indicator
Browse by Year
2025 Shift Cable 2024 Shift Cable 2023 Shift Cable 2022 Shift Cable 2021 Shift Cable 2020 Shift Cable 2019 Shift Cable 2018 Shift Cable 2017 Shift Cable 2016 Shift Cable 2015 Shift Cable 2014 Shift Cable 2013 Shift Cable 2012 Shift Cable 2011 Shift Cable 2010 Shift Cable 2009 Shift Cable 2008 Shift Cable 2007 Shift Cable