×
- Hello
- Login or Register
- Quick Links
- Live Chat
- Track Order
- Parts Availability
- RMA
- Help Center
- Contact Us
- Shop for
- Nissan Parts
- Nissan Accessories
My Garage
My Account
Cart
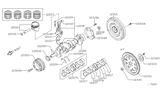
Genuine Nissan Xterra Crankshaft
Crank Shaft- Select Vehicle by Model
- Select Vehicle by VIN
Select Vehicle by Model
orMake
Model
Year
Select Vehicle by VIN
For the most accurate results, select vehicle by your VIN (Vehicle Identification Number).
4 Crankshafts found


Nissan Xterra Crankshaft Assembly
Part Number: 12200-EA200$1026.43 MSRP: $1449.77You Save: $423.34 (30%)Ships in 1-3 Business Days
Nissan Xterra Crankshaft Assembly
Part Number: 12200-9BF0A$1026.43 MSRP: $1449.77You Save: $423.34 (30%)


Nissan Xterra Crankshaft
Nissan Xterra Crankshaft transforms the up-and-down power of the pistons into smooth rotation that ultimately spins the gears and wheels, making it a centerpiece of engine operation. This Crankshaft rides in the engine block on precision journals, while connecting rods fasten to offset throws that convert reciprocating action into circular motion. Early and lower output Xterra engines rely on cast iron Crankshaft construction, valued for durability at modest horsepower, whereas high performance editions step up to forged steel, a tougher style able to handle greater torque loads, so material choice marks the main difference between types applied through the model years. When owners follow scheduled oil changes, the part generally lasts the life of the vehicle, dirty oil or reduced flow lets grit score journals and widen clearances, inviting knock and harmful vibration. A rattling feel from under the hood warns that the Crankshaft or its bearings may be compromised and, on any Nissan built Xterra, ignoring that sign risks costly engine failure. Regular inspections keep the Crankshaft healthy and ensure Nissan engines turning confidently inside every Xterra adventure.
If you need any OEM Nissan Xterra Crankshaft, feel free to choose them out of our huge selection of genuine Nissan Xterra Crankshaft. All our parts are offered at unbeatable prices and are supported by the manufacturer's warranty. In addition, we offer quick shipping to have your parts delivered to your door step in a matter of days.
Nissan Xterra Crankshaft Parts Questions & Experts Answers
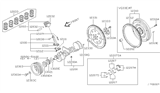
- Q: How to properly reassemble and install the crankshaft during the engine reassembly process on Nissan Xterra?A:The reassembly of an engine must begin with thorough cleaning, inspection, and repair or reconditioning of the engine block and crankshaft. The engine should be positioned such that the crankcase faces upwards on the stand. The brace assembly must be lifted out of the bearing cap through removal of main bearing cap bolts and ensure no harm comes to bearing surfaces. If it exists, take out original bearing inserts from both main caps and block and clean their surfaces using a lint free cloth. Keep the surfaces precisely clean. For the following check for main bearing oil clearance, place new main bearing inserts into main bearing saddles in block ensuring proper alignment with oil holes in a block. Bear in mind that bearings should not be hammered into position as this may damage bearing faces. Place the flanged thrust bearing without lubrication either behind it or at its front face depending on the kind of engine (fourth cap and saddle for 3.3L engines) (third cap and saddle for 2.4L and 3.5L engines). Ensure cleanliness of both these surfaces as well as those on the crankshaft main bearing journals. Once cleaned, laydown the crankshaft within the primary bearings at their places relative to each other Next important step is to use Plastigage for checking main bearing oil clearance on each crankshaft journal.Remove any traces of Plastigage from the journals before installing them which should face towards drivebelt end Install brace assemblies with caps by tightening bolts until Plastigage is not disturbed in accordance with arrow directions Rotate gradually tightening main-bearing cap assembly bolts three times starting from centre going outwards avoiding turning over crankshaft After tightening all these bolts to required torque remove caps carefully leaving Plastigage untouched Measure crushed width against scale on envelope to determine if specified value meets up with clearance specified If not ensure cleanliness then think about probably changing such things like different types of inserts used Carefully remove all Plastigage material traces from bearing faces and main bearing journals The crankshaft should be put into the block with clean caps and then the cap bolts tightened to torque values Aligning main bearing and crankshaft thrust surfaces by gently tapping ends of the crankshafts After re-tightening all main-bearing cap bolts, rotate crankshaft by hand in order to check for any binding Verify the amount of endplay in the crankshaft using feeler gauge or dial indicator, if new bearings are installed and thrust faces are good Finally, secure it to block when installing a new seal and retainer.

Related Nissan Xterra Parts
 Nissan Xterra Oil Pump Gasket
 Nissan Xterra Rod Bearing
 Nissan Xterra Camshaft
 Nissan Xterra Oil Pan Gasket
 Nissan Xterra Crankshaft Gear
 Nissan Xterra Oil Pump
 Nissan Xterra Oil Pan
 Nissan Xterra Crankshaft Pulley
 Nissan Xterra Cam Gear
 Nissan Xterra Crankshaft Thrust Washer Set
 Nissan Xterra Piston Ring Set