×
- Hello
- Login or Register
- Quick Links
- Live Chat
- Track Order
- Parts Availability
- RMA
- Help Center
- Contact Us
- Shop for
- Nissan Parts
- Nissan Accessories
My Garage
My Account
Cart
Genuine Nissan Xterra Oil Pump
Oil Fluid Pump- Select Vehicle by Model
- Select Vehicle by VIN
Select Vehicle by Model
orMake
Model
Year
Select Vehicle by VIN
For the most accurate results, select vehicle by your VIN (Vehicle Identification Number).
8 Oil Pumps found


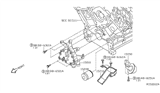
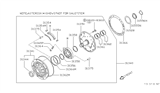
Nissan Xterra Oil Pump Assembly
Part Number: 15010-EA20A$267.38 MSRP: $377.65You Save: $110.27 (30%)Ships in 1-3 Business Days


Nissan Xterra Oil Pump Assembly
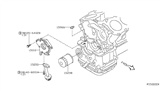
Part Number: 31340-97X00$566.46 MSRP: $864.57You Save: $298.11 (35%)Ships in 1-3 Business Days


Nissan Xterra Oil Pump Assembly
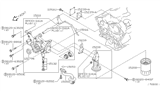
Part Number: 15010-EA200$267.38 MSRP: $377.65You Save: $110.27 (30%)Ships in 1-3 Business Days


Nissan Xterra Pump-Oil
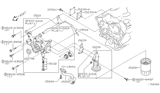
Part Number: 15010-4S100$372.95 MSRP: $526.77You Save: $153.82 (30%)Ships in 1-3 Business Days


Nissan Xterra Oil Pump
The Oil Pump in the Nissan Xterra operates similarly to a heart, pumping oil around and enabling your engine to work properly. The Oil Pump is driven by the crankshaft. A mesh strainer draws oil from the sump. Subsequently, it sends it through a filter. Finally, it routes the filtered oil into the engine galleries. The Oil Pump has a hydraulic function. The pressure of the Oil Pump depends on the speed of the engine. When a proper clearance between the pump gears and the housing is maintained, flow is aided. If the pressure does build too high, a free pressure relief valve will open. The Oil Pump configuration uses a single crank-driven type. In the single crank type, a pair of inter-meshing gears rotates in a close-fitting housing. This operation produces suction at the inlet and continuous delivery at the outlet. A threaded pressure switch or sending unit, located in the gallery, detects system pressure and activates a warning light or gauge if pressure drops too low. Regular inspections of the gears, housing, pickup tube, and screen make it dependable in every Nissan Xterra engine. As a result, a steady supply of oil flows through the Nissan Xterra powertrain. The Oil Pump is crucial across the Nissan Xterra lineup.
If you need any OEM Nissan Xterra Oil Pump, feel free to choose them out of our huge selection of genuine Nissan Xterra Oil Pump. All our parts are offered at unbeatable prices and are supported by the manufacturer's warranty. In addition, we offer quick shipping to have your parts delivered to your door step in a matter of days.
Nissan Xterra Oil Pump Parts Questions & Experts Answers
- Q: How to remove and install the oil pump on 3.5L V6 Nissan Xterra?A:Remove the primary timing chain and the crankshaft sprocket. It is not necessary to remove the camshaft sprockets, the camshaft sprocket bolts, the secondary timing chains or the primary timing chain tensioner pivot arm/chain guide during this procedure. Simply pivot the tensioner arm/chain guide over to the left side to allow removal of the oil pump housing. Remove the oil pans. Remove the oil pump pick-up tube. Remove the oil pump-to-engine block bolts from the front of the engine. Gently pry the oil pump housing outward enough to clear the dowel pins on the engine block and remove it from the engine. Use a large Phillips screwdriver to remove the screws holding the front cover on the oil pump housing. Clean all components with solvent, then inspect them for wear and damage. Remove the oil pressure regulator cap, washer, spring(s) and valve. Check the oil pressure regulator valve sliding surface and valve spring. If either the spring or the valve is damaged, they must be replaced as a set. Check the clearance of the following oil pump components with a feeler gauge and compare the measurements to the specific clearances: Rotor tooth tip clearance, Outer rotor-to-body clearance, Cover-to-inner rotor clearance, Cover-to-outer rotor clearance, Inner rotor ridge clearance. If any clearance is excessive, replace the entire oil pump assembly. Pack the pump with petroleum jelly to prime it. Assemble the oil pump and tighten the screws securely. Install the oil pressure regulator valve. spring and washer, then tighten the oil pressure regulator valve cap. Use new gaskets on all disassembled parts and reverse the removal procedure for installation. Align the flats on the crankshaft with the flats on the oil pump gear. Tighten all fasteners to the specific torque. Before installing the oil pan, be sure to replace the O-rings on the oil pump housing and engine block.

Related Nissan Xterra Parts
 Nissan Xterra Drain Plug Washer
 Nissan Xterra Oil Filter
 Nissan Xterra Rod Bearing
 Nissan Xterra Drain Plug
 Nissan Xterra Oil Pressure Switch
 Nissan Xterra Dipstick
 Nissan Xterra Oil Pan
 Nissan Xterra Dipstick Tube
 Nissan Xterra Crankshaft Pulley
 Nissan Xterra Oil Cooler
 Nissan Xterra Crankshaft Thrust Washer Set
 Nissan Xterra Piston Ring Set