×
- Hello
- Login or Register
- Quick Links
- Live Chat
- Track Order
- Parts Availability
- RMA
- Help Center
- Contact Us
- Shop for
- Nissan Parts
- Nissan Accessories
My Garage
My Account
Cart
Genuine 1984 Nissan 300ZX Transmission Assembly
Trans Assembly- Select Vehicle by Model
- Select Vehicle by VIN
Select Vehicle by Model
orMake
Model
Year
Select Vehicle by VIN
For the most accurate results, select vehicle by your VIN (Vehicle Identification Number).
9 Transmission Assemblies found

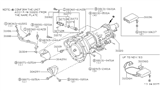
1984 Nissan 300ZX Automatic Transmission
Part Number: 31020-X8062$3168.30 MSRP: $3835.71Limited AvailabilityYou Save: $667.41 (18%)Product Specifications- Other Name: Transmission-Auto
- Manufacturer Note: E4N71B
- Replaced by: 31020-X8101
- Lookup Code: 31020
- Item Weight: 247.20 Pounds
- Item Dimensions: 40.4 x 21.6 x 18.4 inches
- Condition: New
- Fitment Type: Direct Replacement
- SKU: 31020-X8062
- Warranty: This genuine part is guaranteed by Nissan's factory warranty.
1984 Nissan 300ZX Automatic Transmission
Part Number: 31020-X8006$3168.30 MSRP: $3835.71Limited AvailabilityYou Save: $667.41 (18%)Product Specifications- Other Name: Transmission-Auto
- Manufacturer Note: 4N71B
- Replaced by: 31020-X8100
- Lookup Code: 31020
- Item Weight: 183.80 Pounds
- Item Dimensions: 40.8 x 22.9 x 21.0 inches
- Condition: New
- Fitment Type: Direct Replacement
- SKU: 31020-X8006
- Warranty: This genuine part is guaranteed by Nissan's factory warranty.
1984 Nissan 300ZX Automatic Transmission
Part Number: 31020-X8020$3168.30 MSRP: $3835.71Limited AvailabilityYou Save: $667.41 (18%)Product Specifications- Other Name: Transmission-Auto
- Manufacturer Note: 4N71B
- Replaced by: 31020-X8100
- Lookup Code: 31020
- Item Weight: 178.50 Pounds
- Item Dimensions: 40.4 x 22.7 x 20.6 inches
- Condition: New
- Fitment Type: Direct Replacement
- SKU: 31020-X8020
- Warranty: This genuine part is guaranteed by Nissan's factory warranty.

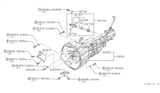
1984 Nissan 300ZX Manual Transmission Assembly
Part Number: 32010-03P03$3218.37 MSRP: $3896.33Limited AvailabilityYou Save: $677.96 (18%)Product Specifications- Other Name: Manual Transmission
- Manufacturer Note: FS5R90A(T-5)
- Replaced by: 32010-03P04
- Lookup Code: 32010
- Condition: New
- Fitment Type: Direct Replacement
- SKU: 32010-03P03
- Warranty: This genuine part is guaranteed by Nissan's factory warranty.
1984 Nissan 300ZX Manual Transmission Assembly
Part Number: 32010-03P01$3218.37 MSRP: $3896.33Limited AvailabilityYou Save: $677.96 (18%)Product Specifications- Other Name: Manual Transmission
- Manufacturer Note: FS5R90A(T-5)
- Replaced by: 32010-03P04
- Lookup Code: 32010
- Item Weight: 111.20 Pounds
- Item Dimensions: 40.0 x 17.0 x 15.2 inches
- Condition: New
- Fitment Type: Direct Replacement
- SKU: 32010-03P01
- Warranty: This genuine part is guaranteed by Nissan's factory warranty.
- Product Specifications
- Manufacturer Note: FS5W71C
- Replaced by: 32010-19P61
- Lookup Code: 32010
- Item Weight: 157.70 Pounds
- Item Dimensions: 36.4 x 18.4 x 15.2 inches
- Condition: New
- Fitment Type: Direct Replacement
- SKU: 32010-01P10
- Warranty: This genuine part is guaranteed by Nissan's factory warranty.
- Product Specifications
- Manufacturer Note: E4N71B
- Replaced by: 31020-X8084
- Lookup Code: 31020
- Item Weight: 187.00 Pounds
- Item Dimensions: 41.6 x 21.7 x 19.4 inches
- Condition: New
- Fitment Type: Direct Replacement
- SKU: 31020-X8075
- Warranty: This genuine part is guaranteed by Nissan's factory warranty.
- Product Specifications
- Other Name: Transmission Assembly-Automatic
- Manufacturer Note: 4N71B
- Replaces: 31020-X8020, 31020-X8006
- Lookup Code: 31020
- Item Weight: 187.30 Pounds
- Item Dimensions: 42.0 x 23.3 x 20.2 inches
- Condition: New
- Fitment Type: Direct Replacement
- SKU: 31020-X8100
- Warranty: This genuine part is guaranteed by Nissan's factory warranty.
- Product Specifications
- Other Name: Transmission
- Manufacturer Note: FS5R90A(T-5)
- Replaces: 32010-03P01, 32010-03P03
- Lookup Code: 32010
- Item Weight: 110.20 Pounds
- Item Dimensions: 40.4 x 16.3 x 15.2 inches
- Condition: New
- Fitment Type: Direct Replacement
- SKU: 32010-03P04
- Warranty: This genuine part is guaranteed by Nissan's factory warranty.
1984 Nissan 300ZX Transmission Assembly
Committed to delivering top-notch quality at affordable prices, our website is your go-to source for OEM 1984 Nissan 300ZX Transmission Assembly worldwide. Each of our genuine 1984 Nissan 300ZX Transmission Assembly come with a manufacturer's warranty, so rest assured, quality and cost are covered. With us, you're making a smart choice that stands the test of time.
1984 Nissan 300ZX Transmission Assembly Parts Questions & Experts Answers
- Q: How to overhaul the FS5R9OA Transmission Assembly on the 1984 Nissan 300ZX?A: To begin taking this apart, study the exploded view drawings of the transmission. Eliminate the offset lever roll pin with a punch and hammer, then remove bolts that hold together the housing and offset lever as an assembly from extension housing to transmission case. After you have removed the detent ball, spring, and roll pin from beside or within the offset lever, you are further required to pull out plastic funnel, thrust bearing race as well as thrust bearing from either end of countershaft or inside extension housing. With these pointers in mind Remove transmission cover bolts and slide cover off toward right side of case noting location of dowel type alignment bolts for re-assembly purposes later. While removing fifth gear shift fork drive out roll pin just ensuring that a wood block is placed below it to prevent any damage on reverse shift rail. Detach fifth gear synchronizer snap-ring and shift fork then go ahead and extract fifth gear synchronizer assembly pulling back fifth gear from countershaft's rear. Remove insert retainer, insert springs plus inserts from fifth gear synchronizer sleeve marking position of sleeve as well as hub for purposes of assembling. By removing the snap ring separate the 5th speed driven gear from rear of output shaft; then punch alignment marks on front bearing cap and transmission case for assembly orientation purposes. Next remove mounting bolts to detach bearing cap before prying off bearing cap oil seal using screwdriver while taking care not to damage it also remove bearing race together with end play shims from cap. Turn clutch shaft so that flat face is pointing towards countershaft after which draw clutch shaft out through transmission case by pulling input shaft and main drive gear assembly forwardly. Take off clutch shaft needle bearings, thrust bearing including race followed by lifting output shaft rear bearing race so that you can get at whole shaft set out of its casing afterwards. In some cases utilize homemade spring removal tool if necessary thus unhook overcenter link spring at back portion of case and remove reverse lever C-clip. You can now disengage the rail with the reverse lever by turning it until it is free from the latter then take out rail at rear of case. Release pivot pin that secures reverse lever; disconnect the idler gear from reverse lever while pulling out reverse fork and lever assembly from the transmission case. Remove countershaft real snap ring before carefully pushing countershaft assembly towards rear in order to take out countershaft bearing. Subsequently, move entire countershaft assembly to the back and lift it out of transmission case followed by taking off of counter shaft rear bearing spacer as well as pin for idler shaft. These are pulled out of transmission case accompanied by use of press if necessary to remove clutch front bearing as well as countershaft front bearing from case. Afterwards you must in turn extract rear extension housing seal with a flat drift and hammer then pull thrust bearing washer off output shaft. Finally, mark sleeve and hub on third/fourth synchronizer insert springs, remove third/fourth synchronizer blocking ring, remove sleeve from hub before removing third gear off output shaft together with second gear snap-ring tabbed thrust washer plus second gear off shaft 3rd gear should be removed first from output shaft than no 2 gear snap-ring tabbed thrust washer and 2nd gear itself.After that, detach the back shaft bearing then remove the 1st gear thrust washer, roll pin, first gear and blocking ring. Scribe assembly reference marks on the first/second gear synchronizer sleeve and output shaft hub prior to removing insert spring and inserts from the first/reverse sliding gear; take out this gear from output shaft hub. Put selector arm plates and shift rail in neutral position, rotate shift rail clockwise until selector arm disengages from selector arm plates making selector arm roll pin accessible. Push pull shift rail away until selector arm contacts first/second shift fork; remove roll pin and shift rail. Remove shift forks, selector arm plates, selector arm and interlock plate; pry out shift rail oil seal and O-ring; remove shift rail plug. Take out nylon inserts with their position noted for assembly reference from the shift forks. Clean transmission components thoroughly using solvent while inspecting transmission case for cracks, stripped threads as well as gear train plus any damage or wear on shifting mechanism itself. Reassemble by installing nylon inserts as well as selector arm plates within the shifts forks coating edges of sealer before installing it onto them covers. Smear petroleum jelly over bores that are used for placing shaft rails into cover flush with its surface followed by putting first/second shifts fork inside these covers or pushing through a stem of shifter lifting than fitting in a cap lock plate together with shifter raising lever. Align all holes including a hole where a roll pin should go through then install that pin ensuring it is flush with surface of an arms tab area. Install the O-ring in oil seal groove of a shifting rod along with oil seal lip being greased up before it is pressed into transmission cover. Paste lubricant onto output shafts right through boreholes then install thereon second speed-synchronizing sleeve retaining marks for alignment purposes. Place synchronizer inserts on the output shaft and then install second speed blocking ring and second gear, ensuring that washer tab is situated in a corresponding output shaft groove. Attach first speed blocking ring with retaining round-headed pin after which rear bearing is installed on the output shaft utilizing bearing installer as well as press. Put the first gear thrust washer onto third gear prior to installing third/fourth gear synchronizer hub inserts and sleeve on the output shaft making sure that the hose extended one is facing toward the front. Install thrust washer bearing onto an output shaft; coat countershaft front bearing outer cage with locking compound and countershaft installed flush with case. Lubricate inner surface of depression using petroleum jelly, insert countershaft thrust washer having a tab matching corresponding cavities at case bottom than put it there in upright position thereby mounting front bearing bore. Locate counter-shaft back spacer while applying lubricant over rear bearing whose installation will be performed by means of special tool consisting of bearing installer & sleeve; make sure it protrudes beyond case surface. Finally, slide reverse idler gear on first followed by out-put shaft through hole made for this purpose.Using a bearing installer and press, install the clutch shaft front clutch shaft bearing, grease the roller bearings with petroleum jelly and place them in the clutch shaft. Next, place the race and clutch bearing in the clutch shaft followed by fourth gear blocking ring capped by rear output shaft bearing race cap. Finally, insert third/fourth synchronizer sleeve on to blocking ring of clutch shaft, install front bearing cap oil seal and front bearing race into front bearing cap without yet installing the preload shims. After that temporarily mount front bearing cap then reverse lever as well as pivot bolt while coating the thread of pivot bolt with non-hardening gasket sealer. Check whether reverse lever fork is connected or not through idler gear before mounting snap-ring on fifth speed driven gear followed by fifth gear countershaft. From behind case insert reverse rail rotating it until it enters fifth speed reverse lever then set overcenter link spring over reverse lever. Assemble fifth gear synchronizer sleeve using alignment reference marks; add springs and retainer put plastic inserts on each side of fifth speed shift fork then locate them onto countershaft, reverse rail use a wood block under rail/fork assembly to tapping roll pin home in it. Then apply petroleum jelly to thrust race along with its matching synchro hub draw against opposite direction for lapped thrust face over thrust bearing plus thru plastic funnel into end of countershaft gear afterwards fit extension housing provisionally thereon. Now place transmission case upwardly position dial indicator with stylus touching end of output shaft rotate output shaft to zero dial indicator reading. Pull up on output shaft until all end play is extracted after seeing dial indicator reading; this will help you select shim pack removing such play from between back of first gear and rearward face of mainshaft tightening nut. The transmission should be placed down on its right side for removal of any needed shims from either side or both sides of tapered cone type roller bearings which are installed in the clutch shaft bearing cap. Apply non-hardening gasket sealer to case mating surface of front bearing cap, align with marks, and tighten attaching bolts to specs. The extension housing should be removed for final check of end play. To neutral position move shift forks and synchronizer rings apply non-hardening gasket sealer to the cover mating surfaces of transmission case then lower cover assembly aligning shift forks and synchronizer sleeves as necessary. Line up reverse lever with center for installation of two dowel bolts and then put in all other cover bolts tight until they meet requirements. Then using non-hardening gasket sealer apply it on extension housing mating surface of transmission case while installing extension housing such that shift rail only enters shift cover opening.Try to fix the offset lever and spring in neutral guide plate detent by use of detent ball then fix extension housing bolts thereafter tighten them up as per specifications. Put roll pin and damper sleeve into the offset lever, apply non-hardening gasket sealer to backup light switch, and place it in the case; also fill the case with necessary gear lubricant type as well as correct amount.
Related 1984 Nissan 300ZX Parts
 1984 Nissan 300ZX Torque Converter
 1984 Nissan 300ZX Valve Body
 1984 Nissan 300ZX Needle Bearing
 1984 Nissan 300ZX Transmission Pan