×
- Hello
- Login or Register
- Quick Links
- Live Chat
- Track Order
- Parts Availability
- RMA
- Help Center
- Contact Us
- Shop for
- Nissan Parts
- Nissan Accessories
My Garage
My Account
Cart
Genuine Nissan 350Z Bumper
Bumper Fascia- Select Vehicle by Model
- Select Vehicle by VIN
Select Vehicle by Model
orMake
Model
Year
Select Vehicle by VIN
For the most accurate results, select vehicle by your VIN (Vehicle Identification Number).
17 Bumpers found


Nissan 350Z Front Bumper Fascia Kit
Part Number: FBM22-1A45H$1168.35 MSRP: $1800.24You Save: $631.89 (36%)Ships in 1-3 Business Days

Nissan 350Z Bumper-Front,Center
Part Number: 62023-CF40A$48.84 MSRP: $77.16You Save: $28.32 (37%)Ships in 1-3 Business Days

Nissan 350Z Bumper-Front,Center
Part Number: 62023-CD000$22.29 MSRP: $33.53You Save: $11.24 (34%)Ships in 1-2 Business Days
Nissan 350Z Front Bumper Cover
Part Number: 62022-CF40J$384.18 MSRP: $639.65You Save: $255.47 (40%)Ships in 1-3 Business Days


Nissan 350Z Front Primered Bumper Cover
Part Number: 62022-CD025$376.61 MSRP: $627.05You Save: $250.44 (40%)Ships in 1-3 Business Days

Nissan 350Z Front Bumper Cover
Part Number: F2022-1A45H$1168.35 MSRP: $1800.24You Save: $631.89 (36%)Ships in 1-3 Business Days
Nissan 350Z Rear Bumper Cover
Part Number: 85022-CD025$427.76 MSRP: $712.22You Save: $284.46 (40%)Ships in 1-3 Business DaysNissan 350Z Rear Bumper Cover
Part Number: 85022-CF40J$381.32 MSRP: $587.55You Save: $206.23 (36%)Ships in 1-3 Business DaysNissan 350Z Front Bumper Cover
Part Number: FBM22-CF40J$384.18 MSRP: $639.65You Save: $255.47 (40%)Ships in 1-3 Business DaysNissan 350Z Rear Bumper Cover
Part Number: 85022-CF42J$381.32 MSRP: $587.55You Save: $206.23 (36%)Ships in 1-3 Business DaysNissan 350Z Rear Bumper Cover
Part Number: HEM22-CF41J$427.76 MSRP: $712.22You Save: $284.46 (40%)Ships in 1-3 Business DaysNissan 350Z Rear Bumper Cover
Part Number: HEM22-CF42J$381.32 MSRP: $587.55You Save: $206.23 (36%)Ships in 1-3 Business Days


Nissan 350Z Bumper
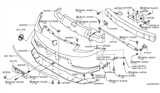
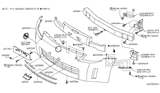
The Nissan 350Z Bumper is your car's first line of defense and will absorb hits at low speed to prevent damage to panels and people. The Bumper is made of molded plastic skin with hidden foam or honeycomb blocks that compress on contact, converting crash energy into harmless distortion at both ends. During the run of the model, there arose two stock styles. Early 2003-2005 Nissan 350Z cars had a fairly rounded fascia to enable smoother airflow, while models from 2006 to 2009 had sharper edges with a deeper lip to reduce drag and have a bolder look. It doesn't matter what it looks like; it does the same job to protect your car. If owners are lured by the attraction of very cheap replacements, their vehicle may use a weaker material that does not handle the force as well as the original. But if they stick with an equivalent standard component that is properly engineered, they will not adversely affect the crash performance or appearance. Since the Bumper is designed to crumple, there may be cracking or dislodging of the Bumper during a fender-bender. This planned sacrifice saves the frame of the car and reduces repair bills. The Nissan 350Z has an inbuilt safety edge that will be retained with a genuine panel replacing the original Bumper.
If you need any OEM Nissan 350Z Bumper, feel free to choose them out of our huge selection of genuine Nissan 350Z Bumper. All our parts are offered at unbeatable prices and are supported by the manufacturer's warranty. In addition, we offer quick shipping to have your parts delivered to your door step in a matter of days.
Nissan 350Z Bumper Parts Questions & Experts Answers
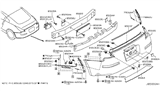
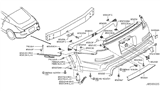
- Q: How to remove and install a Nissan 350Z's bumper cover?A:Starting with applying the parking brake; then lifting the car up and placing support jack stands underneath it. Under the vehicle, now, unbolt all the screws that are used to fasten the lower flaps of the bumper cover. At the interior of the vehicle, in the front wheel opening remove the retaining screws that kept the bumper cover affixed to the inner fender well splash shield. Push the lower edge of the splash shield, and there is a nut behind the trim of the bumper cover to remove. In the next step ,seemingly unscrew all the clips holding upper part of the bumper cover in position, after this lifts the bumper cover up and pull it off the car. It is necessary to demate any electrical connections that can hinder the removal process. Perform the procedures implemented at the beginning to set up the parking brake, to lift the automobile, and to apply jack stands. Under the vehicle once more, undo the bolts holding the lower flares of the bumper cover in place again. Inside the trunk, remove the fasteners which hold the rear inside trunk finishing panel, in order to reveal the bumper cover retaining fasteners. Removing the fasteners fixing the bumper to the right and left quarter panel then pulling off the bumper's cover and directing it away from the car. The process of installation, therefore, is a mirror image of the process of removal of the Office suite.

Related Nissan 350Z Parts
 Nissan 350Z Emblem
 Nissan 350Z Headlight
 Nissan 350Z Wheel Cover
 Nissan 350Z Spoiler
 Nissan 350Z License Plate
 Nissan 350Z A/C Accumulator
 Nissan 350Z A/C Condenser Fan
 Nissan 350Z HVAC Pressure Switch