×
- Hello
- Login or Register
- Quick Links
- Live Chat
- Track Order
- Parts Availability
- RMA
- Help Center
- Contact Us
- Shop for
- Nissan Parts
- Nissan Accessories
My Garage
My Account
Cart
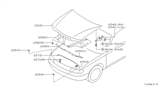
Genuine Nissan Altima Hood
Engine Hood- Select Vehicle by Model
- Select Vehicle by VIN
Select Vehicle by Model
orMake
Model
Year
Select Vehicle by VIN
For the most accurate results, select vehicle by your VIN (Vehicle Identification Number).
12 Hoods found


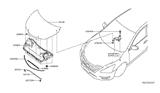
Nissan Altima Hood Assembly
Part Number: 65100-6CA0B$558.93 MSRP: $861.22You Save: $302.29 (36%)Ships in 1-3 Business Days


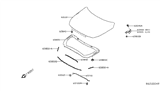
Nissan Altima Hood Assembly
Part Number: 65100-3TA0A$532.18 MSRP: $820.00You Save: $287.82 (36%)Ships in 1-3 Business Days


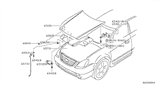
Nissan Altima Hood Assembly
Part Number: 65100-ZX00A$378.64 MSRP: $583.42You Save: $204.78 (36%)Ships in 1-3 Business Days


Nissan Altima Hood Assembly
Part Number: 65100-6CA0A$558.93 MSRP: $861.22You Save: $302.29 (36%)Ships in 1-3 Business Days
Nissan Altima Hood
Part Number: 65100-ZB030$448.23 MSRP: $690.65You Save: $242.42 (36%)Ships in 1-3 Business Days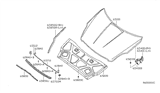
Nissan Altima Hood Assembly
Part Number: 65100-JA00D$779.78 MSRP: $1201.51You Save: $421.73 (36%)Ships in 1-3 Business DaysNissan Altima Hood
Part Number: 65100-8J030$437.30 MSRP: $673.80You Save: $236.50 (36%)Ships in 1-3 Business Days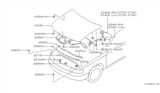

Nissan Altima Hood
The Hood of the Nissan Altima shields the engine bay from the elements and road debris while permitting fast access for inspections and repairs, offering a valuable balance between protection and convenience. Over the years, this mid-size sedan was built with a front-hinged Hood. This means it opens towards the windshield, which is actually a mechanism that closes with a latch. A secondary safety catch further secures it, preventing it from lifting when the vehicle is at speed. The earlier models made use of strong stamped steel, which was valued for its robustness. The later models applied lighter aluminum panels, which manage to meet the crumple-zone goals, meaning the body absorbs crash energy. All Hoods are designed to align with the fenders and grille, regardless of material, for optimal aerodynamics and visibility. Due to the component location above heat and vibration, normal wear occurs, like corrosion or latch fatigue, causing some owners to swap in a new Hood so the car still looks good and seals the area correctly. Assuming this won't be an issue in the only case the Hood is routinely opened for oil checks, it is serving both a protective and service access purpose. The Nissan built in smyrna was a product, and the Altima nameplate brings that identity. Namely, Altima parts like the Hood and factory-matched body panels will fit without incident. The lines Nissan Altima owners favor will stay intact.
If you need any OEM Nissan Altima Hood, feel free to choose them out of our huge selection of genuine Nissan Altima Hood. All our parts are offered at unbeatable prices and are supported by the manufacturer's warranty. In addition, we offer quick shipping to have your parts delivered to your door step in a matter of days.
Nissan Altima Hood Parts Questions & Experts Answers
- Q: How should the hood be removed and installed properly on Nissan Altima?A:The hood is hefty and a bit cumbersome to place on and take off; it is ideal that at lowest two people carry out this procedure. First, one should begin by using blankets or pads to cover the cowl area of the body, and the Fenders in particular for protection of the paint. Scribe a line around the hood hinge if they do not align to ensure that you are able to align them properly when it comes to installment, cut any cables or wires that may hamper removal of the hood. A helper should hold one side of the hood, and you hold the other side of the hood, then, at the same time, take out the nuts connecting the hinge and the hood as you hold up the hood with your shoulder. Lift off the hood and for the installation reverse the procedure of remove the hood. Regarding the adjustment, the variation in the fore-and-aft and side-to-side alignment can be attained by altering the hinge plate slot when the bolts or nuts are loosened. Draw a line around the hinge plate to identify the direction of the movement; later, you can use a wrench to slacken the bolts/Nuts and slid the hood into the right position to fasten the hinge bolts tightly. If needed, the entire Hood Latch assembly can be moved up and down and side to side on the radiator support to get the hood to flat flush with the fenders. Categorise markers around the hood latch mounting bolts for reference and unbolt the mounting bolts before re-locating the latch assembly and finally tightening the bolts to check the proper fitting of the assembly by closing the hood. Last, the height of the hood Bumpers on the radiator support should be final positions, where, when the hood is fully closed, it aligns perfectly with the fenders and then the whole assembly of the hood latch and hinges should be greased with a white lithium-base grease every now and then to prevent binding and wearing out.

Related Nissan Altima Parts
 Nissan Altima Emblem
 Nissan Altima Grille
 Nissan Altima Hood Cable
 Nissan Altima Hood Latch
 Nissan Altima Hood Hinge
 Nissan Altima Air Deflector
Browse by Year
2025 Hood 2024 Hood 2023 Hood 2022 Hood 2021 Hood 2020 Hood 2019 Hood 2018 Hood 2017 Hood 2016 Hood 2015 Hood 2014 Hood 2013 Hood 2012 Hood 2011 Hood 2010 Hood 2009 Hood 2008 Hood 2007 Hood 2006 Hood 2005 Hood 2004 Hood 2003 Hood 2002 Hood 2001 Hood 2000 Hood 1999 Hood 1998 Hood 1997 Hood 1996 Hood 1995 Hood 1994 Hood 1993 Hood