×
- Hello
- Login or Register
- Quick Links
- Live Chat
- Track Order
- Parts Availability
- RMA
- Help Center
- Contact Us
- Shop for
- Nissan Parts
- Nissan Accessories
My Garage
My Account
Cart
Genuine Nissan Juke Piston
Engine Pistons- Select Vehicle by Model
- Select Vehicle by VIN
Select Vehicle by Model
orMake
Model
Year
Select Vehicle by VIN
For the most accurate results, select vehicle by your VIN (Vehicle Identification Number).
6 Pistons found

Nissan Juke Piston With Pin
Part Number: A2010-1KC0C$98.20 MSRP: $138.70You Save: $40.50 (30%)Ships in 1-3 Business DaysNissan Juke Piston With Pin
Part Number: A2010-1KC1C$91.47 MSRP: $129.20You Save: $37.73 (30%)Ships in 1-2 Business Days
Nissan Juke Piston,W/Pin
Part Number: A2010-1KC1A$91.47 MSRP: $129.20You Save: $37.73 (30%)Ships in 1-3 Business DaysNissan Juke Piston,W/Pin
Part Number: A2010-1KC0A$98.20 MSRP: $138.70You Save: $40.50 (30%)Ships in 1-3 Business Days
Nissan Juke Piston
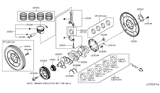
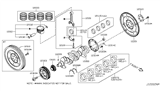
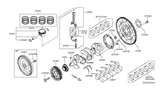
The Nissan Juke Piston is designed to convert the force of a fiery combustion into rotating movement of the crankshaft, which ultimately moves the car forward. The Piston inside each cylinder is designed to fit tightly and creates a seal with the help of rings. Despite the high heat and pressure, the Piston remains lightweight as it is made up of an aluminum alloy that provides strength but is also not heavy to allow for quicker acceleration. The majority of types utilize a trunk-type Piston, similar to what it finds in contemporary petrol and diesel units. The deep skirt supports the side forces and grooves hold the important oil and compression rings. Two-stroke technology applied deflector shapes to steer fresh charge, and slipper style pieces were applied on higher-rev trims to shave mass for better balance. These are mostly historical references for comparison. The flexibility allows Nissan to select the optimum Piston geometry for durability, fuel economy, and smoothness. The Juke engine relies on oil cooling channels that have been incorporated inside the crown so that under everyday driving conditions, the temperature remains normal, which will help prolong Piston life even when applied for prolonged periods at highway speeds. Nissan has continued to develop core hardware with constant refinement of the basic component silhouette, as seen with later editions of Juke.
If you need any OEM Nissan Juke Piston, feel free to choose them out of our huge selection of genuine Nissan Juke Piston. All our parts are offered at unbeatable prices and are supported by the manufacturer's warranty. In addition, we offer quick shipping to have your parts delivered to your door step in a matter of days.
Nissan Juke Piston Parts Questions & Experts Answers
- Q: How to install big-end bearings and assembling piston/connect rod assemblies in engines on Nissan Juke?A:Standard size imperial diameter big-end bearings can be purchased off the shelf, and a choice of undersizes if required, for re-ground crank shafts is available; contact any Nissan dealer or an automotive engineering workshop. Start off with removing the old lubricant and washing the backs of the bearing shells as well as the regions where they are found in the connecting rod and bearing cap. Insert the bearing shells into the specified positions in the connecting rods and caps, to make the shells look equally centralized without any contact with the bearing surface. Remove all shells and connecting rods from the water; besides, wipe off all the pistons and connecting rods using lint-free cloth, lubricate cylinder bores, pistons and piston rings before aligning the piston/connecting rod pair in their respective locations. So, with the assembly No 1, place the piston rings in the cylinder in such manner that they are spaced and clamped with the help of a piston ring compressor. Fit the piston/connecting rod assembly into the top of cylinder No 1 with the piston marking facing the correct side of the bore and tap the assembly home until the piston crown is flush with the cylinder top. Ensure that the bearing shell is fitted correctly, lubricate the crankpin and the two bearing shells and gently Diego with impact the piston/connecting rod assembly into place on the crank pin. Replace the big-end bearing cap and fasten the retaining bolts with equal force and turn them only with fingers making sure that the faces having marks in identification are still in contact. It is then necessary to tighten the bearing cap retaining bolts to the already mentioned torque as well as turning the bolts by the mentioned angle in the specifications. Try to rotate the Crankshaft and observe that there is very little or no bind or tight areas, this is normal on some new parts. Refit the remaining piston/connecting rod assemblies in the same way as previously described by this instruction. To 1.2 Litre petrol engines, replace the main bearing cap support beam and gradually tighten the holding bolts to the prescribed force. To all petrol engine, smear the same to the mating face and reposition the upper alloy part of the sump to the bottom of the cylinder block tightening all bolts that holds the sump in place in the makers recommended torque setting. Once the upper alloy part of the sump is properly positioned, install a new crankshaft left-hand oil seal, and then proceed to place the flywheel, cylinder head, oil pump, Timing Chain/belt and sump back into their rightful positions.

Related Nissan Juke Parts
 Nissan Juke Crankshaft Gear
 Nissan Juke Crankshaft Pulley
 Nissan Juke Crankshaft
 Nissan Juke Crankshaft Thrust Washer Set
 Nissan Juke Belt Tensioner Bolt