×
- Hello
- Login or Register
- Quick Links
- Live Chat
- Track Order
- Parts Availability
- RMA
- Help Center
- Contact Us
- Shop for
- Nissan Parts
- Nissan Accessories
My Garage
My Account
Cart
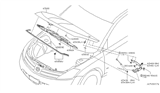
Genuine Nissan Murano Hood
Engine Hood- Select Vehicle by Model
- Select Vehicle by VIN
Select Vehicle by Model
orMake
Model
Year
Select Vehicle by VIN
For the most accurate results, select vehicle by your VIN (Vehicle Identification Number).
6 Hoods found


Nissan Murano Hood
Part Number: 65100-5AA0A$578.96 MSRP: $892.07You Save: $313.11 (36%)Ships in 1-3 Business Days


Nissan Murano Hood
Part Number: FEA0M-1AAMA$518.23 MSRP: $798.51You Save: $280.28 (36%)Ships in 1-3 Business Days
Nissan Murano Hood Assembly
Part Number: FEA00-CA0MM$474.36 MSRP: $730.91You Save: $256.55 (36%)Ships in 1 Business Day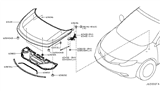
Nissan Murano Hood
Part Number: F510M-1AAMA$518.23 MSRP: $798.51You Save: $280.28 (36%)Ships in 1-3 Business Days
Nissan Murano Hood
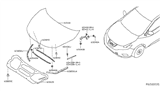
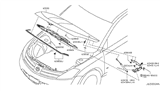
The Nissan Murano Hood is the front covering that allows the owners to access the engine with utmost ease. Besides that, it protects important parts from the weather, road debris, and impact damage. The Hood acts as a flexible helmet and opens on secure hinges so that regular checks or fluid top-ups take place in seconds before locking down to seal the engine bay. Through the years of the Murano, the basic design principle remained the same. However, materials underwent an evolution from sturdy stamped steel to lighter aluminum or fiberglass panels, reducing weight but not strength. Every Nissan crossover generation uses a Hood that is manufactured using materials that deform and crumple in a collision. This means that energy is absorbed before it reaches the cabin. Despite changes made to styling elements such as character creases or grille extensions to align with the refreshed front fascias, the basic layout of the single-panel Hood has remained consistent. Therefore, the driver can be assured that the operation remains familiar, regardless of the model year. Because the factory fitment matches the unique shapes of the Murano body exactly, swapping a damaged Hood for a genuine Nissan replacement will maintain perfect alignment, weather sealing, and overall appearance.
If you need any OEM Nissan Murano Hood, feel free to choose them out of our huge selection of genuine Nissan Murano Hood. All our parts are offered at unbeatable prices and are supported by the manufacturer's warranty. In addition, we offer quick shipping to have your parts delivered to your door step in a matter of days.
Nissan Murano Hood Parts Questions & Experts Answers
- Q: How should the hood be removed and installed safely and effectively on Nissan Murano?A:The hood is dense and it is somewhat burdensome to put on and take off, therefore it requires a least two people to do it. The start it is useful to utilize some blankets or pads to cover the cowl area of the body and some Fenders to safeguard the painted parts. Either scratch marks or draw a line around the Hood Hinge so that it can easily be aligned in the next auto body repair. Cut off the power supply by detaching any wires or cables that may hinder this process and use a stick to support the hood once it is raised by quiting the strut. Remove the screw with a small flat-blade screwdriver on the steel retainer clip that is located at the upper part of the support strut to the hood and pull the strut way from the vehicle and let it lie on the fender. Then, with help from the assistant, take the hood mounting nuts on the hinges and taking off the hood gently and do not attempt doing this on your own to prevent a mishap. For installation, the procedures will be reversed in this order The epoxy, then the lens holder and finally, the coupler. To bend the hood, unbolt and shift the hinge plate slot in the circular fashion slightly fore and aft, and side to side while maintaining the proper alignment of the hinge plate with the marks noted. After that tighten the hinge bolts and lower the hood and check the position of the car's hood. If required move the whole Hood Latch assembly in vertical and horizontal direction on the radiator support to get a tight and flush fit with the fenders and then make a markup of the latch mounting bolts for future use. Lastly the position of the hood Bumpers on the radiator support should be adjusted so that the hood is level with the fenders when closed and most importantly the intermittent lubrication of the hood latch assembly and the hood hinges to avert binding and wear should be in white lithium-base grease.


