×
- Hello
- Login or Register
- Quick Links
- Live Chat
- Track Order
- Parts Availability
- RMA
- Help Center
- Contact Us
- Shop for
- Nissan Parts
- Nissan Accessories
My Garage
My Account
Cart
Genuine Nissan Quest Crankshaft Seal
- Select Vehicle by Model
- Select Vehicle by VIN
Select Vehicle by Model
orMake
Model
Year
Select Vehicle by VIN
For the most accurate results, select vehicle by your VIN (Vehicle Identification Number).
13 Crankshaft Seals found


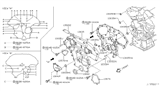
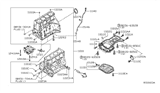
Nissan Quest Seal-Oil,Crankshaft Front
Part Number: 13510-31U10$18.31 MSRP: $25.86You Save: $7.55 (30%)Ships in 1-3 Business Days


Nissan Quest Seal-Oil,Crankshaft Front
Part Number: 13510-7Y000$25.74 MSRP: $36.35You Save: $10.61 (30%)Ships in 1-2 Business Days
Nissan Quest Seal-Oil,Crankshaft Front
Part Number: 13510-9HP0A$15.83 MSRP: $21.82You Save: $5.99 (28%)Ships in 1-3 Business Days

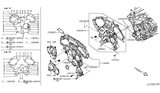
Nissan Quest Retainer Assy-Oil Seal,Rear
Part Number: 12296-JA10A$37.81 MSRP: $52.12You Save: $14.31 (28%)Ships in 1-3 Business Days

Nissan Quest Retainer Assy-Oil Seal,Rear
Part Number: 12296-31U20$56.00 MSRP: $79.10You Save: $23.10 (30%)Ships in 1-3 Business Days


Nissan Quest Seal-Oil,Crankshaft Front
Part Number: 13510-10Y10$12.71 MSRP: $17.52You Save: $4.81 (28%)Ships in 1-2 Business Days


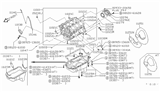
Nissan Quest Seal-Oil,CRANKSHAFT Rear
Part Number: 12279-4Z001$37.40 MSRP: $54.17You Save: $16.77 (31%)Ships in 1-2 Business Days

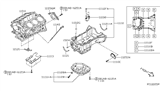
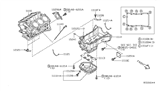
Nissan Quest Retainer Assy-Oil Seal,Rear
Part Number: 12296-9HP0A$51.43 MSRP: $70.90You Save: $19.47 (28%)Ships in 1-2 Business Days


Nissan Quest RETAINER-Oil
Part Number: 12297-F6500$45.69 MSRP: $62.98You Save: $17.29 (28%)Ships in 1-2 Business Days

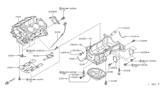
Nissan Quest Seal-Oil,CRANKSHAFT Rear
Part Number: 12279-18V00$35.05 MSRP: $50.77You Save: $15.72 (31%)Ships in 1-2 Business Days


Nissan Quest Seal-Oil,CRANKSHAFT Rear
Part Number: 12279-1E000$41.45 MSRP: $60.04You Save: $18.59 (31%)

Nissan Quest Seal-Oil,CRANKSHAFT Rear
Part Number: 12279-30P00$35.05 MSRP: $50.77You Save: $15.72 (31%)
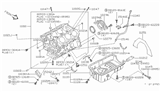
Nissan Quest Crankshaft Seal
The Crankshaft Seal from Nissan helps to keep engine oil contained at the front of the crankcase so important parts stay lubricated. This round part is located on the front side of the engine where it seals the tip of the crankshaft, preventing oil from leaking. The Crankshaft Seal is composed of metal, which provides strength, and rubber, which guarantees flexibility. It rotates with the crankshaft and withstands engine heat. The Crankshaft Seal reduces friction between moving assemblies and limits wear. It also stops oil leaks for smoother operations and longer service life. A leak can arise if the seal becomes too worn or damaged, causing oil spots or low oil levels. The Nissan Quest's component is offered in one standard kind, with no mention of alternative kinds. Its principal purpose is identical to any other Nissan engine Crankshaft Seal, which is to keep lubrication where it belongs within the Quest powerplant. An oil inspection on a Nissan Quest can catch early clues that a Crankshaft Seal is on its way out.
If you need any OEM Nissan Quest Crankshaft Seal, feel free to choose them out of our huge selection of genuine Nissan Quest Crankshaft Seal. All our parts are offered at unbeatable prices and are supported by the manufacturer's warranty. In addition, we offer quick shipping to have your parts delivered to your door step in a matter of days.
Nissan Quest Crankshaft Seal Parts Questions & Experts Answers
- Q: How to replace the rear crankshaft seal after remove the transaxle from the Nissan Quest?A:For this procedure the transaxle has to be unbolted from the car and supporting from above is the engine hoist or the three bar support when you will be working under the car with the transaxle out. First, using seal removal tool or screw driver gently try to remove the old Crankshaft Seal from the retainer touching the crankshaft it's that sensitive maybe maybe because of that the new seal will develop a leakage. Next, spread multi-purpose grease to the crankshaft seal journal and the sides of the new seal lip. It is preferred to employ a seal installation tool to achieve the installation of the new seal; in the absence of this implement, a large socket, pipe segment or, a blunt object must be used to gently tap the new seal into place. Make sure that lip is guided on to the seal journal of the crankshaft in a gentle and slow fashion, since this is likely to disrupt the seal. Screw the installed seal right into place but no deeper than so that the flange of the seal is in line with the back of the seal plate. The last few steps are basically those of the reversibility of the removal process outlined above.

Related Nissan Quest Parts
 Nissan Quest Camshaft Position Sensor
 Nissan Quest Camshaft Seal
 Nissan Quest Coolant Temperature Sensor
 Nissan Quest Crankshaft
 Nissan Quest Alternator Bracket
 Nissan Quest Belt Tensioner Bolt
Browse by Year
2017 Crankshaft Seal 2016 Crankshaft Seal 2015 Crankshaft Seal 2014 Crankshaft Seal 2013 Crankshaft Seal 2012 Crankshaft Seal 2011 Crankshaft Seal 2010 Crankshaft Seal 2009 Crankshaft Seal 2008 Crankshaft Seal 2007 Crankshaft Seal 2006 Crankshaft Seal 2005 Crankshaft Seal 2004 Crankshaft Seal 2003 Crankshaft Seal 2002 Crankshaft Seal 2001 Crankshaft Seal 2000 Crankshaft Seal 1999 Crankshaft Seal 1998 Crankshaft Seal 1997 Crankshaft Seal 1996 Crankshaft Seal 1995 Crankshaft Seal 1994 Crankshaft Seal 1993 Crankshaft Seal