×
- Hello
- Login or Register
- Quick Links
- Live Chat
- Track Order
- Parts Availability
- RMA
- Help Center
- Contact Us
- Shop for
- Nissan Parts
- Nissan Accessories
My Garage
My Account
Cart
Genuine Nissan Titan Rack And Pinion
Steering Rack And Pinion- Select Vehicle by Model
- Select Vehicle by VIN
Select Vehicle by Model
orMake
Model
Year
Select Vehicle by VIN
For the most accurate results, select vehicle by your VIN (Vehicle Identification Number).
9 Rack And Pinions found


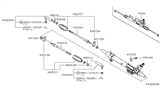


Nissan Titan Gear & Linkage
Part Number: 49001-ZH50A$1072.81 MSRP: $1643.62You Save: $570.81 (35%)Ships in 1-3 Business Days


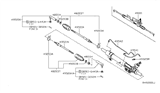
Nissan Titan Power Steering Gear & Linkage
Part Number: 49001-ZH30A$1072.81 MSRP: $1643.62You Save: $570.81 (35%)Ships in 1-3 Business Days
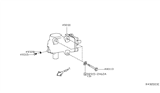
Nissan Titan Gear Assembly - Power Steering
Part Number: 49200-EZ00D$1318.01 MSRP: $1595.66You Save: $277.65 (18%)Ships in 1-3 Business DaysNissan Titan Power Steering Gear & Linkage
Part Number: 49001-7S000$1072.81 MSRP: $1643.62You Save: $570.81 (35%)Ships in 1-3 Business DaysNissan Titan Gear Assembly - Power Steering
Part Number: 49200-EZ00C$1318.01 MSRP: $1595.66You Save: $277.65 (18%)Ships in 1-3 Business DaysNissan Titan Gear & Linkage
Part Number: 49001-ZC20A$1072.81 MSRP: $1643.62You Save: $570.81 (35%)Ships in 1-3 Business Days
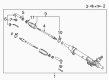
Nissan Titan Rack And Pinion
The Rack And Pinion in a Nissan Titan is the main component that converts the turn of the driver's steering wheel into a side-to-side motion that turns the front wheels. Steel housing contains a circular pinion gear that is attached to the steering column and meshes with a linear rack gear that is secured to the chassis. When the wheel is turned, the pinion drives the Rack And Pinion laterally and pulls or pushes tie-rods attached to steering knuckles, which drive the wheels. This Rack And Pinion provides accurate control and feedback due to limited gear backlash through direct engagement. The effort required to control the vehicle can be made easier due to hydraulic or electric power assistance. However, the core operation of the Rack And Pinion will nonetheless remain unchanged. This mechanism can use straight or helical gears, but since straight racks generally run cooler, they will operate with less force. Through the inclusion of these components, the Rack And Pinion delivers a reliable directional response on Titan models that is critical to Titan steering feel, reinforces the driving dynamics of every Nissan Titan, and simultaneously enhances overall handling of the wider Nissan range while benefiting overall stability of Nissan.
If you need any OEM Nissan Titan Rack And Pinion, feel free to choose them out of our huge selection of genuine Nissan Titan Rack And Pinion. All our parts are offered at unbeatable prices and are supported by the manufacturer's warranty. In addition, we offer quick shipping to have your parts delivered to your door step in a matter of days.
Nissan Titan Rack And Pinion Parts Questions & Experts Answers
- Q: How to remove and install the Rack And Pinion steering gear on Nissan Titan equipped with rear auto-leveling suspension?A:On Armada models equipped with a rear auto-leveling suspension, turn the ignition key to the OFF position before raising the vehicle. With the front wheels pointing straight ahead, loosen the front wheel lug nuts, raise the front of the vehicle and support it securely on jackstands. Apply the parking brake and block the rear wheels. Remove the front wheels. With the ignition key removed, secure the Steering Wheel in position with the seat belt or a holding tool. Remove the engine splash shield from under the vehicle. On 4WD models, remove the front axle assembly. The driveaxles can remain in place, supported by wire. Mark the relationship of the steering shaft to the Rack And Pinion input shaft, then remove the pinch-bolt. Do not disturb the small plastic cap on the Rack And Pinion input shaft if the Rack And Pinion is going to be reinstalled. Place a drain pan under the Rack And Pinion. Using a flare-nut wrench, disconnect the pressure and return fluid lines at the Rack And Pinion and allow the fluid to drain. On 2WD models, remove the front stabilizer bar brackets and lower the bar for clearance. Disconnect the tie-rod ends from the steering knuckles. Remove the Rack And Pinion mounting fasteners, then remove the Rack And Pinion. Installation is the reverse of removal. Be sure to tighten all fasteners. Tighten the wheel lug nuts. Add power steering fluid to the fluid reservoir, then bleed the air from the system. Have the front end alignment checked and, if necessary, adjusted.

Related Nissan Titan Parts
 Nissan Titan Wheel Bearing
 Nissan Titan Steering Wheel
 Nissan Titan Shock Absorber
 Nissan Titan Sway Bar Bushing
 Nissan Titan Coil Spring Insulator
 Nissan Titan Coil Springs
 Nissan Titan Control Arm
 Nissan Titan Steering Knuckle
 Nissan Titan Wheel Cover
 Nissan Titan Sway Bar Link
 Nissan Titan Power Steering Pump
Browse by Year
2024 Rack And Pinion 2023 Rack And Pinion 2022 Rack And Pinion 2021 Rack And Pinion 2020 Rack And Pinion 2019 Rack And Pinion 2018 Rack And Pinion 2017 Rack And Pinion 2016 Rack And Pinion 2015 Rack And Pinion 2014 Rack And Pinion 2013 Rack And Pinion 2012 Rack And Pinion 2011 Rack And Pinion 2010 Rack And Pinion 2009 Rack And Pinion 2008 Rack And Pinion 2007 Rack And Pinion 2006 Rack And Pinion 2005 Rack And Pinion 2004 Rack And Pinion