×
- Hello
- Login or Register
- Quick Links
- Live Chat
- Track Order
- Parts Availability
- RMA
- Help Center
- Contact Us
- Shop for
- Nissan Parts
- Nissan Accessories
My Garage
My Account
Cart
Genuine Nissan Versa Crankshaft Seal
- Select Vehicle by Model
- Select Vehicle by VIN
Select Vehicle by Model
orMake
Model
Year
Select Vehicle by VIN
For the most accurate results, select vehicle by your VIN (Vehicle Identification Number).
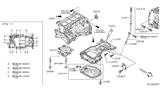
10 Crankshaft Seals found


Nissan Versa Seal O Ring
Part Number: 15066-ZW80A$5.70 MSRP: $8.04You Save: $2.34 (30%)Ships in 1 Business Day


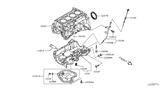
Nissan Versa Seal-Oil,Crankshaft Front
Part Number: 13510-1KC1A$11.50 MSRP: $15.85You Save: $4.35 (28%)Ships in 1-3 Business Days


Nissan Versa Oil Seal-Crank
Part Number: 12279-3HC0B$40.63 MSRP: $58.85You Save: $18.22 (31%)Ships in 1 Business Day


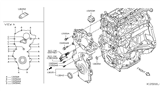
Nissan Versa Seal-Oil,Crankshaft Front
Part Number: 13510-6N200$16.09 MSRP: $22.18You Save: $6.09 (28%)Ships in 1-2 Business Days


Nissan Versa Seal-Oil,CRANKSHAFT Rear
Part Number: 12279-3VA0A$35.84 MSRP: $51.90You Save: $16.06 (31%)Ships in 1-3 Business Days

Nissan Versa Seal-Oil,CRANKSHAFT Rear
Part Number: 12279-3HC0A$40.63 MSRP: $58.85You Save: $18.22 (31%)Ships in 1-3 Business Days


Nissan Versa Oil Seal-Crank
Part Number: 12279-ED000$21.96 MSRP: $31.80You Save: $9.84 (31%)Ships in 1-3 Business Days

Nissan Versa Seal-Oil,CRANKSHAFT Rear
Part Number: 12279-ET000$40.63 MSRP: $58.85You Save: $18.22 (31%)Ships in 1-3 Business Days
Nissan Versa Seal-Oil,Crankshaft Front
Part Number: 13510-1KT0A$11.24 MSRP: $15.50You Save: $4.26 (28%)Ships in 1-3 Business Days
Nissan Versa Seal-Oil CRANKSHAFT Front
Part Number: 13510-ED000$10.49 MSRP: $14.47You Save: $3.98 (28%)Ships in 1-3 Business Days
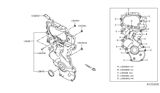
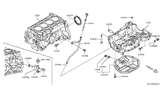
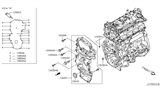
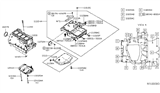
Nissan Versa Crankshaft Seal
Nissan Versa Crankshaft Seal keeps the oil in the crankcase while allowing for the proper lubrication of the front-end shaft. This is a circular component comprising metal and flexible rubber, which forms a tight seal that prevents oil from leaking as the crankshaft rotates at varied speeds. By preventing leaks, the Crankshaft Seal minimizes friction and wear of moving components while allowing the Nissan Versa engine to operate smoothly. A Crankshaft Seal is a seal having a single continuous lip that presses upon a rotating shaft. The housing secures the Crankshaft Seal in place and allows it to maintain the oil film that provides cooling and protection. The Nissan Versa relies on a Crankshaft Seal that remains pliable and intact for proper performance. As soon as the seal wears or gets damaged, oil spots beneath the vehicle or unexplained drops in oil level can appear and should be replaced. The chance of deterioration can rise with high mileage operation, so it is wise to monitor the Crankshaft Seal for any Nissan Versa powerplant.
If you need any OEM Nissan Versa Crankshaft Seal, feel free to choose them out of our huge selection of genuine Nissan Versa Crankshaft Seal. All our parts are offered at unbeatable prices and are supported by the manufacturer's warranty. In addition, we offer quick shipping to have your parts delivered to your door step in a matter of days.
Nissan Versa Crankshaft Seal Parts Questions & Experts Answers
- Q: How to remove and install the crankshaft seal in an engine/transaxle assembly on Nissan Versa?A:Remove the engine/transaxle assembly, then separate the transaxle from the engine. Remove the Flywheel/driveplate. Use a screwdriver wrapped with tape to pry the Crankshaft Seal out, being careful not to gouge or nick the housing. Lubricate the crankshaft seal journal and the lip of the new seal with multi-purpose grease. Install the seal with the seal lip toward the engine and the dust seal toward the transaxle. Tap the seal into place using a seal driver to ensure it doesn't become tilted. Install the seal so that its rear edge is flush with the face of the engine block, or up to 0.020 inch recessed. The remainder of installation is the reverse of removal. Reconnect the battery and perform the necessary re-learn procedures.

Related Nissan Versa Parts
 Nissan Versa Camshaft Position Sensor
 Nissan Versa Coolant Temperature Sensor
 Nissan Versa Crankshaft
 Nissan Versa Alternator Bracket
 Nissan Versa Belt Tensioner Bolt
Browse by Year
2025 Crankshaft Seal 2024 Crankshaft Seal 2023 Crankshaft Seal 2022 Crankshaft Seal 2021 Crankshaft Seal 2020 Crankshaft Seal 2019 Crankshaft Seal 2018 Crankshaft Seal 2017 Crankshaft Seal 2016 Crankshaft Seal 2015 Crankshaft Seal 2014 Crankshaft Seal 2013 Crankshaft Seal 2012 Crankshaft Seal 2011 Crankshaft Seal 2010 Crankshaft Seal 2009 Crankshaft Seal 2008 Crankshaft Seal 2007 Crankshaft Seal