×
- Hello
- Login or Register
- Quick Links
- Live Chat
- Track Order
- Parts Availability
- RMA
- Help Center
- Contact Us
- Shop for
- Nissan Parts
- Nissan Accessories
My Garage
My Account
Cart
Genuine Nissan 240SX Axle Shaft
Car Axle Shaft- Select Vehicle by Model
- Select Vehicle by VIN
Select Vehicle by Model
orMake
Model
Year
Select Vehicle by VIN
For the most accurate results, select vehicle by your VIN (Vehicle Identification Number).
8 Axle Shafts found

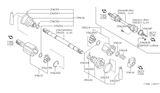


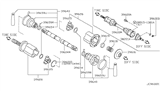


Nissan 240SX Axle Shaft
The 240SX Axle Shaft is a part of the car which is highly reliable and gives lag and back up importance for the complete working of Nissan 240SX automobiles. Being situated to transfer power from the differential to the drive wheels, the Axle Shaft makes it possible for each wheel to rotate in independence which increases traction when cornering. Made of high quality steel, the 240SX Axle Shaft helps in with-steering and supports the vehicle during usage. Feasibility of the Nissan 240SX with both the hatchback and the customized coupe forms makes this Axle Shaft ideal for periodic users or racing aficionados. The halfshaft has a splined end for coupling with the differential and the wheel hubs to ensure the transmission of input torque without loss, this is more so in vehicles that use independent suspensions. This design also loads the vehicle weight and it efficiently transmits torque in such a way that it will not distort the wheels. To maintain the Nissan 240SX Axle Shaft in proper condition, the worn out components should be replaced so as to avoid the noisy nature, vibration and eventually a failure which may be hazardous. The Nissan 240SX is widely applied in drifting, the qualities of Axle Shaft are also impressive in providing reliability on the track. This Axle Shaft is also uniquely constructed and highly efficient that enhances its performance on the roads making the Nissan known for outstanding performance products.
If you need any OEM Nissan 240SX Axle Shaft, feel free to choose them out of our huge selection of genuine Nissan 240SX Axle Shaft. All our parts are offered at unbeatable prices and are supported by the manufacturer's warranty. In addition, we offer quick shipping to have your parts delivered to your door step in a matter of days.
Nissan 240SX Axle Shaft Parts Questions & Experts Answers
- Q: How to remove and install the axle shaft on the rear of a Nissan 240sx with Independent Rear Suspension?A:When pulling out the axle shaft in the 200SX, do not destroy the differential carrier seal or the CV boot. Start with both jacking and lifting the rear of the car off the ground, then unbolting the spring stay. Remove the four flange bolts of the axle shaft on the wheel side and pull the axle shaft, grasped at the center only, out of the differential carrier using some pry bar. The installation process is the reverse of the removal process, beginning with the differential end and proceeding to the wheel end; the four flange bolts need to be tightened to the following torque setting by the engine type. Again, loosening the CV boots of the 240SX requires some protection; hence, try covering them with some cloth. Lift the back of the car up and secure it, loosen and remove the rear tire and its assembly, and unbolt the adjusting cap and Cotter pin on the wheel bearing locknut. Pull the parking brake handle inward and release the rear wheel locknut and separate the axle shaft from the differential side where the small flange bolts are fixed. Move the axle shaft at the center and pull it from the wheel hub through wrench or a prybar or wooden block with up mallet and lock nut for temporary basis. For installation, align the shaft on the wheel hub, assume the lock nut; make sure it does not harm oil seal or either end of the axle shaft. Toward the axle shaft, secure the differential and fasten the flange bolts tightening them to the required torques. Apply the parking brake before tightening the locknut, replace the lost or damaged cotter pin with a new one, the adjusting cap, then fit the rear wheel and tyre assembly before lowering the vehicle. That was when dealing with the 240SX axle shaft assembly replacement, clamp the axle shaft in a vise with soft jaws, pry off the plug from the wheel side, and also take off the plug seal, spring, the spring cap, and the boot bands although it is very important not to reuse the boot bands again. Scratch a matchmark on the spider assembly and the axle shaft before using a press to take out the spider assembly with support to the axle shaft. Extract the slide joint boot and boot bands, raise the joint end of the axle shaft with the differential facing up and, using a cutting tool, cut off the hold joint boot assembly to liberate the housing subassembly. Take off the housing ring, the boot band, the housing cover with the O-ring. Connect a new hold joint boot assembly that is accompanied by a housing ring an O-ring and housing cover and see that the O-ring has been greased. In the outline, this is but to hammer the edge of the housing cover with a mallet, fit a new boot band, and fasten the joint boot assembly to the axle shaft. Place the spider assembly properly, also make sure that match mark is aligned with the other one, then stake the serration sides properly, next step is to pack with grease and the last step is to install the greased O-ring in the housing assembly. Place the housing subassembly, fold the edge in the same way, apply a sealant on the boot and place the boot along with installing the boot bands. Swing the axle shaft round so that the wheel end is uppermost; it is easier that way to install the new boot bands, the joint boot, and the housing, without scratching them. Last to be fitted is the spider assembly, the large diameter boot band, pack with grease and secure the spring cap, spring, and plug seal before using a hammer to lock the plug and replace the axle shaft with the specified amount of grease for either side or both.


